
The Customer Import allows you to update student records in eBECAS/EDMISS.
Overview
The Customer Importer allows bulk updates to student records using an Excel spreadsheet(*.xlsx or *.xls). This tool is powerful and should only be used by advanced users. Where available, we recommend testing all new import formats in a Sandbox environment before proceeding in Production.
The Customer Import doesn’t create new students.
Import File Format
The importer processes an Excel spreadsheet where each row represents a student record to update, and each column is a field to be updated.
-
The first row of the spreadsheet must contain Field.
-
Each row must include a Student number, which will be used to identify the student in the system.
-
The column headers must exactly match the field names listed below in order to be auto-mapped.
-
Imports directly transfer the entered values into the system without validating them for accuracy, such as calculation correctness or typos. It’s essential to verify data before entering it, as the system will input values exactly as they appear in the import spreadsheet.
-
For text fields that allow free input rather than must be from predefined values in the system, a blank value in the import spreadsheet will also input a blank value in the system.
|
Field |
Requirements / Notes |
|---|---|
|
Student number |
Required. Must match an existing student in the system. |
|
Last name |
|
|
First name |
|
|
Date of Birth |
Must be a valid date. |
|
Middle name |
|
|
Title |
|
|
Gender |
|
|
Local Address line 1 |
|
|
Local Address line 2 |
|
|
Local Address line 3 |
|
|
Local Suburb |
|
|
Local State |
|
|
Local Postcode |
|
|
Local Phone |
|
|
Local Fax |
|
|
Local Mobile |
|
|
OS Address line 1 |
|
|
OS Address line 2 |
|
|
OS Address line 3 |
|
|
OS Suburb |
|
|
OS State |
|
|
OS Postcode |
|
|
OS Phone |
|
|
OS Fax |
|
|
OS Mobile |
|
|
OS Email |
|
|
Local Email |
|
|
Country Name |
Must match a country in the system. |
|
Citizenship Country Name |
Must match a country in the system. |
|
Birth Country Name |
Must match a country in the system. |
|
Comma separated single line Local Address |
Format: |
|
Comma separated single line OS Address |
Format: |
|
USI |
|
|
Test Type |
Must match a Test Type set up in the system. |
|
Test Score |
|
|
Test Date |
Must be a valid date. |
|
Test Custom 1 |
|
|
Test Custom 2 |
|
|
Test Custom 3 |
|
|
Test Custom 4 |
|
|
Test Custom 5 |
|
|
Test Custom 6 |
|
|
Custom Field 1 |
|
|
Custom Field 2 |
|
|
Custom Field 3 |
|
|
Custom Field 4 |
|
|
Custom Field 5 |
|
|
Custom Field 6 |
|
|
Custom Field 7 |
|
|
Custom Field 8 |
|
|
Custom Field 9 |
|
|
Custom Field 10 |
|
|
Notes |
|
Set up the Import
To set up Customer Import, navigate to the following:
-
Navigate to Main > Utilities > Import > Customer Import.
-
The Customer Import will display the following form:
-
Import File Name: Select the file to be imported. Browse for and select the file to be imported.
-
Excel Sheet Name: Provide the Sheet Name with the data to be imported (or specify Use first Sheet to just use the first sheet of the Excel file).
-
Header on Line: Specify which row the Headers for the import are located (generally this is the first line, though there may be other information above this such as a title). The excel file used for import must have a ‘Header’ line with the name of each column to be imported.
-
Process: Click Process File and eBECAS/EDMISS will read through the file ready to Map the data and Run the import.
-
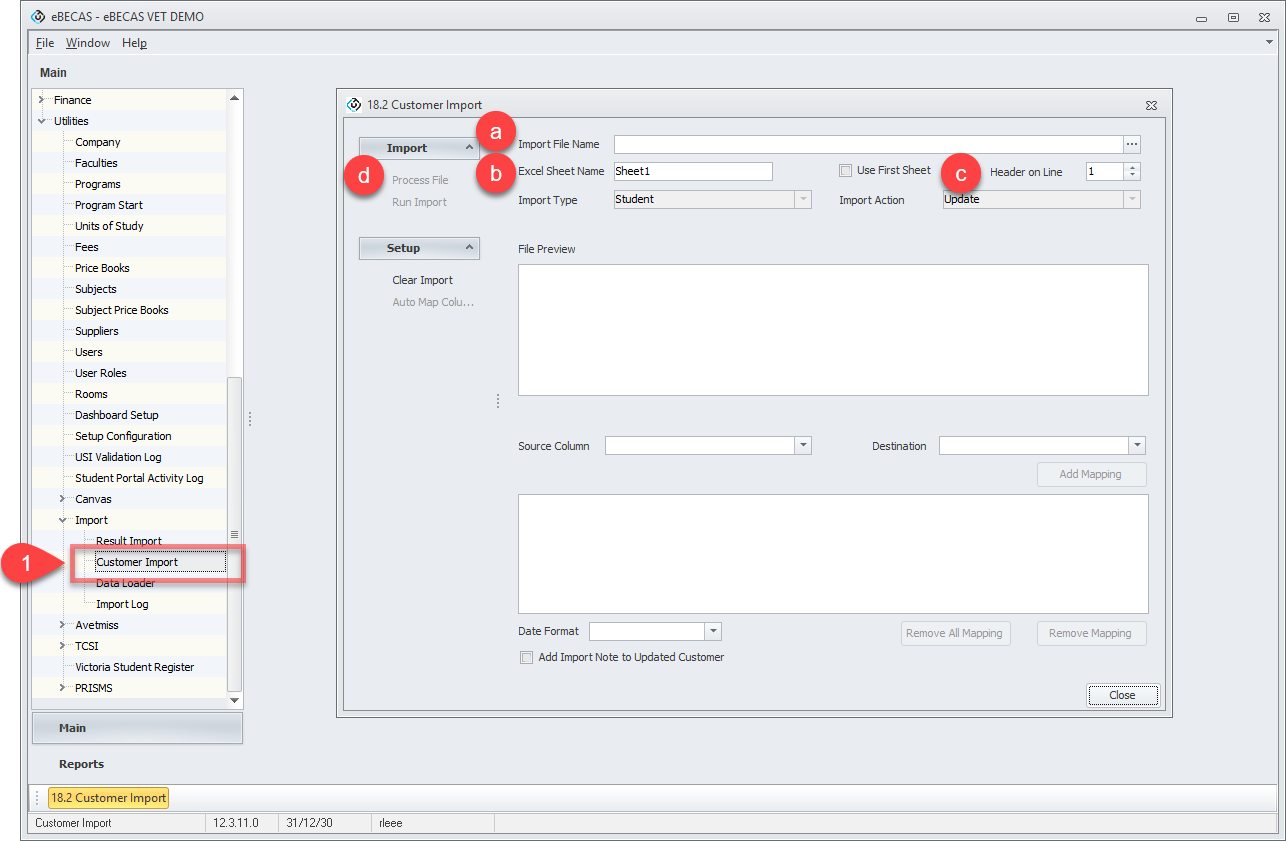
The file will load and a small preview will be shown. The import is now ready for columns to be mapped to eBECAS/EDMISS.
Import the Students
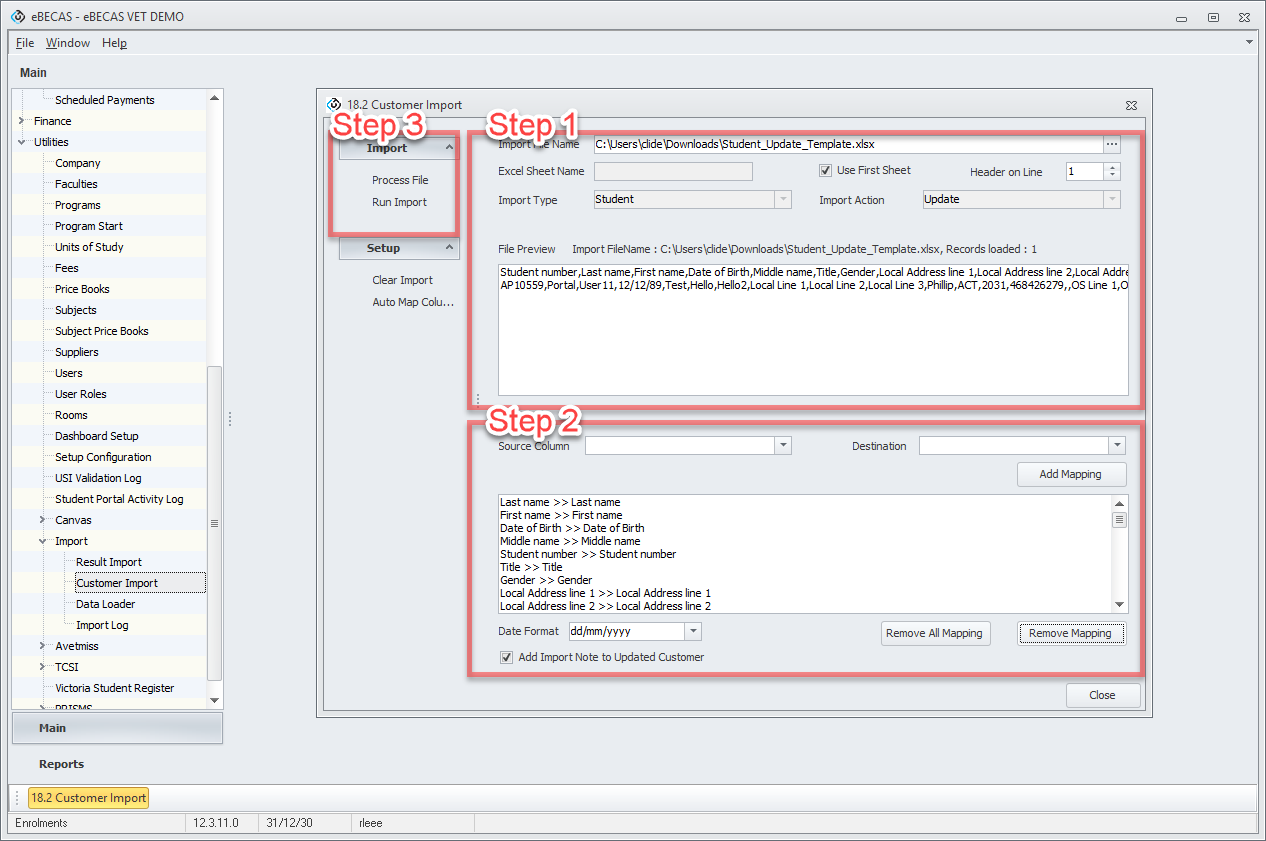
Step 1 - Process File
Browse for and Select the Import Excel file.
Enter the Sheet name with the import data (or just specify First Sheet).
Specify the line Headers are on (with the field names). Generally this is line 1.
All rows beneath the header are treated as rows to be imported.
Click Process File. eBECAS/EDMISS will read the file and identify columns ready for mapping
Step 2 - Configure the Import
Map each column in the import file to a field in eBECAS/EDMISS. Ensure Required fields are mapped. Optionally you can use Auto Map Columns in the Setup on the side menu.
Make sure the Date Format matches the format used in the import.
Optionally, you can add an extra import note to each updated record. This will add a line to the Student’s Notes field with the date, file and user.
Step 3 - Run the Import
Click Run Import to finish.
The importer will report how many records were successful or failed.
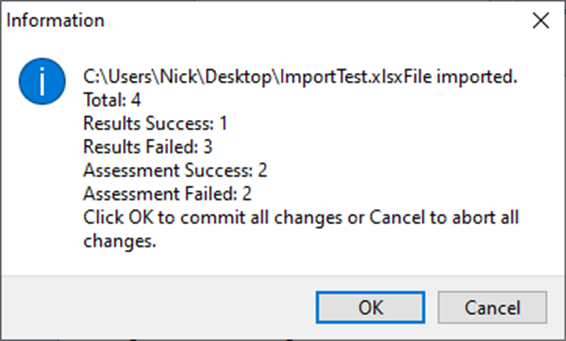
Click OK to continue and commit all changes to eBECAS/EDMISS. Cancel will wind back any changes made.
You can save the results to file. This will report for each row if it was successful, and any error if not successful.
OPtional Step 4 - Check the Results Log File
The Results Log file will show each Row that was processed, if it was imported successfully, and any validation if that row failed.
A record will fail to import for the following reasons :
-
Data for a column is in the incorrect format (for instance, dates formatted incorrectly).
-
The Student Number supplied does not match a Student in eBECAS/EDMISS, or there are multiple students that Student Number matches.
-
Each Student Number must match to exactly one Student record in eBECAS/EDMISS.
-
The value for a lookup (such as Country and Test Type) does not match the lookup name setup in eBECAS/EDMISS. This is not case sensitive.
-
Other Errors – contact Equator IT support for assistance.