
Units of Study are used to structure an academic course into Units, such as semesters, terms, blocks, or study periods.
Each Unit represents a defined part of the course. For example, a course may be divided into Semester 1 and Semester 2, or into multiple terms or study blocks.
Units of Study can be used to manage different parts of a course, including study periods, course intakes, pricing, reporting, and subject allocation where required.
What are Units of Study?
In eBECAS/EDMISS, Units of Study provide a way to divide a course into smaller study periods. A Unit can represent a semester, term, block, or other defined period within the course.
Each Unit can have its own duration and start point within the course. For example, a 52-week course may be divided into two Units:
-
Unit 1 starts in week 1 and runs for 26 weeks.
-
Unit 2 starts in week 27 and runs for 26 weeks.
The actual calendar dates for each Unit are calculated based on the course or enrolment start date, and the selected Course Intake where applicable.
How Units and Course Intakes Work Together
Units define the study periods within a course. A Unit is based on the course week, not a fixed calendar date.
For example:
-
Unit 1 starts in week 1 and runs for 26 weeks.
-
Unit 2 starts in week 27 and runs for 26 weeks.
A Course Intake allows users to quickly select a predefined course start date and course duration when adding a course to an offer.
For example:
-
January Intake starts on 1 January and runs for 52 weeks.
-
February Intake starts on 1 February and runs for 48 weeks.
-
March Intake starts on 1 March and runs for 104 weeks.
When a Course Intake is selected, the selected start date and duration can be used to calculate the actual calendar dates for the Units applied to the offer or enrolment.
For example, if a 52-week Course Intake starts on 1 January and includes two Units:
-
Unit 1 starts in week 1 and runs for 26 weeks.
-
Unit 2 starts in week 27 and runs for 26 weeks.
The system uses the intake start date to calculate the actual start and end dates for each Unit.
Units of Study and Faculty Settings
Units of Study are created and managed at the Course level.
The Faculty setting determines whether courses under the Faculty use the Units of Study structure. When Units of Study is enabled for a Faculty, courses under that Faculty can use Units of Study. The actual Units, such as semesters, terms, blocks, or study periods, are configured from the Course.
This means administrators should first confirm that Units of Study is enabled for the relevant Faculty, and then manage the detailed Units of Study setup from the Course.
Unit of Study Pricing
Unit of Study Pricing is a course billing option that allows the course amount to be calculated from the amounts configured for each Unit. When a course uses Unit of Study Pricing, each Unit can have its own rate. The total course amount is calculated based on the Units included in the offer.
For example, if a course includes two Units:
-
Unit 1 rate: $5,000
-
Unit 2 rate: $5,000
The total course amount is calculated as $10,000.
Unit of Study Pricing is configured at the Course level. This pricing option is separate from the Units of Study structure itself. A course can use Units of Study for study periods, Course Intakes, or Student Self Allocation without using Unit of Study Pricing.
Create Units of Study
Units of Study are created and managed from the Course. Units can be created individually or in bulk using the UOS Builder. The method you choose depends on how the course structure needs to be set up.
-
Use individual Unit creation when you need to create or adjust Units one at a time.
-
Use the UOS Builder when you need to create multiple Units with the same or similar structure, such as semesters, terms, blocks, or Units for each subject.
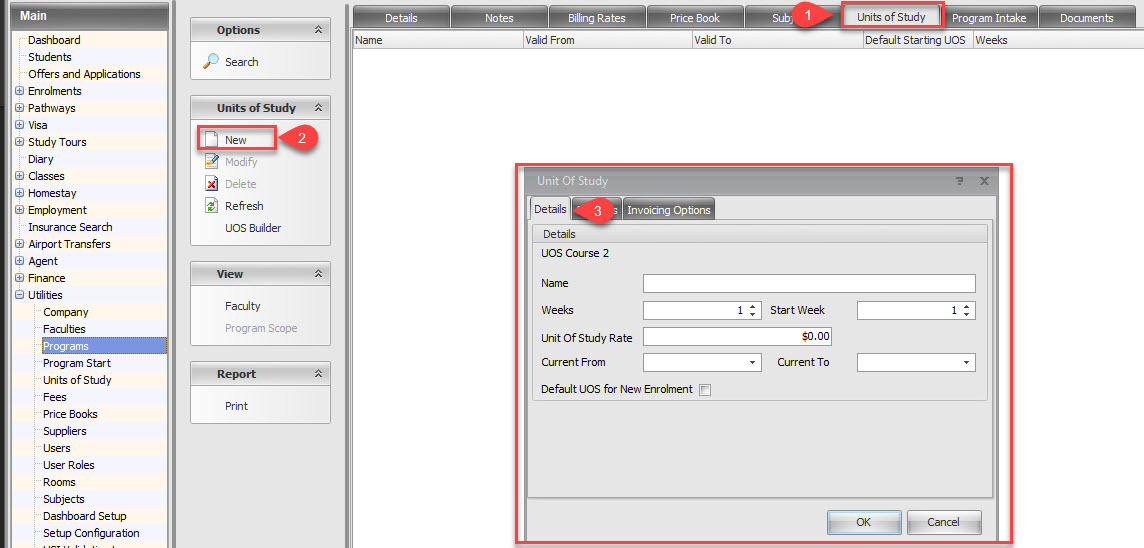
Create Units
Units are created from the Course. To create a Unit:
-
Go to the Course that you want to configure of the faculty that has Units of Study Enabled option enabled.
-
Go to the Units of Study tab.
From the Units of Study area, create a new Unit and complete the required details.
The main fields are:-
Name: The name of the Unit.
-
Weeks: The length of the Unit.
-
Start Week: The week number in the program that the UOS will start. For example, if the course has a length of 52 weeks and it is divided in 2 semesters, you can set up the UOS to start in week 1 (Semester 1) or week 27 (Semester 2). This value will be used to calculate the commencement dates for each UOS when the offer is created.
-
Unit of Study Rate Units of study billing only : The price of the Unit. This is used when the course uses Unit of Study Pricing. This field applies to Course-level Units of Study.
-
Current From and Current To: The period that the UOS is valid for. When the course of this UOS is offered with a commencement date within this period, this UOS will be added automatically to the offer (requires the option ‘Default UOS for New enrolments’ to be selected). This option simplifies significantly the generation of offers.
-
Default UOS for New Enrolments: Enable this setting to automatically add this UOS when the course is offered with a commencement date within the period set by the ‘Current From’ and ‘Current To’ settings in the UOS.
-
-
Click OK to create the Unit.
-
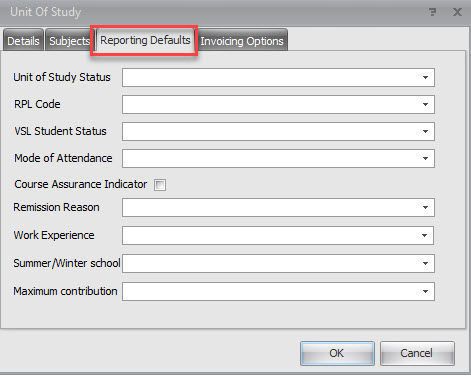
If the program is set as a PIR program (for higher education only), click on the tab ‘Reporting Defaults’ to enter the default values for the UOS that will be reported to TCSI. These values can be updated for each individual enrolment.
-
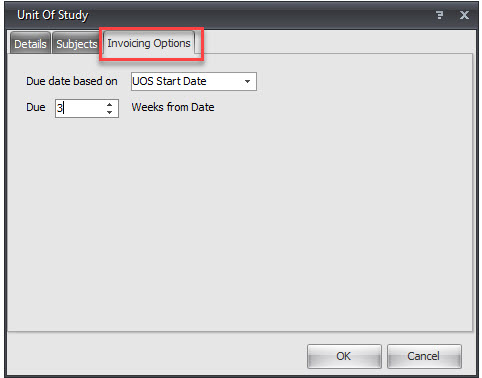
Click on the tab ‘Invoicing Options’ to set up the billing options. The fields available are:
-
Due date based on: Select the date that you want the due dates for the invoices based on. If the program was set as a PIR or VSL program, the census date is the only option available and the due date is calculated based on the settings. For other program types the options are:
-
UOS Start Date: Start date of the Unit of Study.
-
UOS End Date: End date of the Unit of Study.
-
Enrolment Start Date: Start date of the enrolment.
-
Enrolment End Date: End date of the enrolment.
-
-
Due _ weeks from date: Select the number of weeks for the due date based on the setting ‘Due date based on’. A positive value will se the due date after the date and a negative number before the date of reference.For example, if you want the due date to be 4 weeks before the commencement of the unit of study, select -4 (it will also require that you select UOS Start Date on the setting ‘Due date based on’.
-
-
Click Ok to create the Unit of Study
-
The Unit of Study was created for the program.
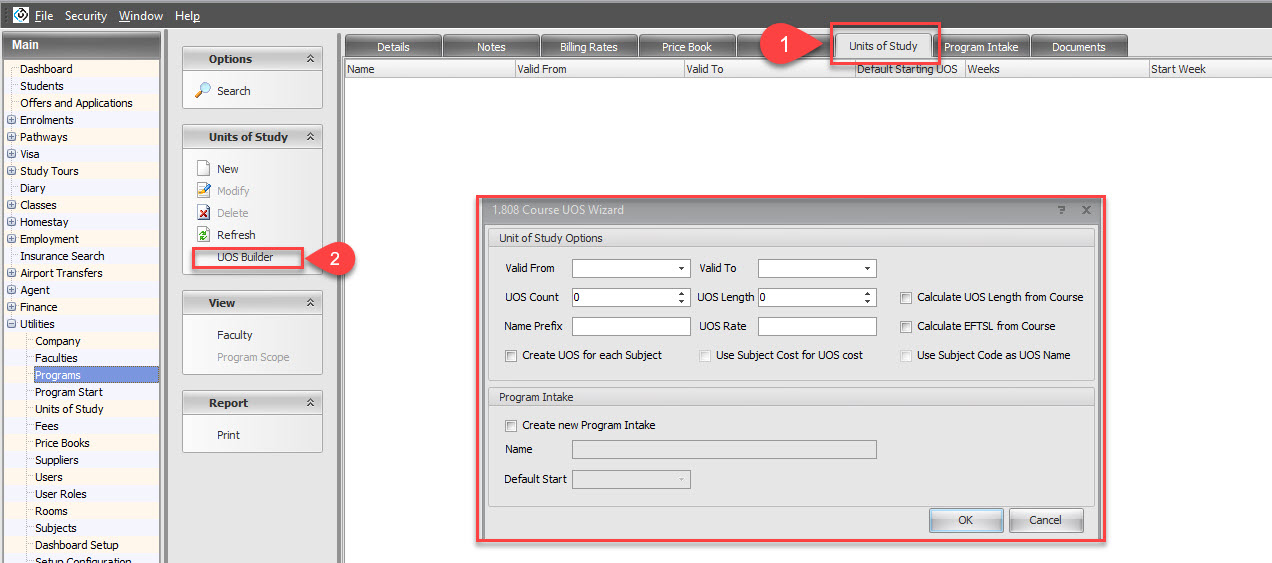
Create Units in Bulk
You can create Units of Study in bulk using the UOS Builder. This is useful when you need to create multiple Units with the same or similar structure, such as semesters, terms, blocks, or Units for each subject.
To create Units in bulk:
-
Go to the Course that you want to configure. Make sure the Course belongs to a Faculty that has Units of Study Enabled selected.
-
Go to the Units of Study tab.
-
From the Units of Study panel, click UOS Builder.
From the Units of Study panel, on the side bar’ click on ‘UOS Builder’. A pop-up window will display.
The fields available are:
-
Valid from and Valid To: The period that the UOSs are valid for. When the course of these UOSs is offered with a commencement date within this period, these UOS will be added automatically to the offer
-
UOS Count: Number of UOS to create.
-
UOS Length: The length (in weeks) for each UOS to be created.
-
Calculate UOS length from course: If selected, the length for each UOS will be calculated automatically based on the length of the course and the number of UOSs to create. Each UOS will have the same length.
-
Name Prefix: A prefix to add to the name for each UOS.UOS Rate: The price for each UOS.
-
Calculate EFTSL from course: If selected, the EFTSL for each UOS will be calculated based on the course that the UOS belongs to.
-
Create UOS for each subject: If selected, a UOS will be created for each subject that currently exists in the same program.
-
Use subject Cost for UOS cost: If selected, the cost for the UOS will be the total amount of the cost for the subjects that are part of the UOS.
-
Use Subject Code as UOS Name: If selected, the name for each UOS will be the subject code.
-
Create new program intake: Select this option if you want to create a new program intake with these UOSs.
-
Name: The name for the new program intake.
-
Default Start: The default start date for the program intake that will be created.
Modify Units of Study
Note: Although you can modify Units of Study, it is important to note that these changes will not impact offers/enrolments/results that have already been created with those UOSs.
-
Go to the Course that contains the Unit of Study you want to modify.
-
Go to the Units of Study tab.
-
Select the Unit of Study that you want to modify.
-
Click Modify.
-
Make the required changes.
-
Click OK to save the changes.
Delete Units of Study
Although you can delete Units of Study, it is important to note that these changes will not impact offers/enrolments/results that have already been created with those UOSs.
Delete Course-level Units of Study from the Course
-
Go to the Course that contains the Unit of Study you want to delete.
-
Go to the Units of Study tab.
-
Select the Unit of Study that you want to delete.
-
Click Delete.
-
Click OK to confirm.