Canvas Integration: Enrolments
Our Canvas integration handles the enrolment and unenrolment of the users (students and teachers) into Canvas courses and sections. In this article, you will learn the settings that are available and the different ways that eBECAS/EDMISS can enrol the users into courses and sections in Canvas.
A course and its sections (optional) in Canvas can be mapped to a class, which in eBECAS/EDMISS belongs to a subject. Therefore, by allocating a student to a particular class, eBECAS/EDMISS can automatically enrol the students into the mapped course and sections (if defined). This mapping also allows the synchronisation of the assessments and results between Canvas and eBECAS/EDMISS.
Enrolments Settings
There are different settings available to manage the enrolment of users into courses and sections in Canvas. Use these options to meet your requirements.
Go to Utilities>Setup Configuration
From the Setup Configuration window, click on Setup>Canvas LMS Integration.
Go to the Enrolments section and select the settings.
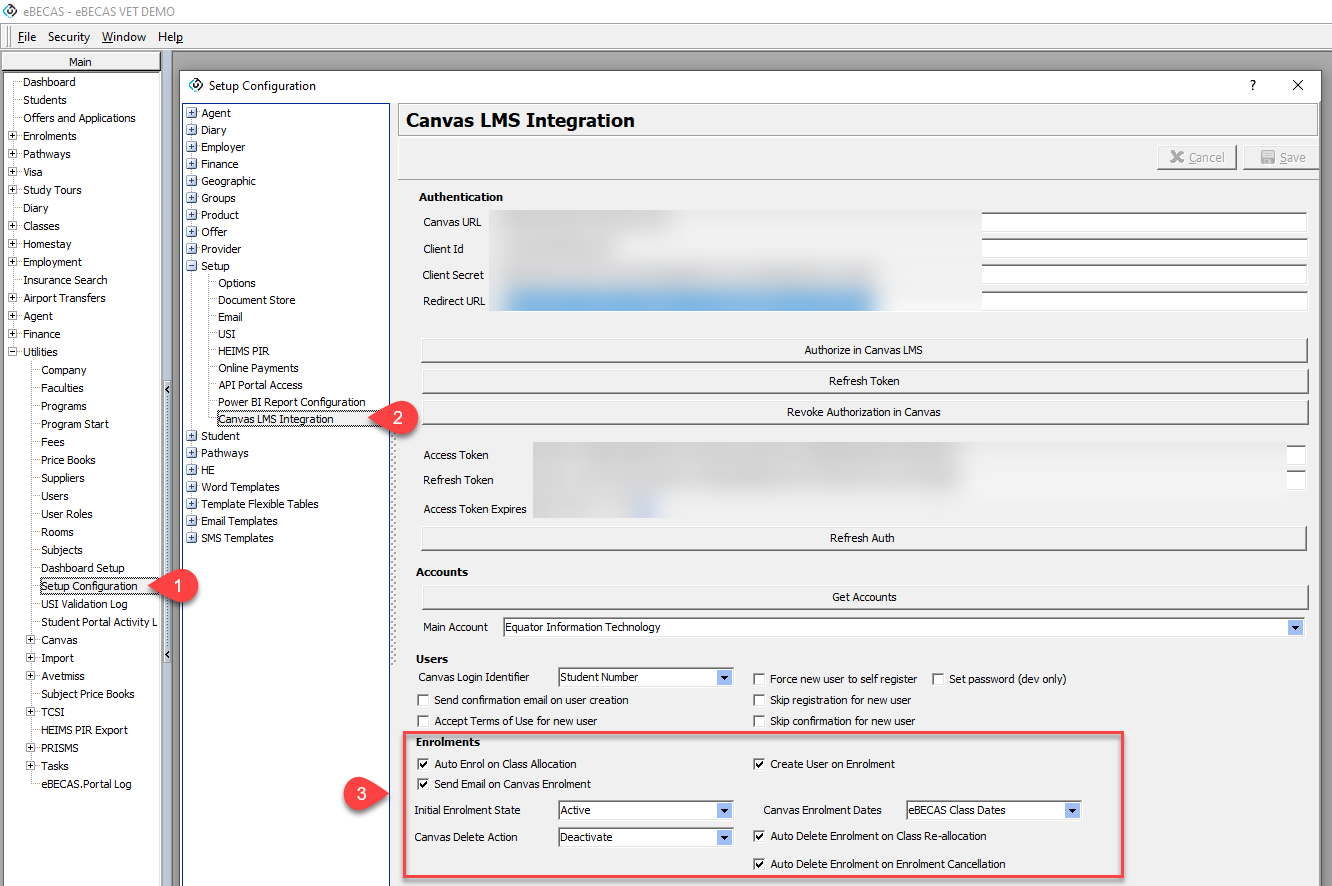
The settings available are:
Auto Enrol on class allocation: If selected, and if the class is mapped to a course and a section (optional) in Canvas, when you allocate the students to that class, the Canvas user will be enrolled automatically into the mapped course and section (if mapped in the class).
Send email to student on Canvas enrolment: If selected, Canvas will send an email to the student confirming the enrolment into the course.
Create user on enrolment: If selected, when a student is allocated to a mapped class, the user in Canvas for that student will be created (if it does not exist).
Initial Enrolment State: The initial status of the enrolment. The available options are:
Active: The student will be immediately enrolled in the course.
Invited: The student will be required to accept the course invitation.
inactive: The student will be listed in the course roster but will not be able to participate in the course.
Canvas enrolment dates: The dates of the students' enrolment in the Canvas course and sections (if mapped). The options are:
Canvas Course/Section Dates: The student's enrolment in Canvas will have the same dates as the course/sections in Canvas.
eBECAS/EDMISS Class dates: The student's enrolment in Canvas will have the same dates as the dates defined for the mapped class in eBECAS/EDMISS.
eBECAS/EDMISS Enrolment dates: The student's enrolment in Canvas will have the same dates as the enrolment related to the mapped class in eBECAS/EDMISS.
No Enrolment dates set: The student's enrolment in Canvas will have no defined dates.
Canvas delete action: The action to take with a Canvas enrolment when it is set to be deleted by an action in eBECAS/EDMISS. The options are:
Deactivate (enrolment status set to deactivated/inactive): The students cannot access the course but the data for the enrolment is not removed. Instructors can access submitted assignments from deactivated enrolments and can assign grades.
Delete (enrolment status set to deleted): Students cannot access the course and records of participation in the course are removed.
Conclude (enrolment status set to concluded): Students can access the course in a read-only format.
Auto Delete Enrolment on Class Re-allocation: If selected, when a student (with a linked Canvas enrolment) is moved out from the class, the status of the Canvas enrolment will be set as per the setting 'Canvas delete action'.
Auto Delete Enrolment on Enrolment Cancellation: If selected, when a student's enrolment is cancelled in eBECAS/EDMISS, the status of all the Canvas enrolments related to the cancelled enrolment will be set as per the setting 'Canvas delete action'.
Map eBECAS/EDMISS Classes with Canvas Courses/Sections
The mapping of the Canvas course and sections to the eBECAS/EDMISS class is performed in the class set up view.
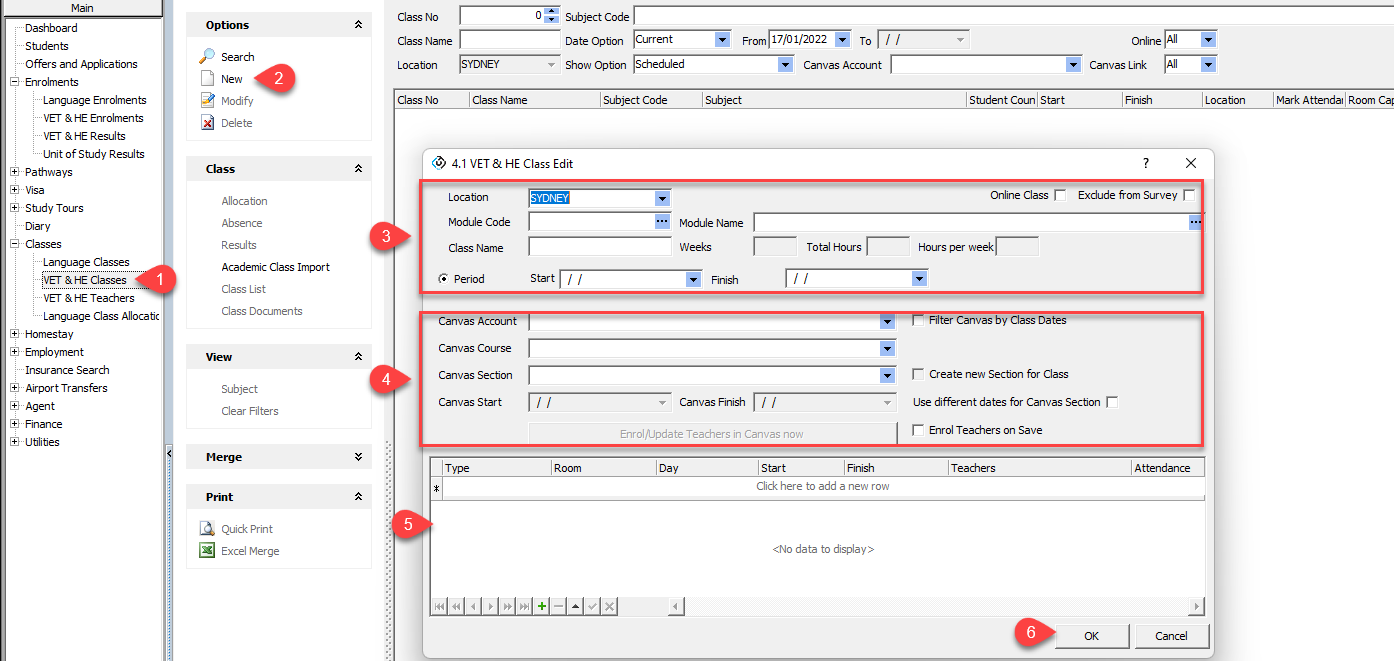
From the navigation menu, go to Classes>VET & HE Classes
If you are creating a new class, click on 'New' from the Options panel. If you want to set up the mapping for an existing class, locate the class and click on 'Modify' on the 'Options' panel. The class create/edit view will show.
Enter the details for the class (location. Module, Class name and dates)
Use the Canvas fields to select the course and section that you want to map the class to (by selecting the option 'Filter Canvas by Class Dates', only courses and sections in Canvas that have dates defined and that those dates overlap to the class dates will display).
Canvas Account: Select the account that the course in Canvas belongs to. By selecting the parent account of the course, the values in the course field will be filtered accordingly.
Canvas Course: Select the course that you want to map the class to.
Canvas Section: If you want to map the class to a particular section within the selected course in Canvas, select the section. If you do not want to map the class to any section, do not select any option.
If you want to map the class to a section that does not exist in the Canvas course yet, you can create it from eBECAS/EDMISS.
To do so:Tick the checkbox 'Create New Section for Class'. By doing so, the 'Canvas Section' field will become a text field with the name of the class pre-populated.
Enter a meaningful name for the section in the 'Canvas Section' field. This will be the name of the new section in the Canvas course.
By selecting or creating a section, the students allocated to that class will only be enrolled into the selected section in Canvas.
Note: If the value that you are looking for is not available on the Canvas fields, you need to refresh the data from the Canvas elements (learn more about Canvas Integration: Elements)
Canvas Start: If you need the section to have different dates than the class dates that you define in eBECAS/EDMISS, select the option 'Use different dates for Canvas section' and enter the dates for the section. This is useful when you want your students to have access to the section in Canvas after the end date of the class in eBECAS/EDMISS. If you modify the class after it was created and update the Canvas Start dates fields, eBECAS/EDMISS will also update the dates for the section in Canvas.
Finish the set up of the class by entering the sessions.
Click on 'Save'.
Enrol Students into Canvas Courses/Sections
The enrolment of students into the Canvas courses and section occur at the class level in eBECAS/EDMISS. There are multiple ways of doing that:
Automated Enrolments
This method requires that the setting 'Auto Enrol on class allocation' is enabled (see section 'Enrolment Settings' above).
Only new allocations to the mapped classes will trigger the automated enrolment. To enrol students into Canvas courses/sections that were already allocated to a class in eBECAS/EDMISS, before the mapping of the class was set, see the section below 'Manual Enrolment'.
After you have mapped the class to a Canvas course/section, every new student allocated to that particular class, will trigger the enrolment of the respective user(s) into the Canvas course/sections. Before enrolling the user, eBECAS will check if the Canvas user for that student exists. Additionally, If the setting 'Create user on enrolment' is enabled (see Enrolment Settings section above), eBECAS will create the user for the student (if it does not exist). If this setting is not enabled and the user does not exist in Canvas, eBECAS won't be able to enrol the student in Canvas.
Manual Enrolments
This method requires that the Canvas course/sections are already mapped to class (see section above).
To manually enrol students into a Canvas course/sections that are already allocated to a class:
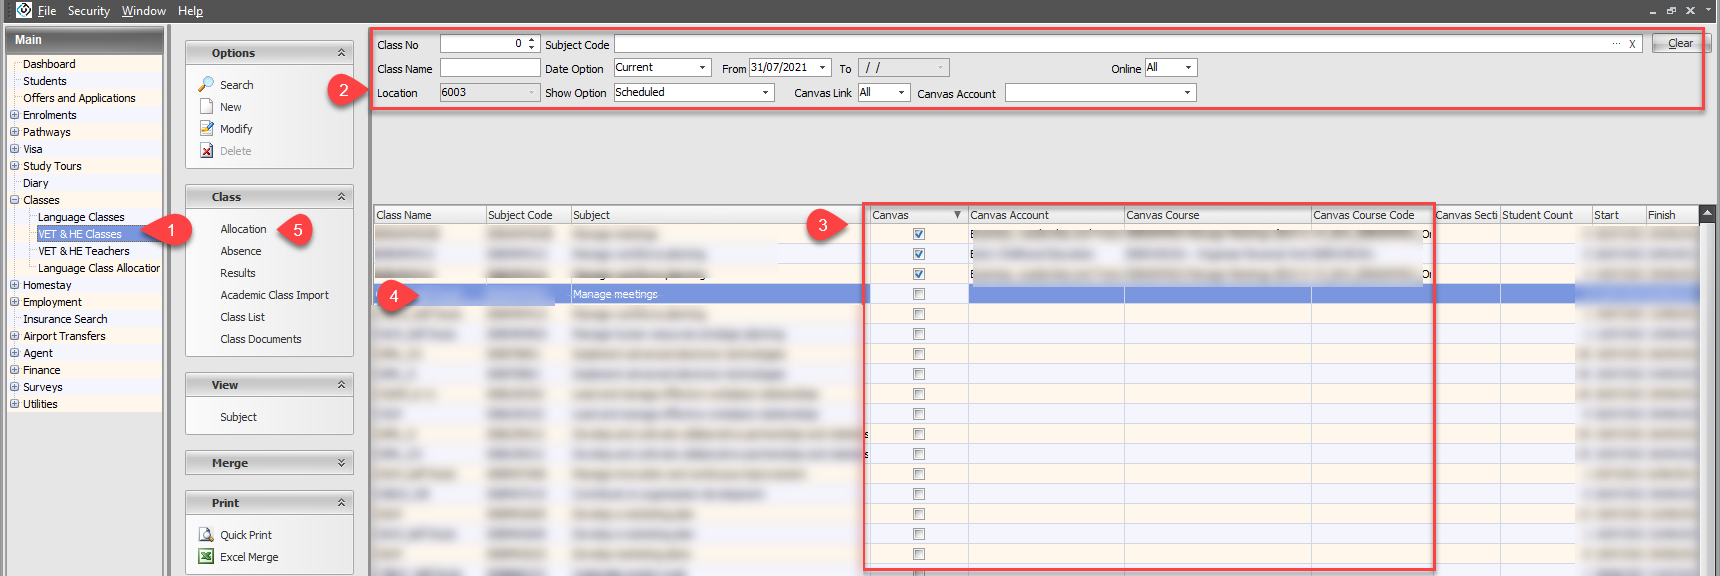
From the navigation menu, go to Classes>VET & HE Classes.
Use the filters available to locate the class of interest.
You can also use the Canvas-related columns to filter the records.
Select the class of interest.
Click on 'Allocation' from the Class panel. The list of the students currently allocated to the class will display.
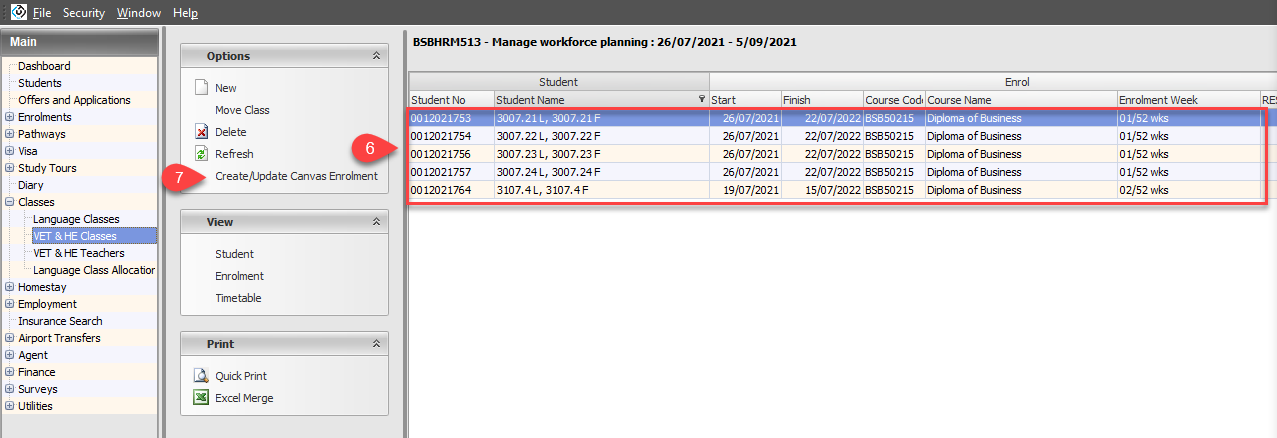
Select the student or students that you want to enrol into the mapped Canvas course/sections.
Tip: Use Ctrl + A to select all the students.
Click on 'Create/Update Canvas Enrolment'
A message with the result of the operation will display.
Update Canvas Enrolments for Students from eBECAS/EDMISS
If you update the mapped Canvas course/section of a class that already has students, or you change the settings for the enrolment dates or the dates themselves, and you need those changes to reflect on the enrolments in Canvas, you can follow the same process described in the section above 'Manual Enrolments'.
View Canvas Enrolment Details in eBECAS/EDMISS
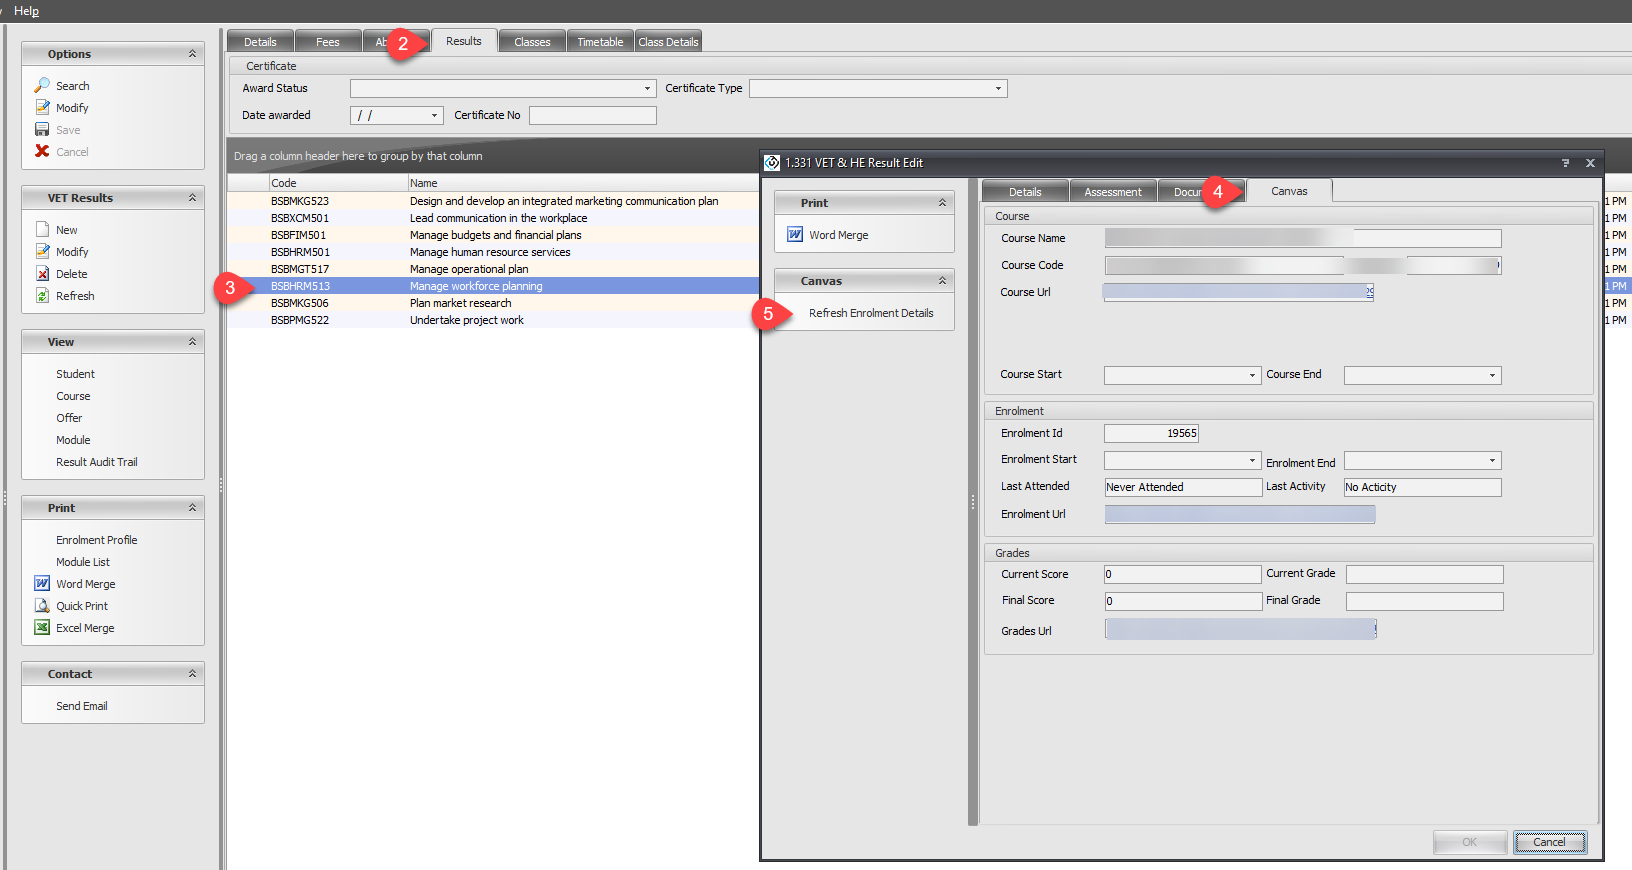
The enrolment of a student in a Canvas course/section is linked to a result of the student for the associated subject in eBECAS/EDMISS (association via the class). Therefore, you are able to see the details of the Canvas enrolment from the results of the subject in eBECAS/EDMISS. To do so:
Locate the enrolment for the student that you want to see the Canvas enrolment details for.
Click on the 'Results' tab.
Double-click on the subject of interest (remember that a class in eBECAS/EDMISS belongs to a particular subject in the student's enrolment). The Results view will display.
Click on the 'Canvas' Tab
If required, click on 'Refresh Canvas details' on the 'Canvas' panel to fetch the current information from Canvas.
Enrol Teachers into Canvas Courses/Sections
The enrolment of teachers into the Canvas courses and section occur at the class level in eBECAS/EDMISS.
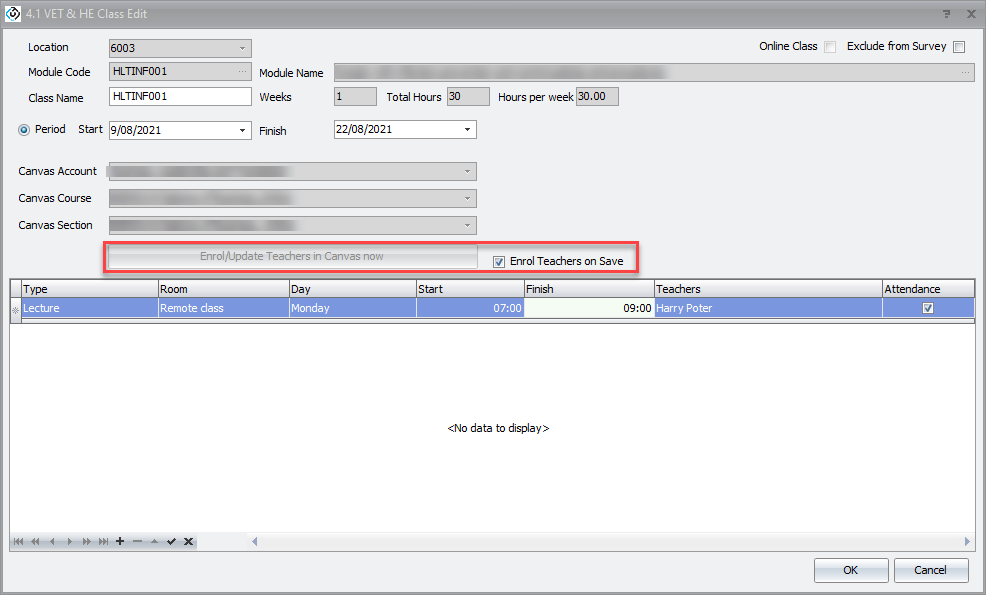
You can enrol the teachers into the mapped Canvas course/section when you are creating or editing the class in eBECAS/EDMISS.
Go to the class of interest.
Create the sessions for the class and assign the teachers accordingly (you can select one of more teachers).
Tick the checkbox 'Enrol Teachers on Save'. By selecting this option, the teachers will be enrolled into the mapped Canvas course/section.
Click 'Ok'
Before enrolling the teacher, eBECAS/EDMISS will check if the Canvas user for the teachers exist. Additionally, If the setting 'Create user on enrolment' is enabled (see Enrolment Settings section above), the user for the teachers will be created (if they do not exist). If this setting is not enabled and the user does not exist in Canvas, eBECAS/EDMISS won't be able to enrol the teachers in Canvas.
When you are editing a class, you can also click on the button 'Enrol/Update Teachers in Canvas now' (if enabled) to enrol and create the users (if the setting is enabled) for the teachers are are assigned to the sessions in the class.
Unenrol a Student from a Canvas Course/Section
Unenroling a student from a Canvas course/section is equivalent to deleting the Canvas enrolment on the course/section.
Deleting a enrolment in Canvas is handled by changing the status of the Canvas enrolment. You have the option to choose the status from the setting 'Canvas Delete Action' . See the section Enrolment Settings for the options available.
The following are the scenarios where a Canvas enrolment can be deleted triggered by an action in eBECAS/EDMISS:
When a Class Allocation is Deleted
The setting 'Auto Delete Enrolment on Class Re-allocation' must be enabled.
When a student is removed from a class, the status for the Canvas enrolment for that student for that class will be updated with the status defined in the setting 'Canvas Delete Action'.
When a Student is re-allocated to Different Class
The setting 'Auto Delete Enrolment on Class Re-allocation' must be enabled.
When a student is moved to a different class, the student is unallocated from the original class and allocated to the new one. The status for the related Canvas enrolment for the original class will be updated as per the setting 'Canvas Delete Action'.
When the eBECAS/EDMISS Enrolment is Cancelled
The setting 'Auto Delete Enrolment on Enrolment Cancellation' must be enabled.
When an enrolment is cancelled in eBECAS/EDMISS, the status for all the Canvas related enrolments for that student for that cancelled enrolment, will be updated with the status defined in the setting 'Canvas Delete Action'.
