Overview
Effective communication is very important in maintaining a strong connection with stakeholders, and having the ability to send emails directly from the system to different entities such as students, agents, providers can significantly enhance this process.
Emails can be sent individually to a student, agent or homestay providers by:
-
Single text email : Send a single simple text email. Optionally, include a PDF generated from a Microsoft Word template as an attachment.
-
Bulk simple text email using Mandrill and bookmarks : Send bulk simple text emails to multiple selected students, agents or homestay families by using Mandrill using templates containing data bookmarks with simple text.
-
Bulk HTML email using Mandrill : Send bulk HTML emails to multiple selected students, agents or homestay families by using Mandrill (and MailChimp for the design) of templates with eBECAS/EDMISS which enables Colleges to send html formatted email with embedded graphics and data.
Considerations for Email Providers
Providers for Sending Single Emails
You can use any SMTP server to send single emails from eBECAS/EDMISS. The SMTP service should allow to send emails on behalf of the users, without per user authentication.
While your College can use a single College based email account, it is strongly encouraged for Colleges to use a separate email service such as Mandrill (by MailChimp) to ensure emails are not marked as spam and are verified.
Provider for Sending Bulk Emails
To send bulk emails from eBECAS/EDMISS, you need to use Mandrill (by MailChimp).
Mandrill (by MailChimp) integration with eBECAS/EDMISS enables formatted html email templates to send single and bulk emails to Students, Agents and Homestay providers that contain eBECAS/EDMISS data.
Set up Email Provider
Set up a SMTP Provider for Sending Single Emails
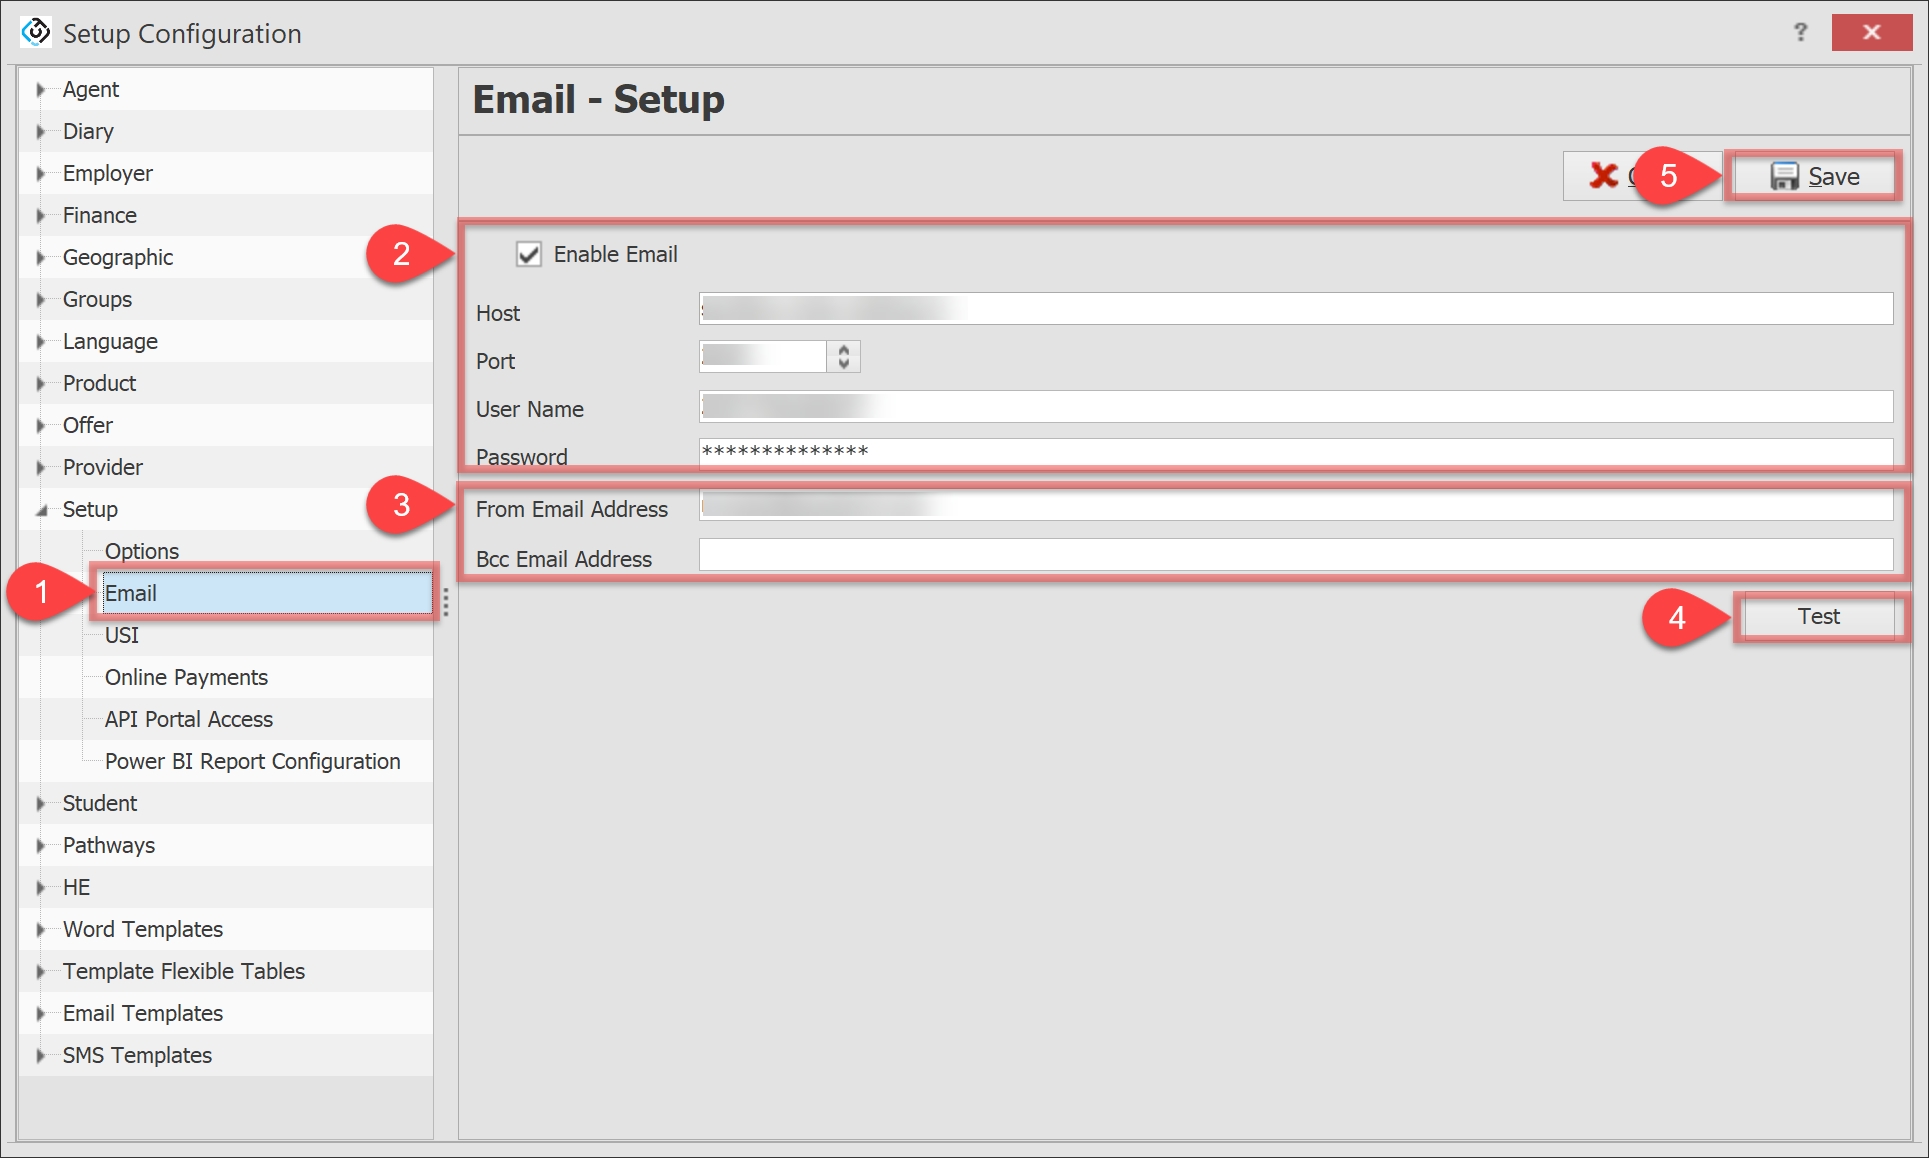
To set up SMTP server,
-
Go to Utilities > Setup Configuration > Setup > Email.
-
Enter the SMTP server details and credential.
-
(Optional) Set the default email address for the sender, and set the default email address for BCC.
-
Click on Test button to verify that the entered details are functioning properly.
-
Click on Save to finish.
Set up Mandrill for Sending Bulk Emails
eBECAS/EDMISS allows you to send bulk emails using simple text email templates with bookmarks or HTML email templates via Mandrill.
Follow these steps to set up Mandrill in eBECAS/EDMISS.
-
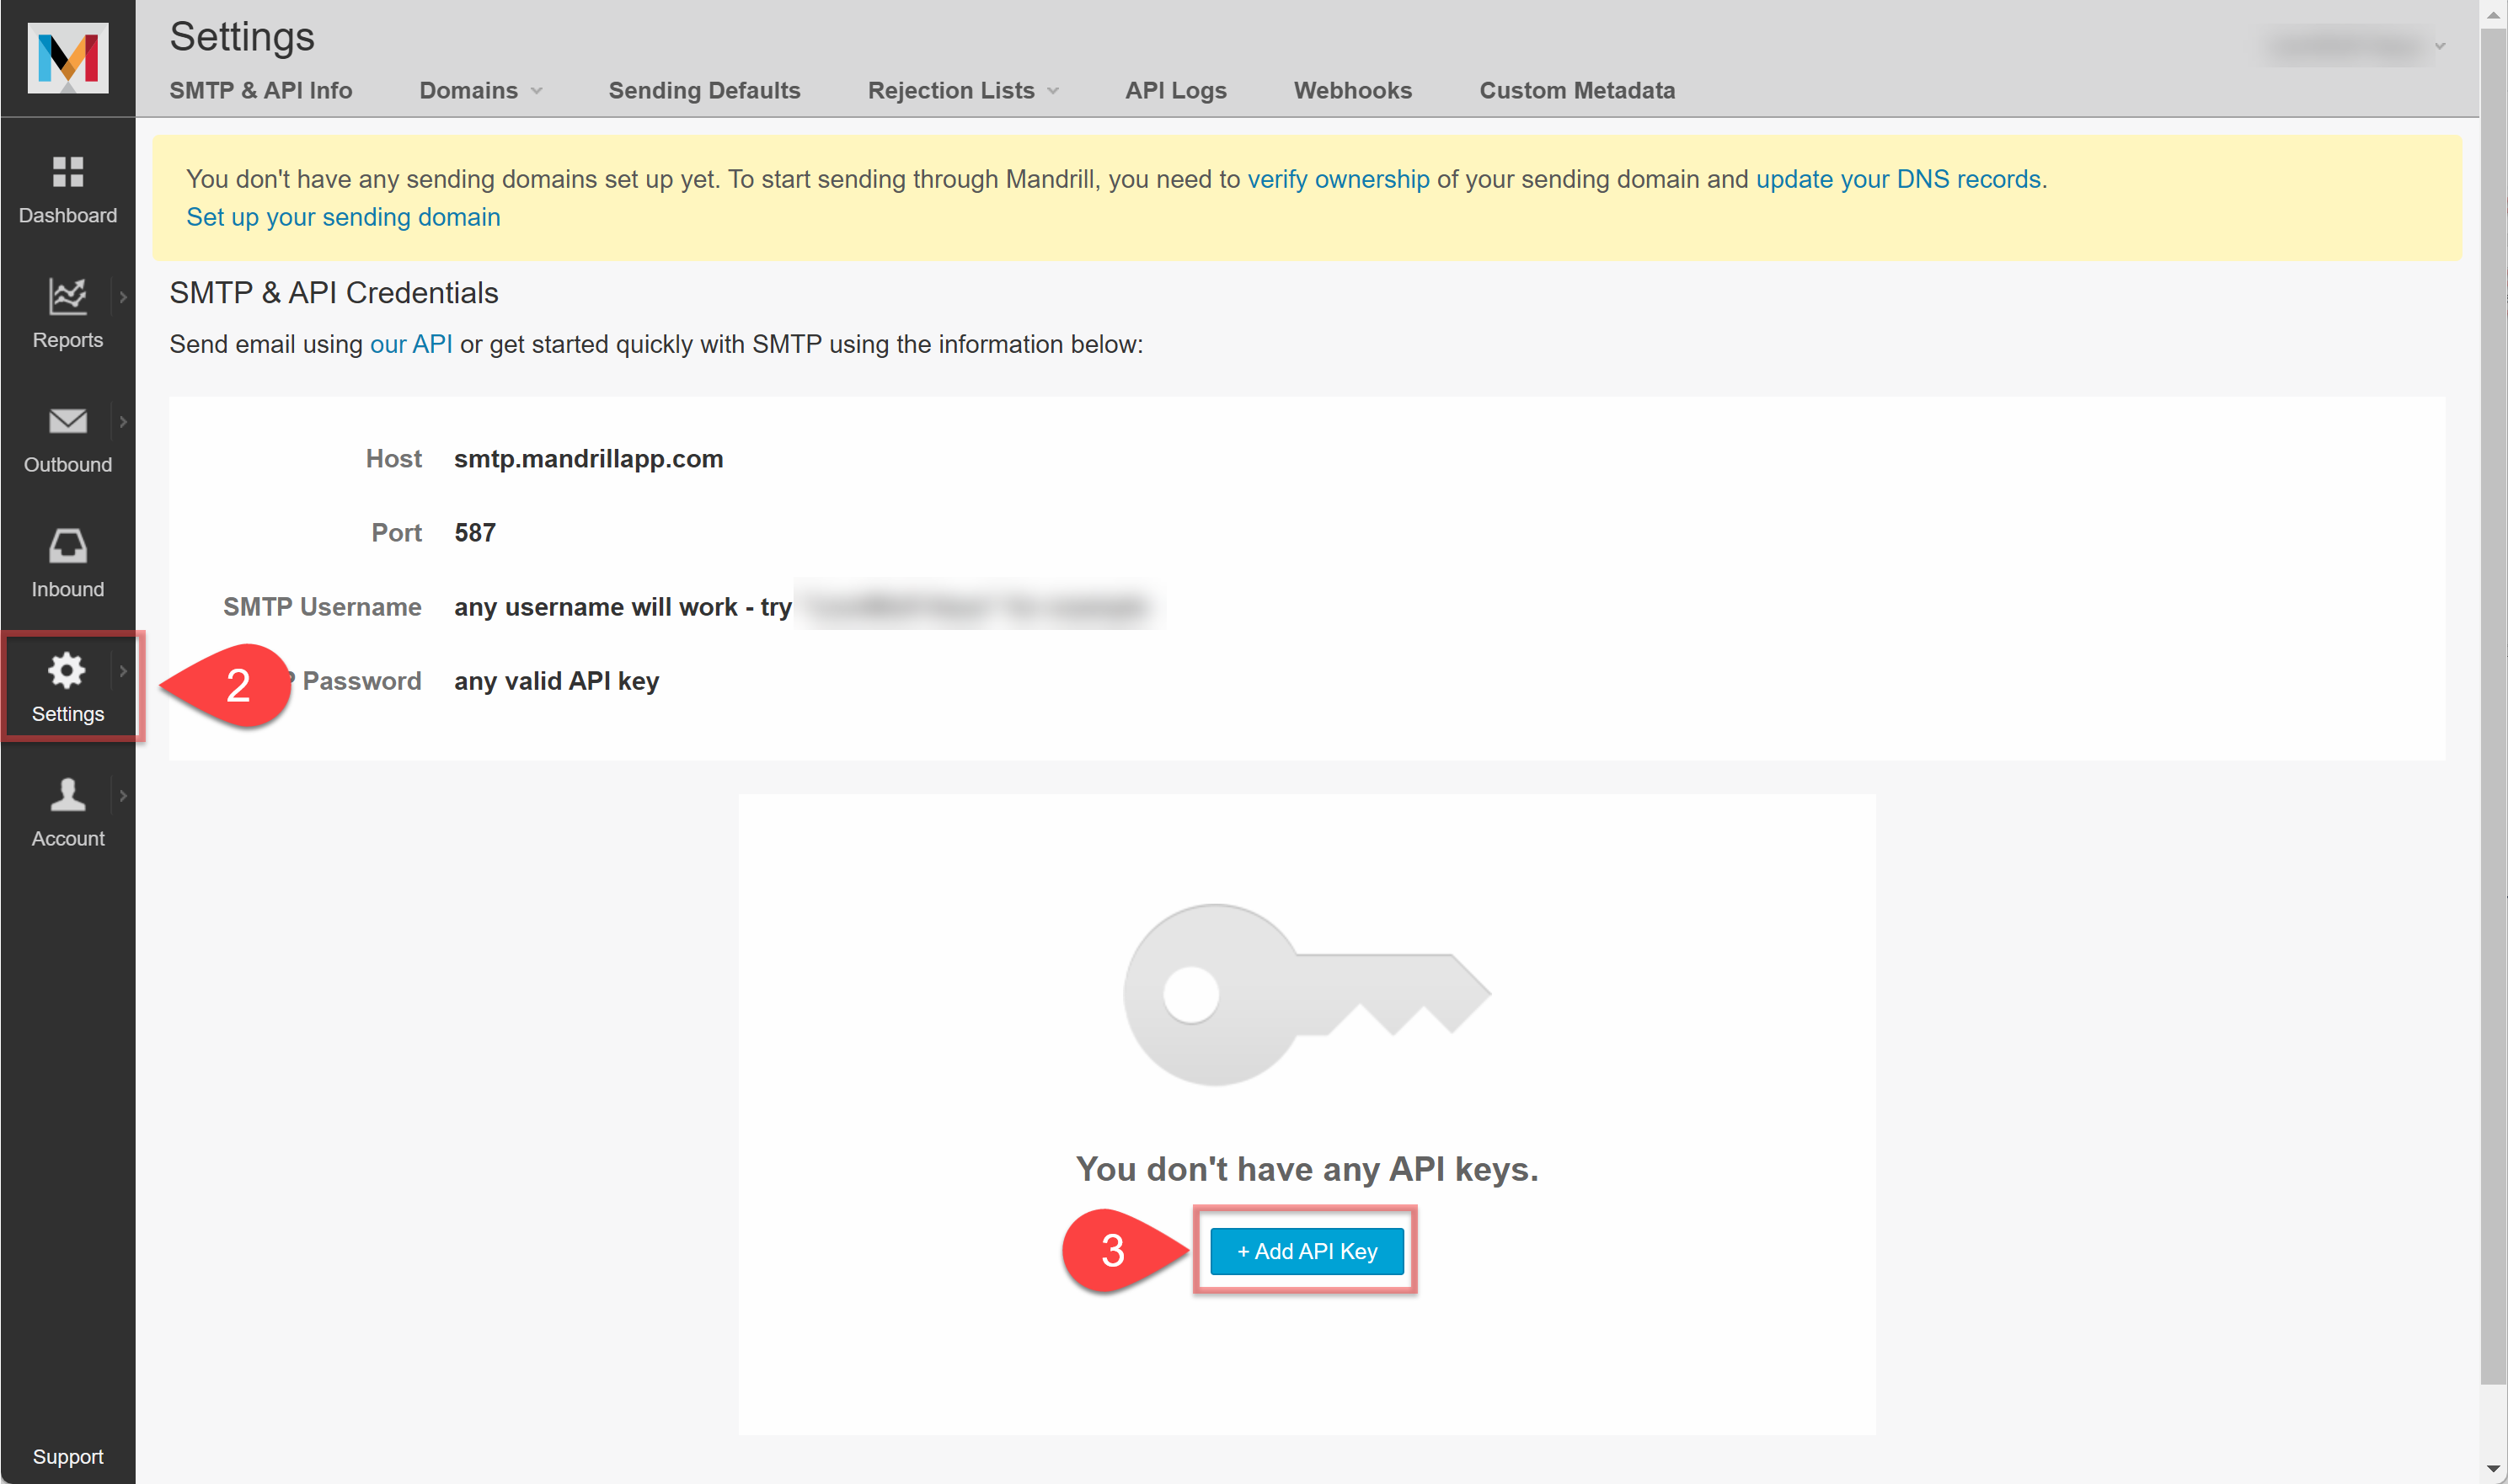
Create a Mandrill account through this link: https://mandrillapp.com
-
Log in to Mandrill and go to the Dashboard > Settings.
-
Click on Add API key and copy the created key.
-
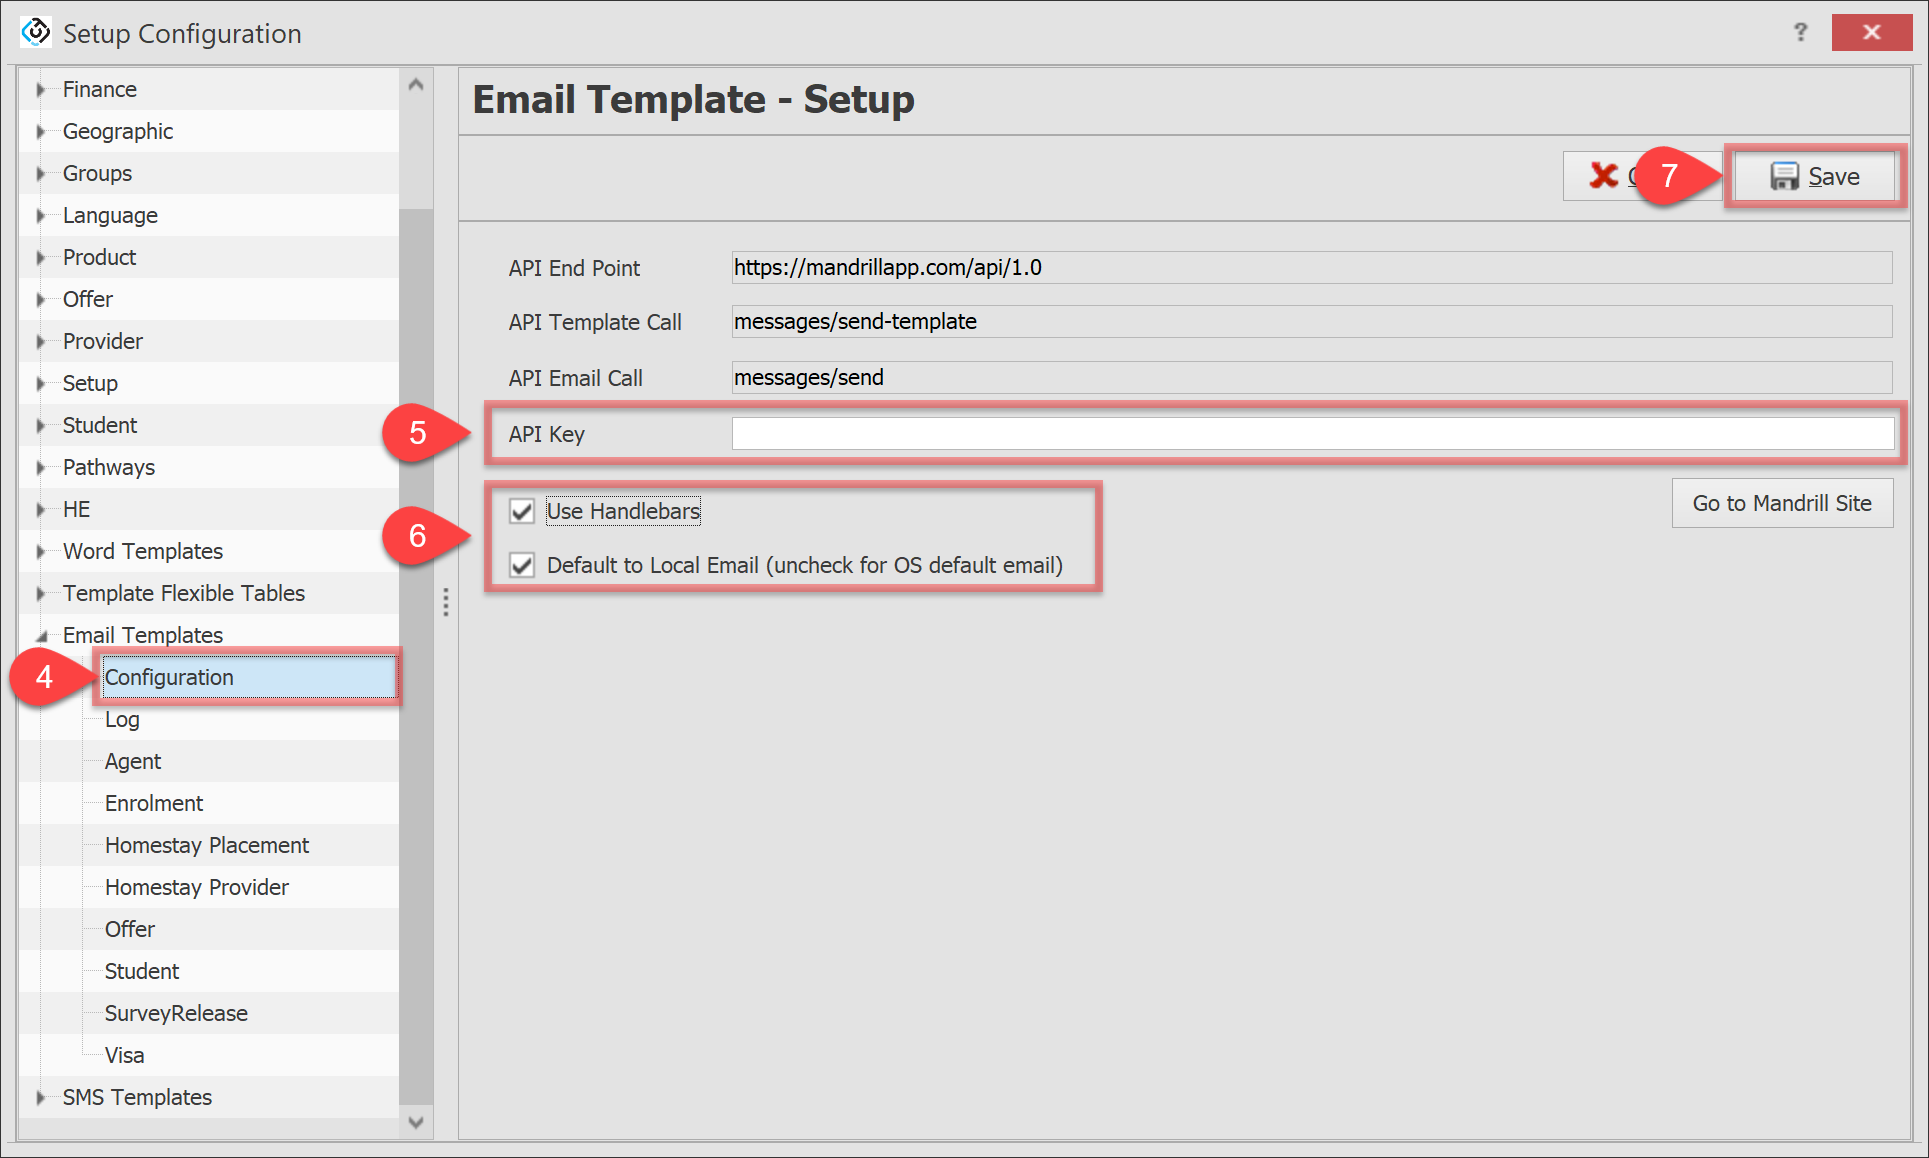
Go to Utilities > Setup Configuration > Email Templates > Configuration.
-
Paste the copied API key in API Key field.
-
Config the options.
-
Use Handlerbars: Select it to use Bookmarks in Email Templates.
-
Default to Local Email: Select it to set Local Email address as default when sending emails to students.
-
-
Click on Save to finish.
Email Templates
When sending bulk emails, templates are essential. Templates enable you to craft messages ranging from simple text emails to complex messages with dynamic data.
Simple Text Email Templates
-
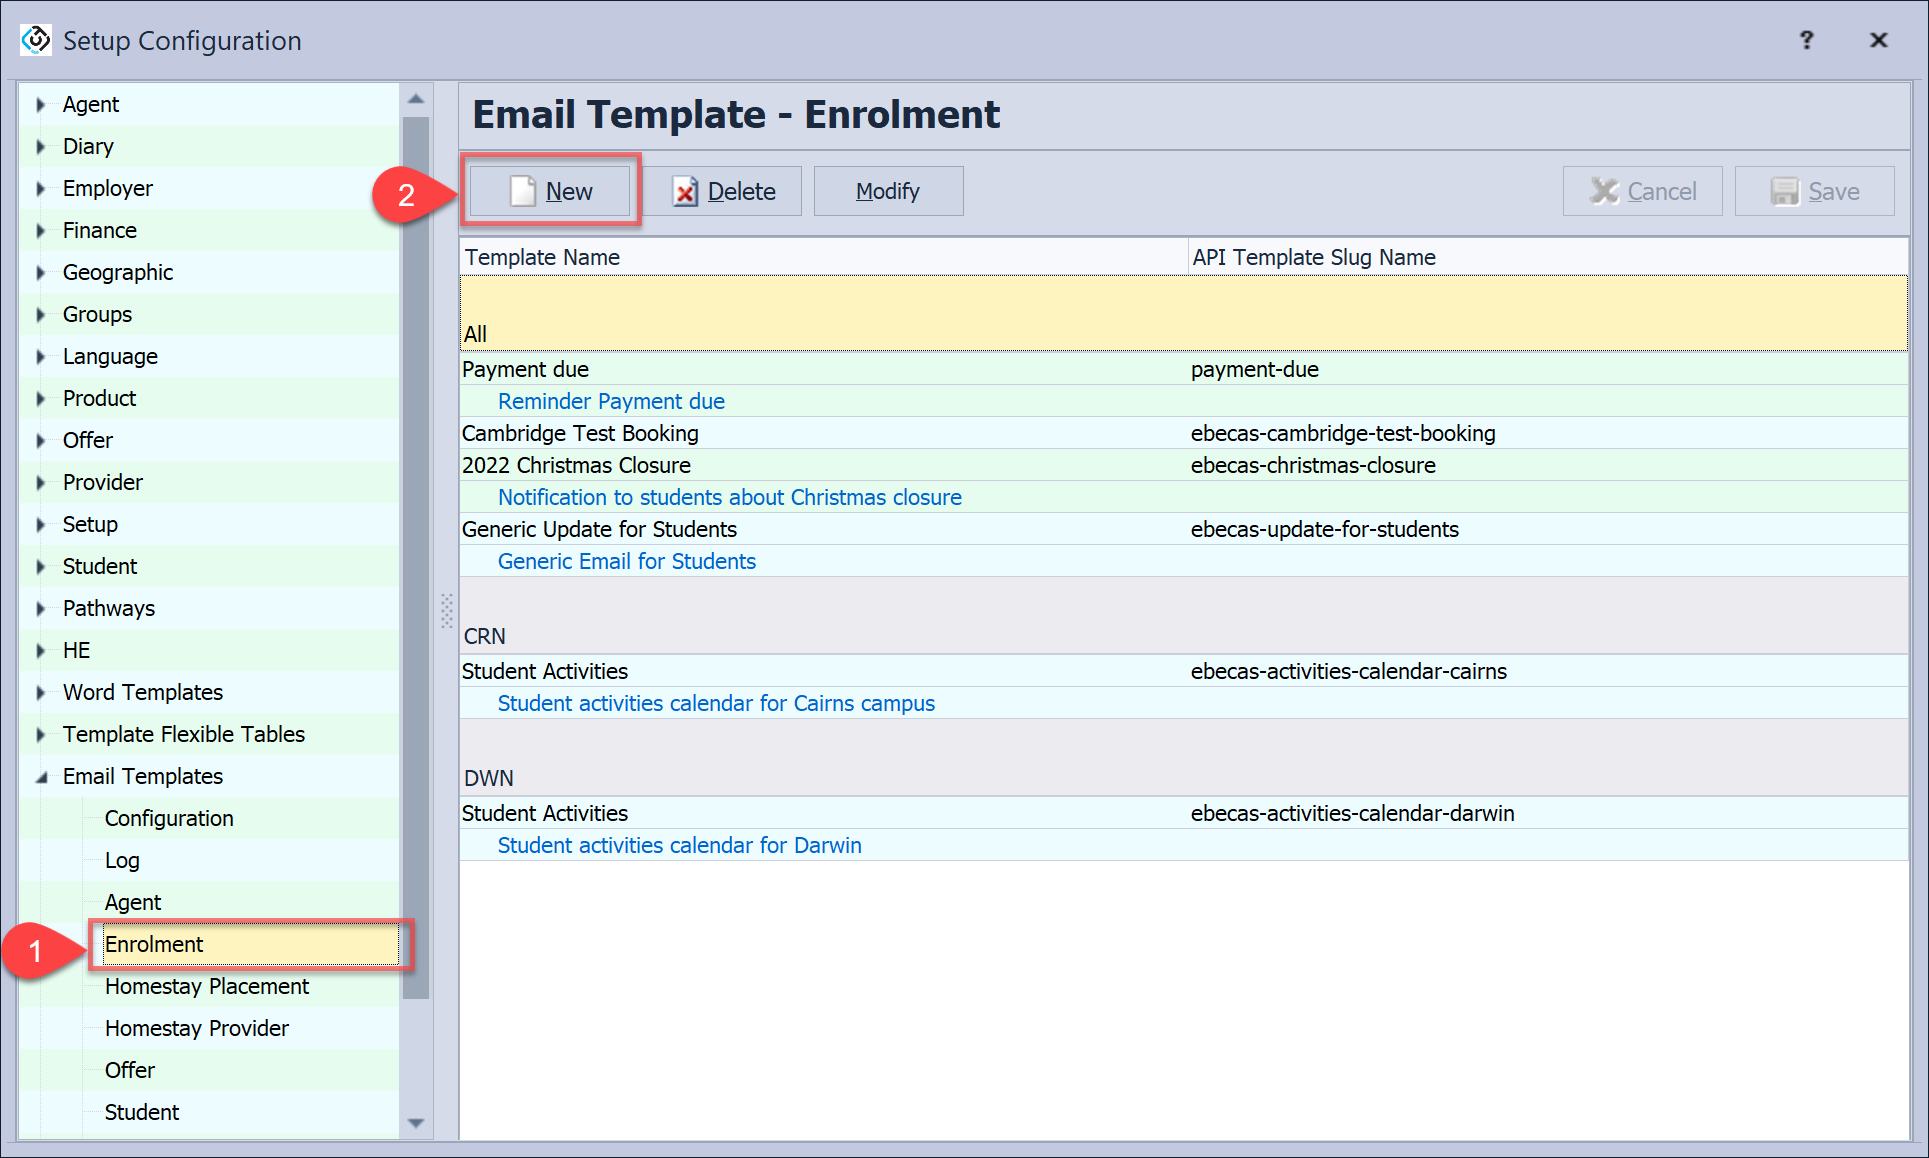
Go to Utilities > Setup Configuration > Email Templates > your desired object.
-
Click on New.
-
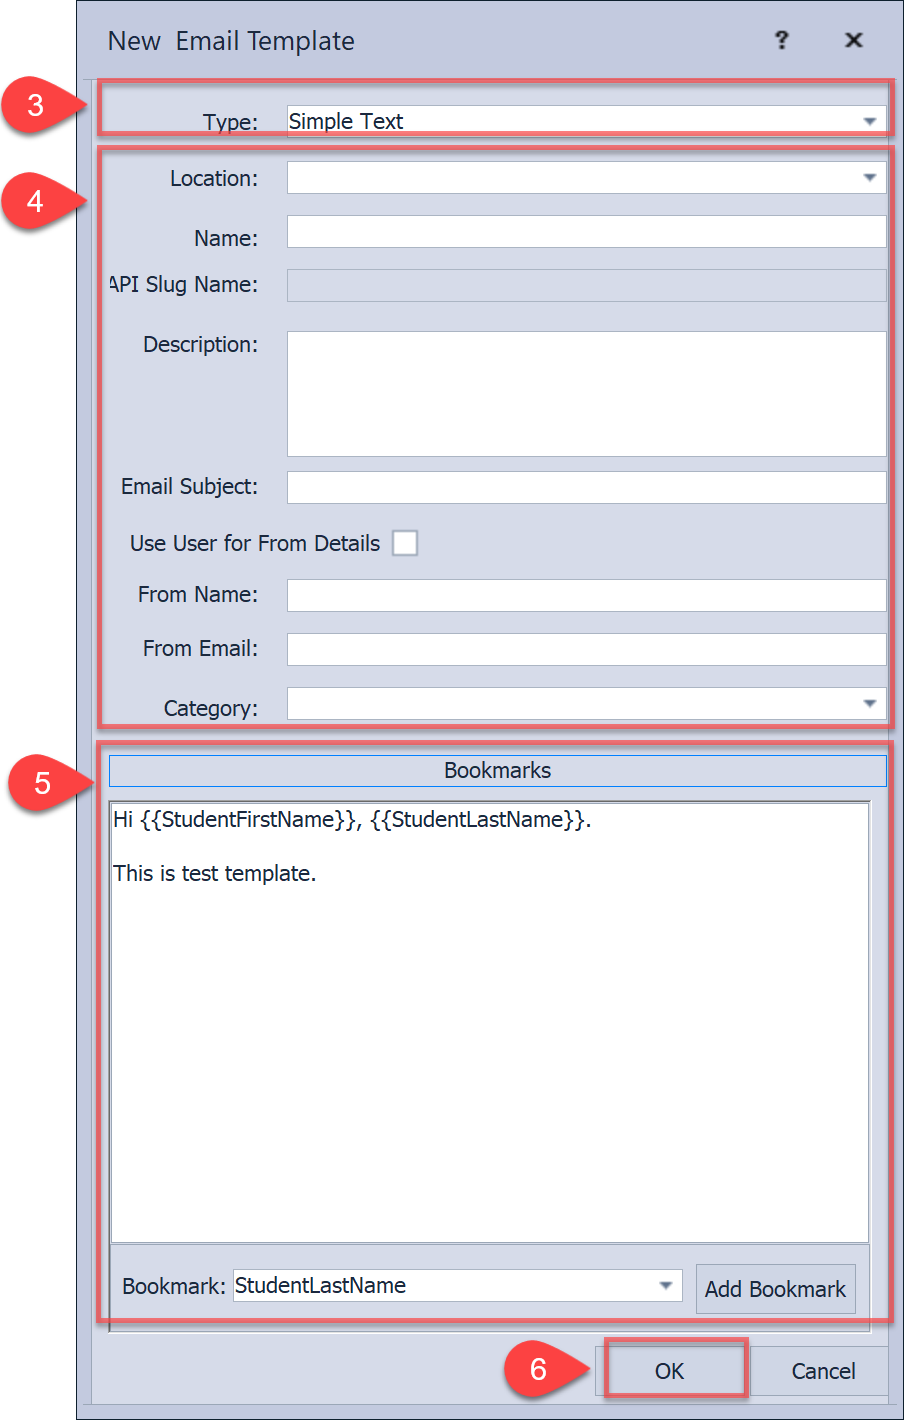
Select Simple Text as the type.
-
Enter the details for the new template.
-
Location : Specify the location that this template is used on. Leave empty for global location use.
-
Name : Set a name for this template.
-
API Slug Name : Fill the Mandrill API Slug name specified in Mandrill for HTML template. This field is not needed for simple text email templates.
-
Description : Set a description for this template.
-
Email Subject : Set the subject of the email to be sent through the template.
-
Use User for From Details : Select it to automatically use the current user's name and email address as the sender's name and email address for the email to be sent through the template.
-
From Name : Set the sender's name for the email to be sent through the template. This field will be disabled if you use the User for From Details option.
-
From Email : Set the sender's email address for the email to be sent through the template. This field will be disabled if you use the User for From Details option.
-
Category : Set the default category for the email to be sent through the template.
-
-
Enter the body of the email message to be sent through the template.
Tip
You can use Bookmarks that are placeholders will be replaced with data during merging to insert dynamic values such as outstanding fees, student details including course, class and attendance.
Select the bookmark that you’d like to use form the dropdown and click on Add Bookmark to place it in the template.
-
Click on OK to save it.
HTML Email Templates via Mandrill
HTML Email templates are specified and created in Mandrill.
-
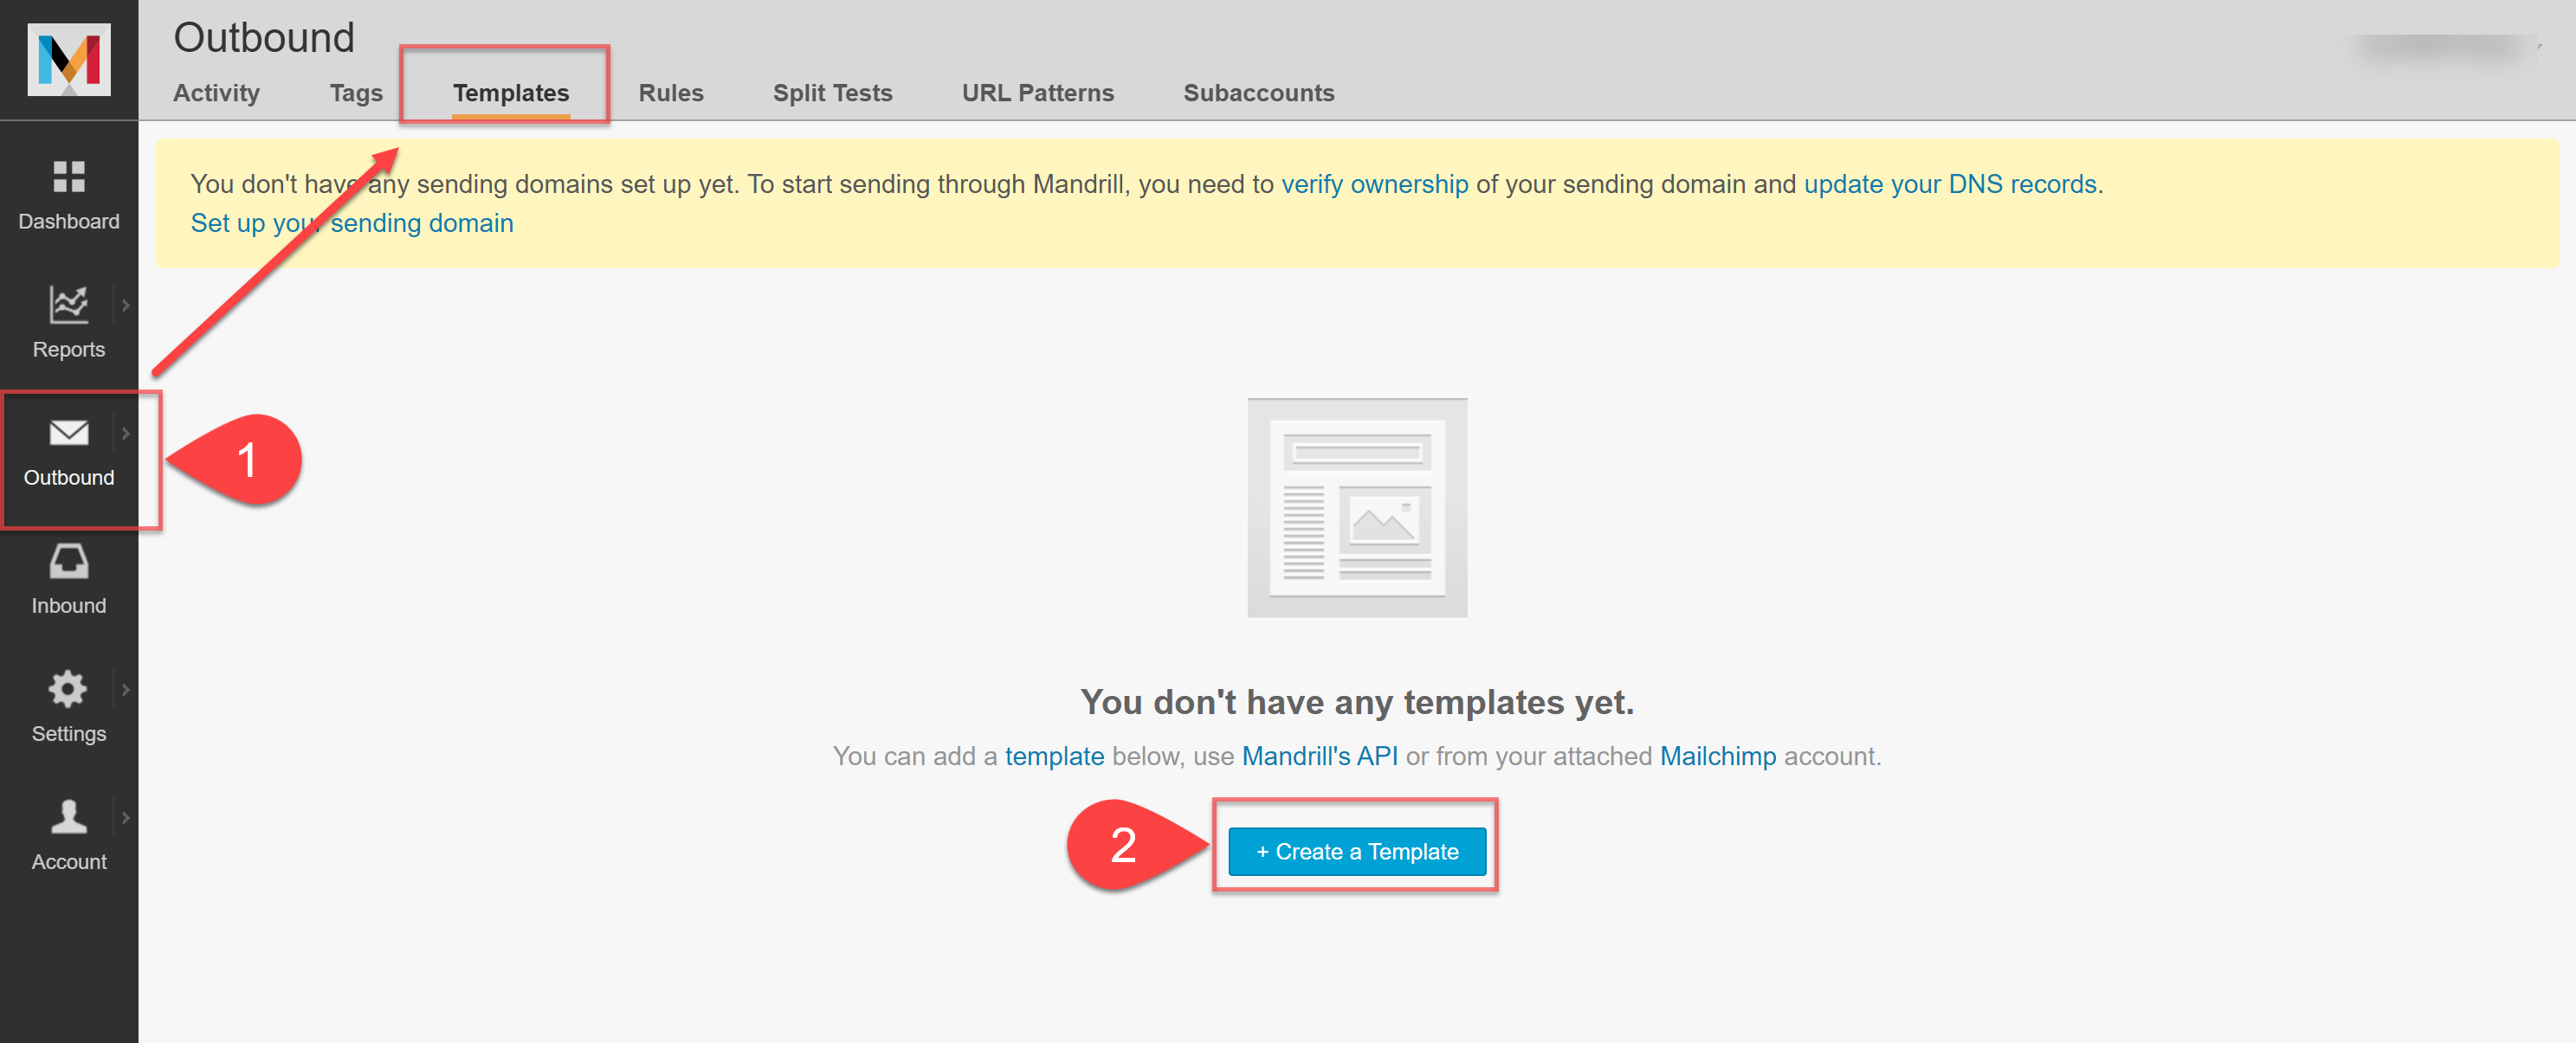
Log in to Mandrill and go to the Dashboard > Outbound > Templates.
-
Click on Create a Template.
-
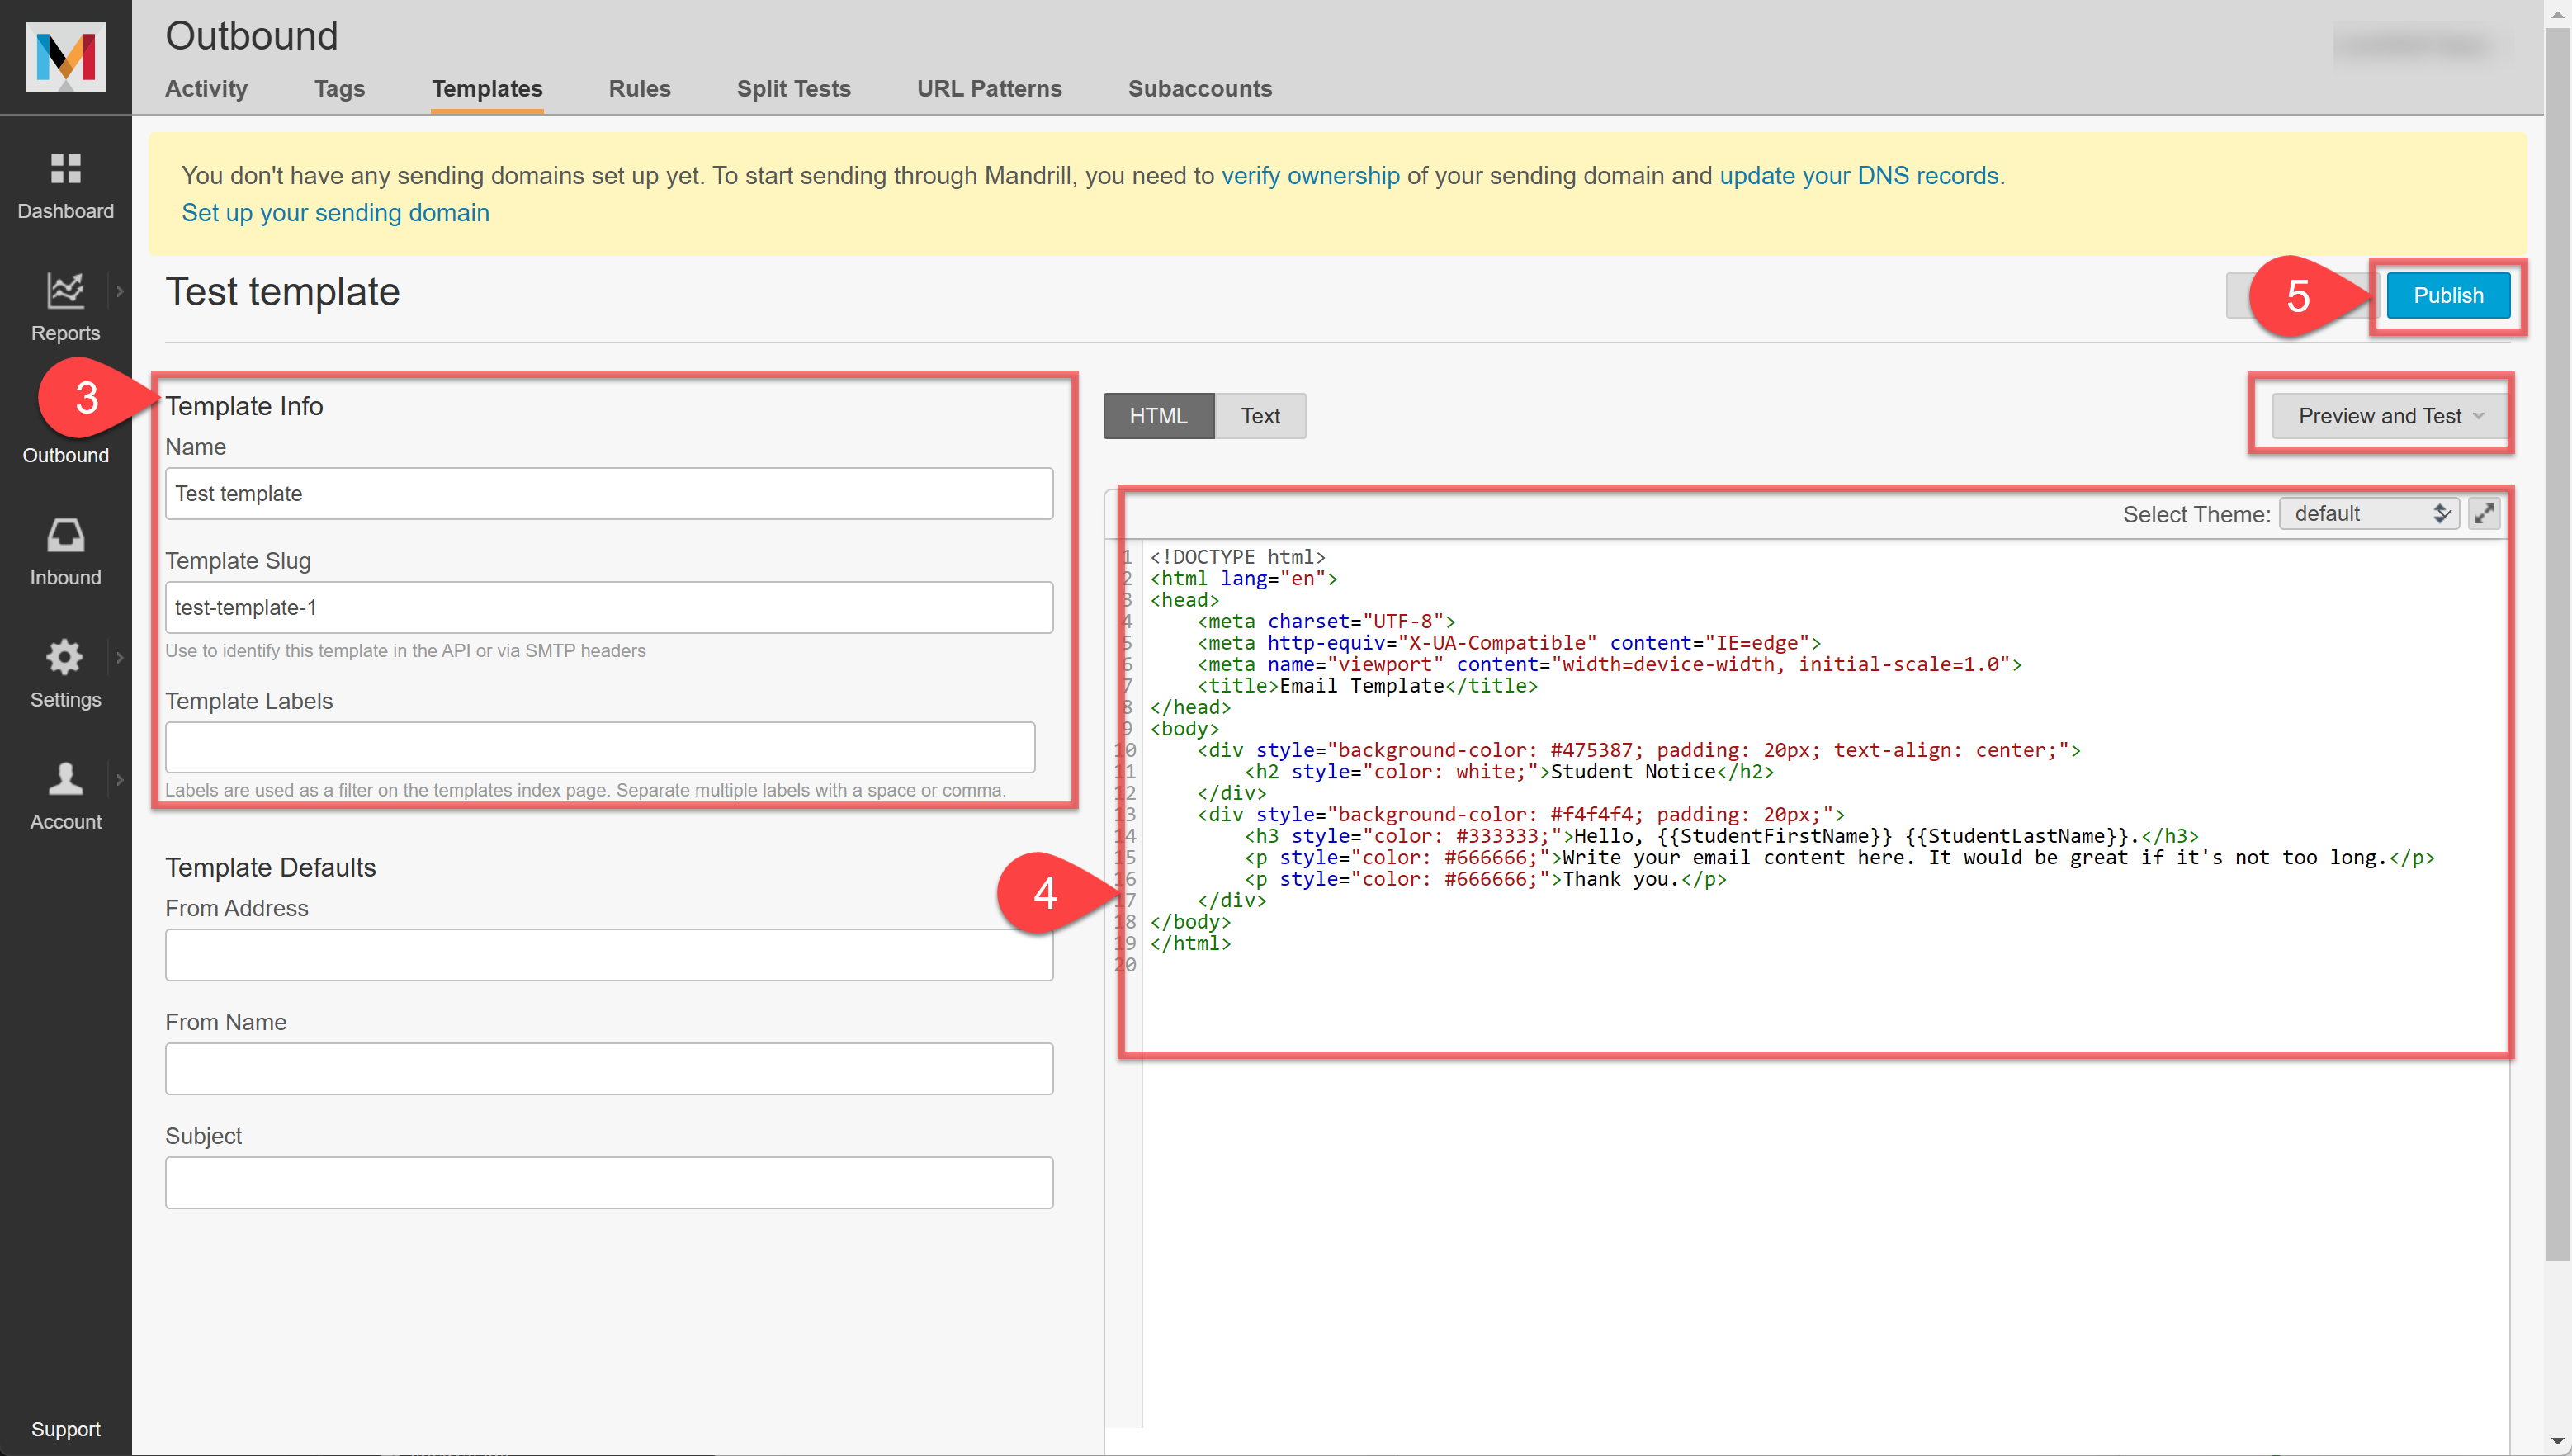
Enter Template Info.
Please write down the Template Slug name for register it in the step 8. -
Provide an email design created with HTML and Bookmarks.
To check which Bookmarks are available, go to Setup Configuration > Email Templates > Objects that you’re creating the template for > New > Template type > Bookmarks.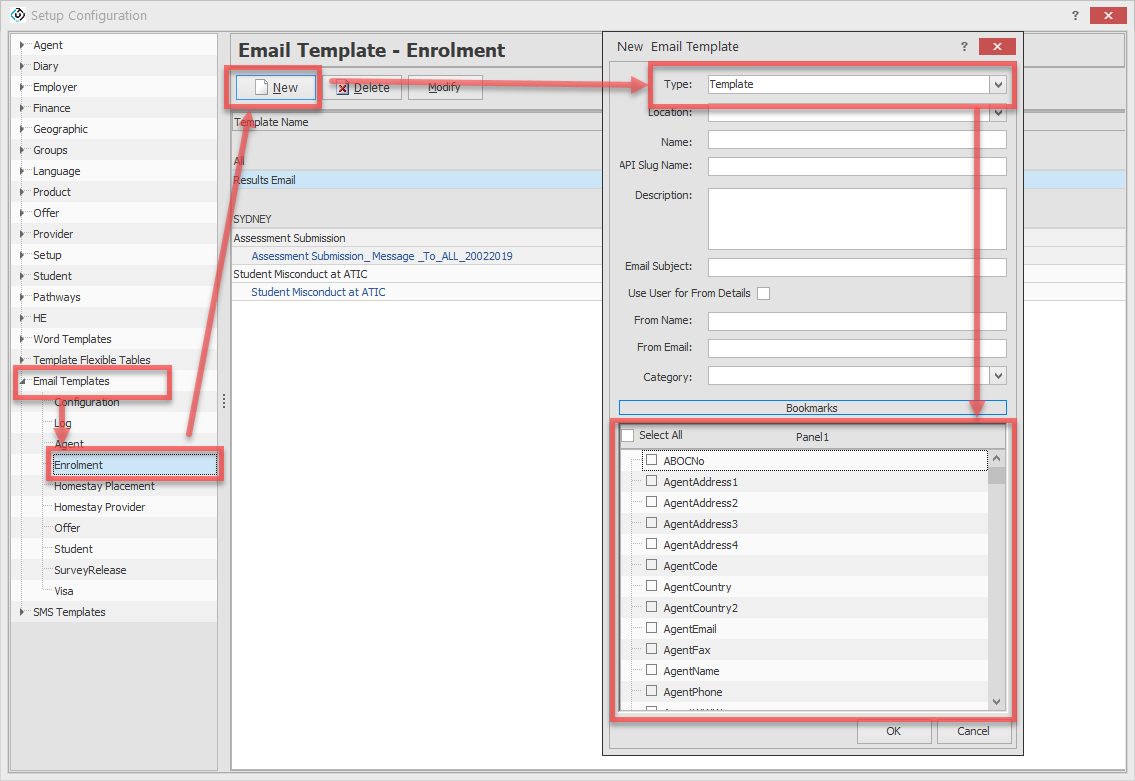
-
To input a bookmark into a template, use two pairs of curly braces {{ }} with the name in the centre.
For example,{{StudentNumber}}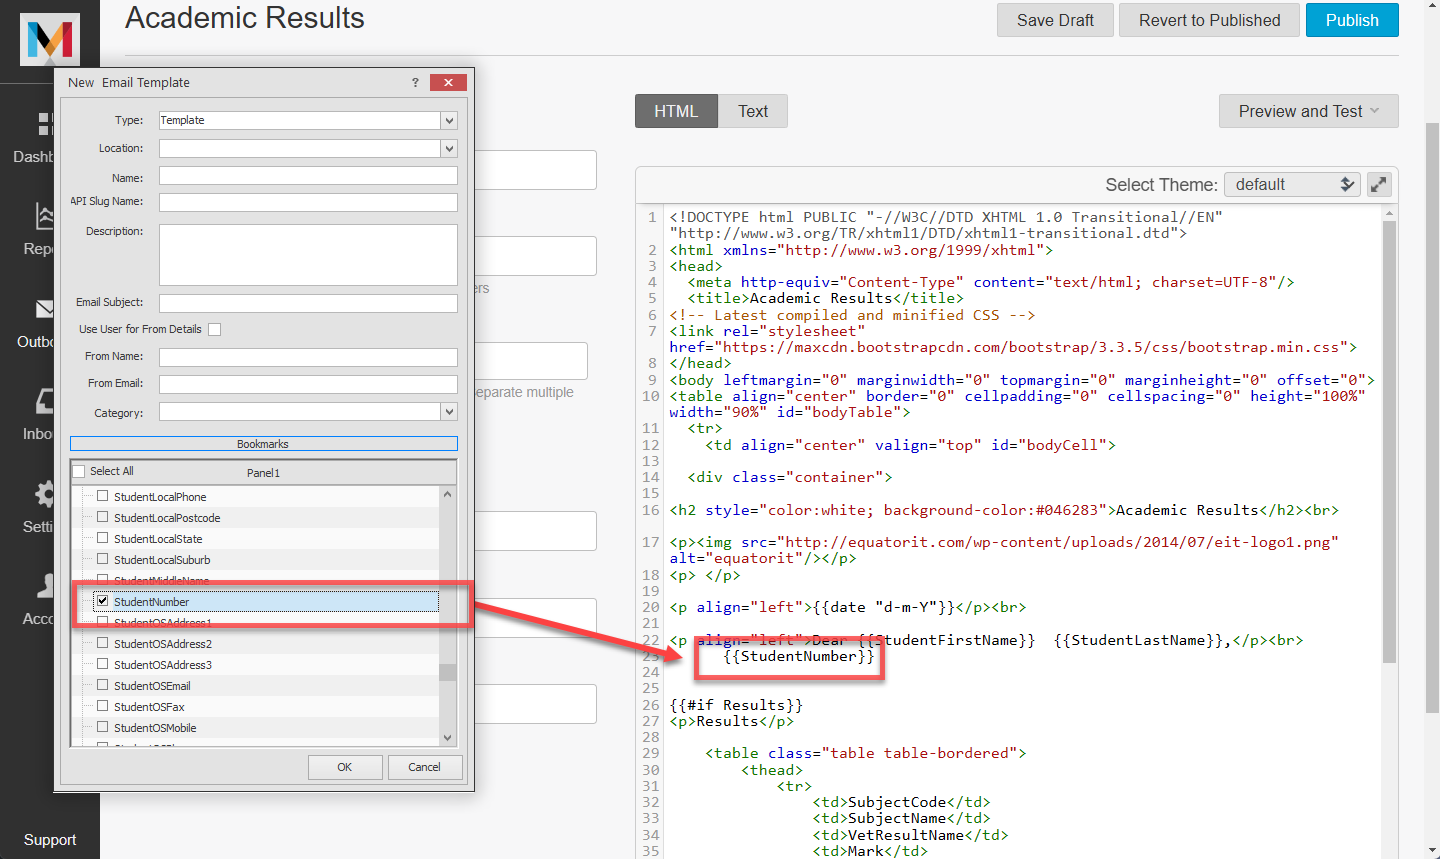
-
To input multiple values iterated through the same bookmark in a table format, define the block section using
{{#each "grid name"}} {{/each}}and input the bookmarks that can be used within that grid in between.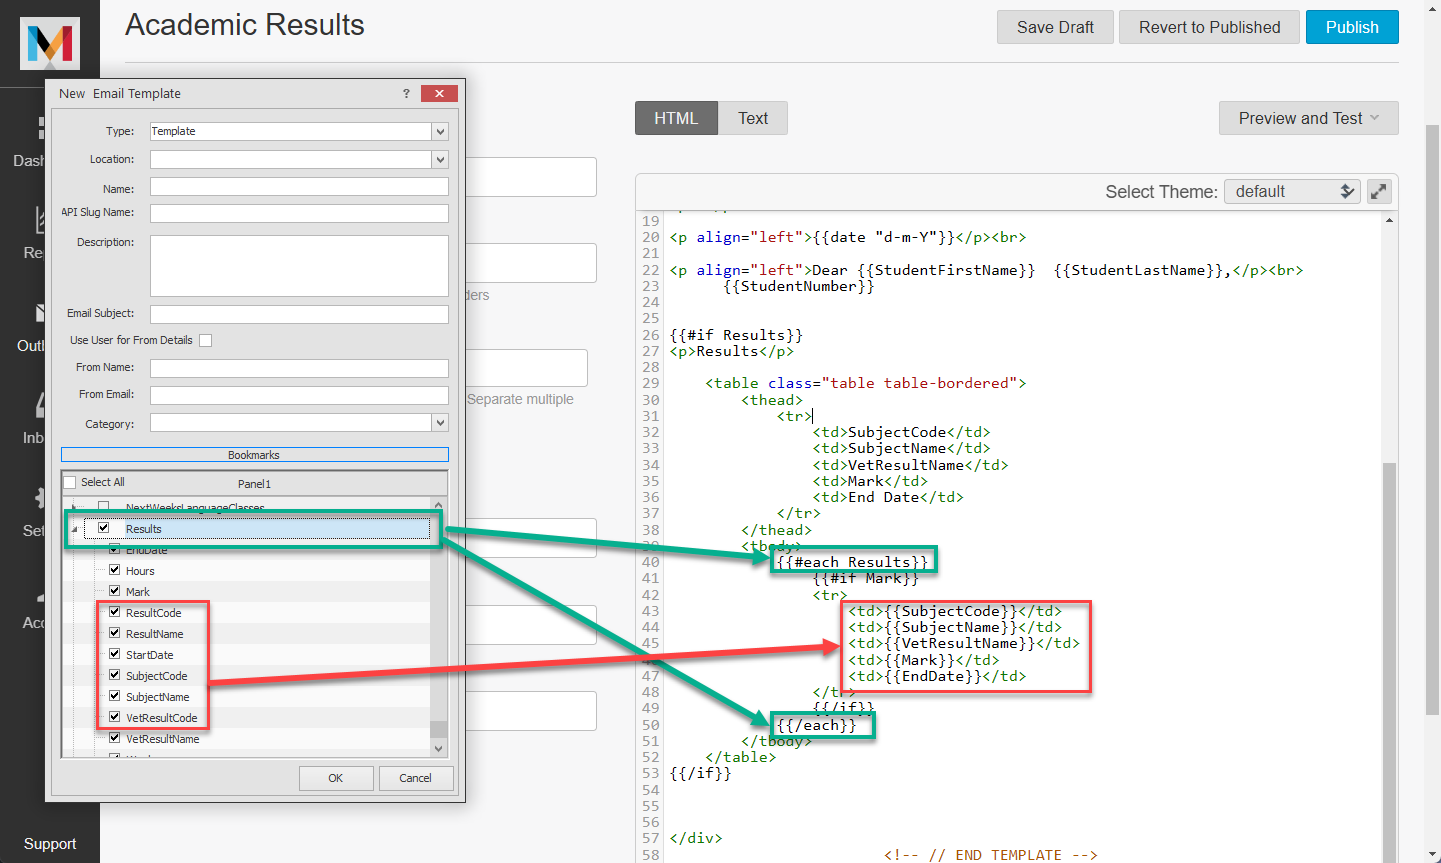
-
Mandrill's templates operate based on Handlebars.
By using Handlebars' built-in helper features, you can create more dynamic and powerful templates such as conditional block.
For more details, please visit to the following link: Mailchimp | Handlebars
-
Click on Publish to save.
-
To reference this template from within eBECAS/EDMISS,
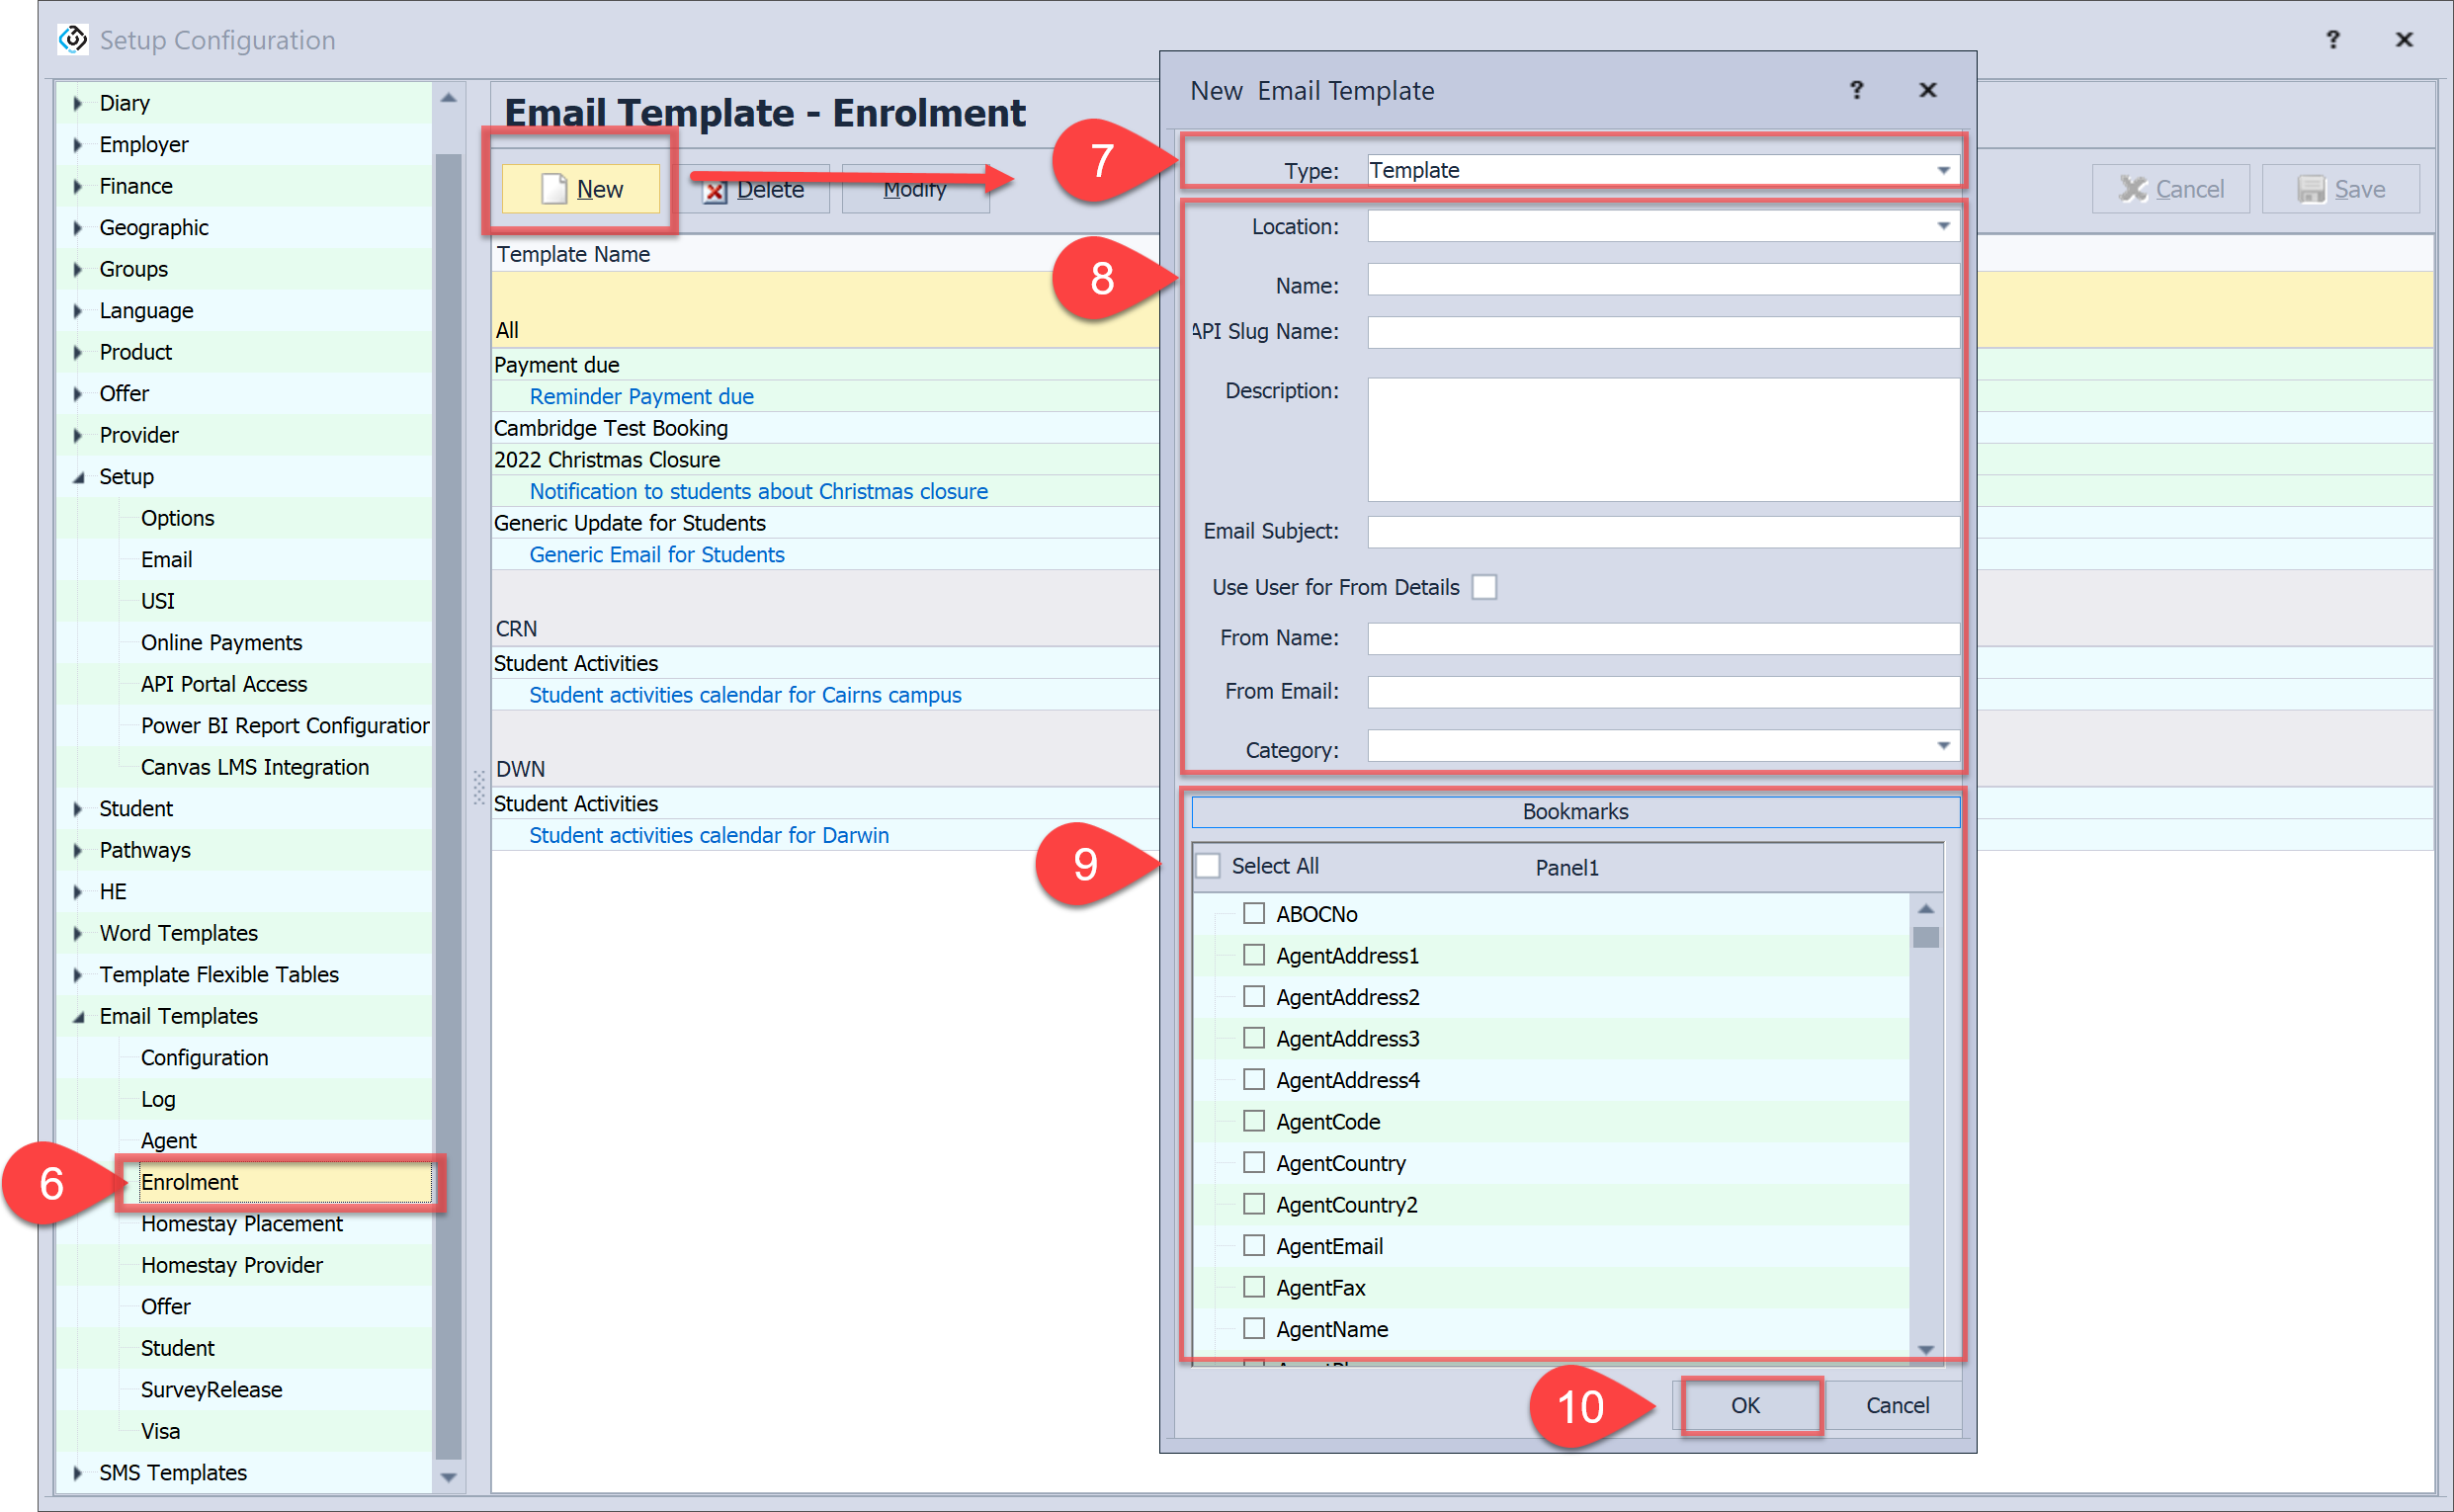
go to Utilities > Setup Configuration > Email Templates > your desired object. -
Click on New and select Template as type.
-
Enter the details for the new template.
-
Location : Specify the location that this template is used on. Leave empty for global location use.
-
Name : Set a name for this template.
-
API Slug Name : Fill the Mandrill API Slug name specified in Mandrill.
-
Description : Set a description for this template.
-
Email Subject : Set the subject of the email to be sent through the template.
-
Use User for From Details : Select it to automatically use the current user's name and email address as the sender's name and email address for the email to be sent through the template.
-
From Name : Set the sender's name for the email to be sent through the template. This field will be disabled if you use the User for From Details option.
-
From Email : Set the sender's email address for the email to be sent through the template. This field will be disabled if you use the User for From Details option.
-
Category : Set the default category for the email to be sent through the template.
-
-
Select the bookmarks that used in the HTML template in Mandrill.
Please avoid selecting all as the retrieved data can be extensive.
Mandrill may fail to work if too much data is provided for each email.
-
Click on OK to save it.
Send Emails
Send Single Email
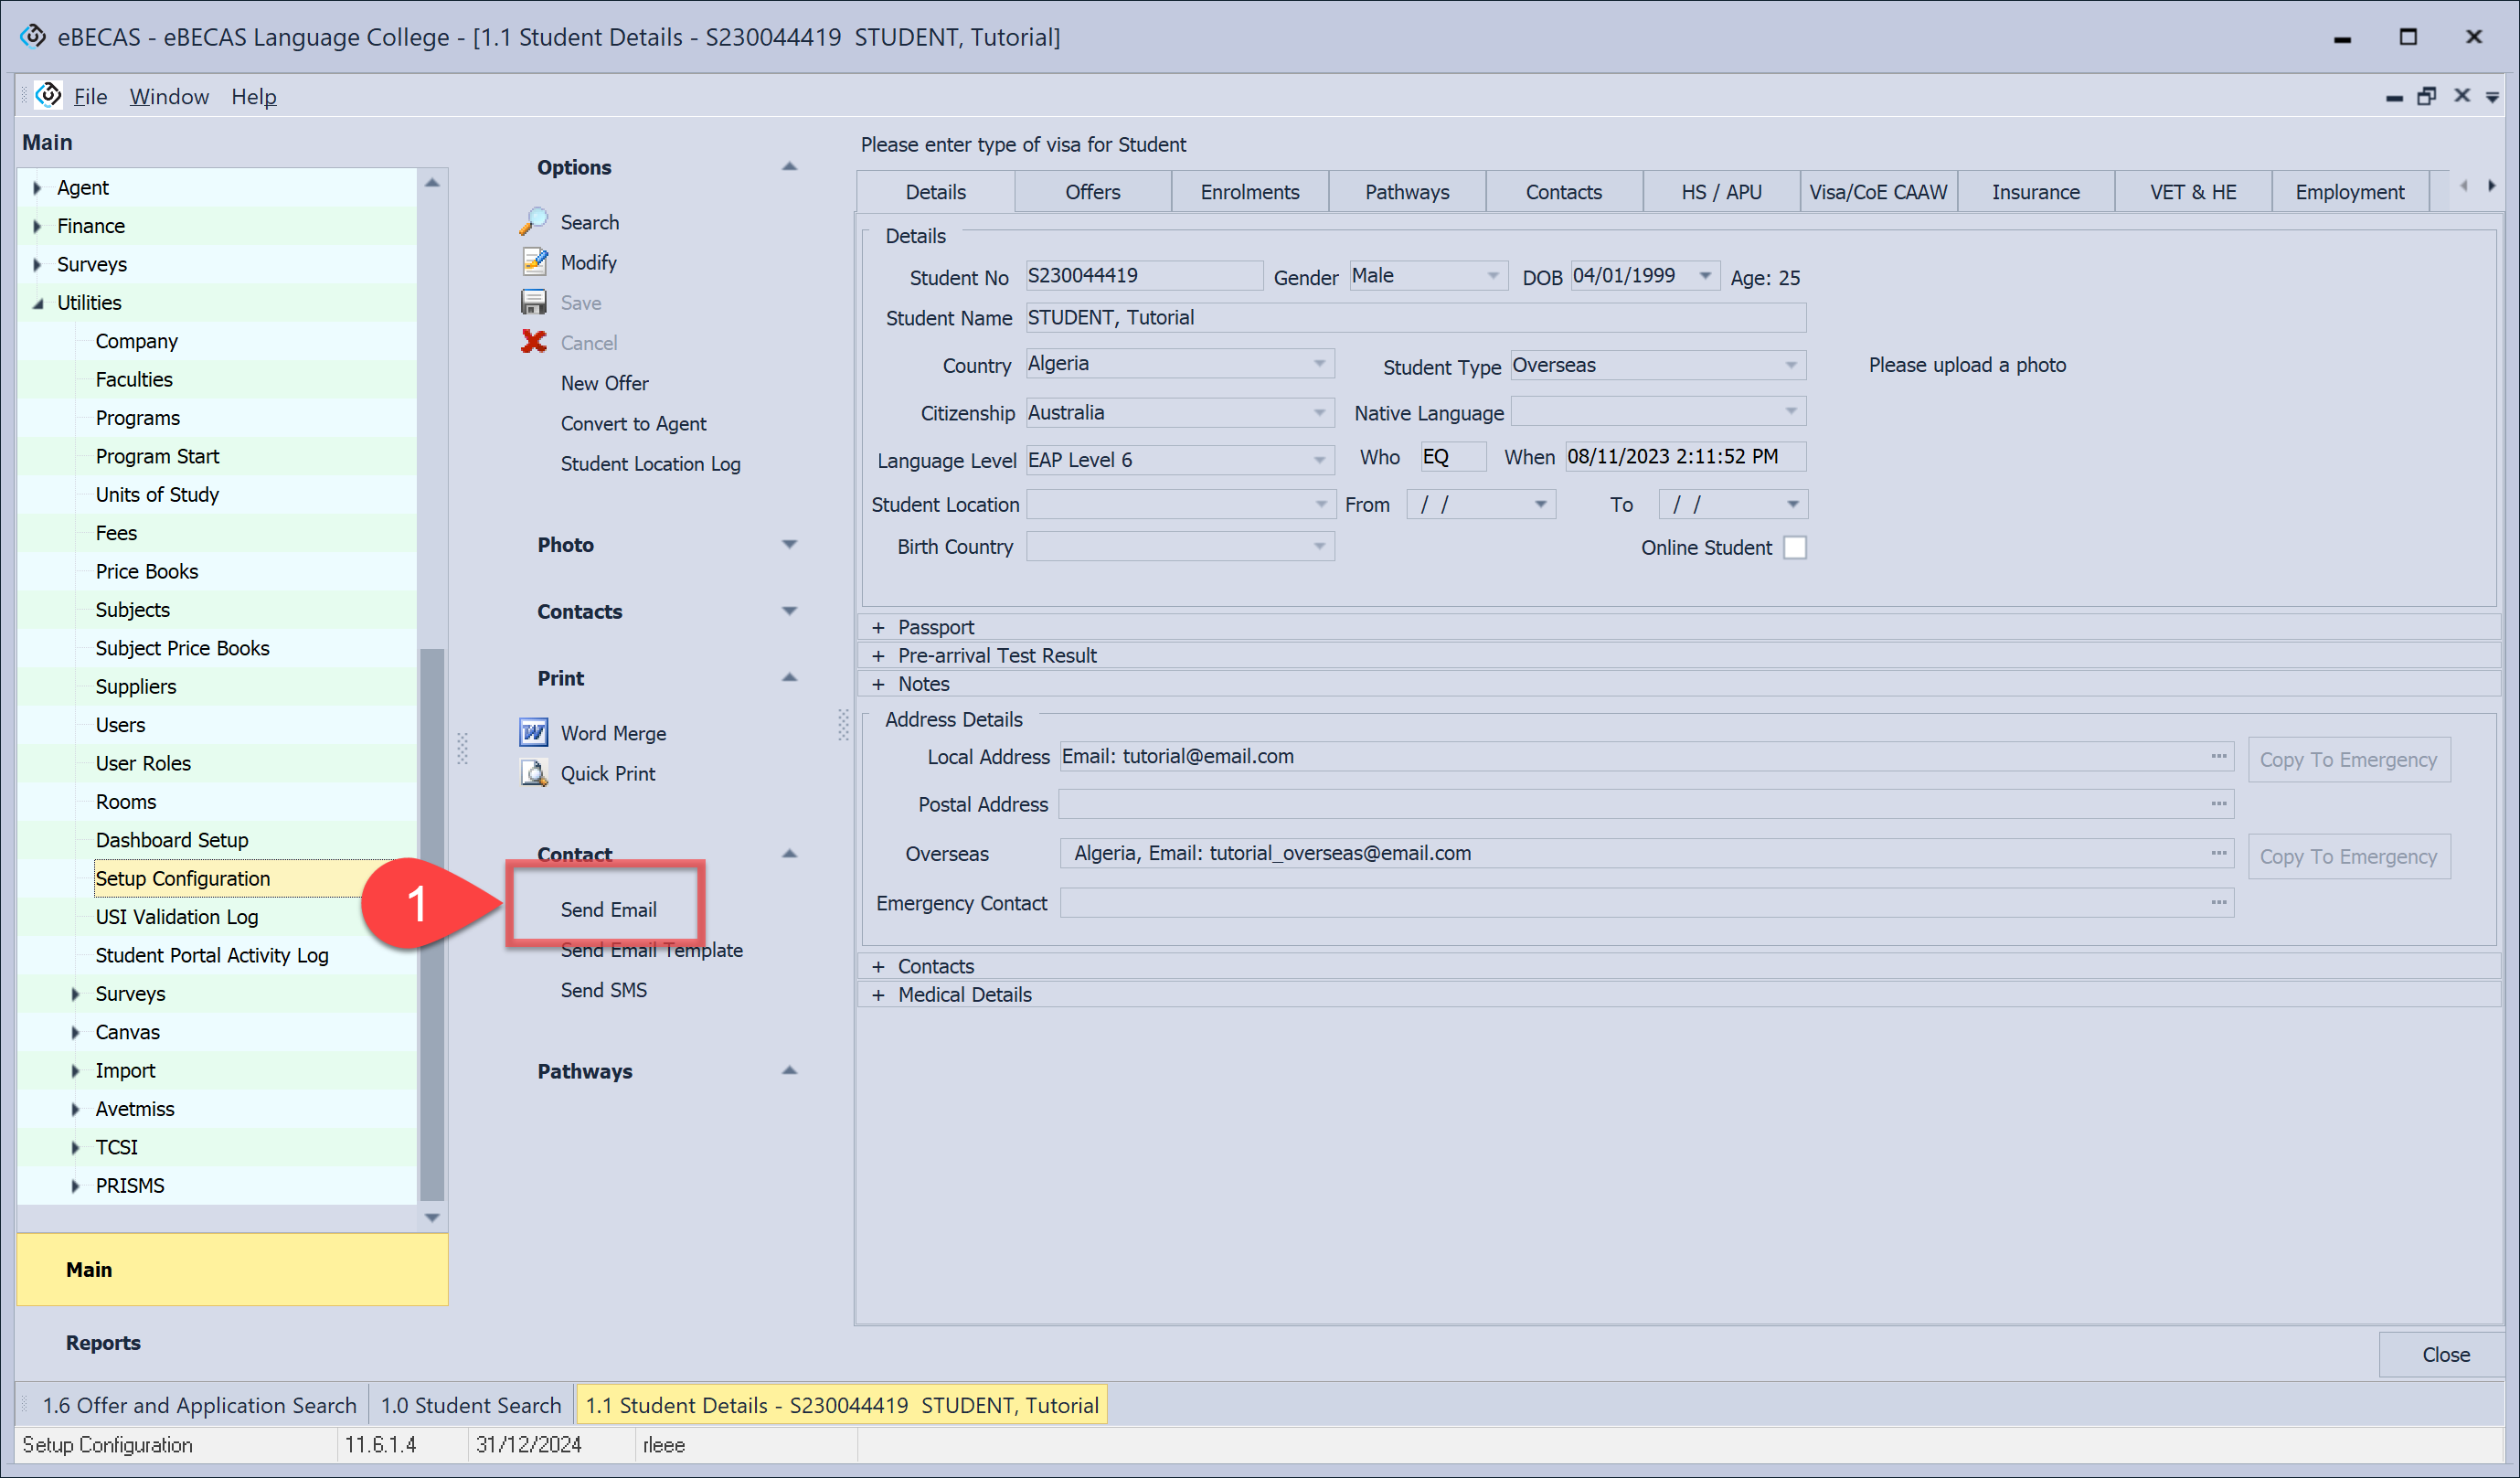
Single Emails can be sent to a student, agent or homestay provider from the details page. For example from the student details page, follow the below steps:
-
Click on Send Email in the side menu.
-
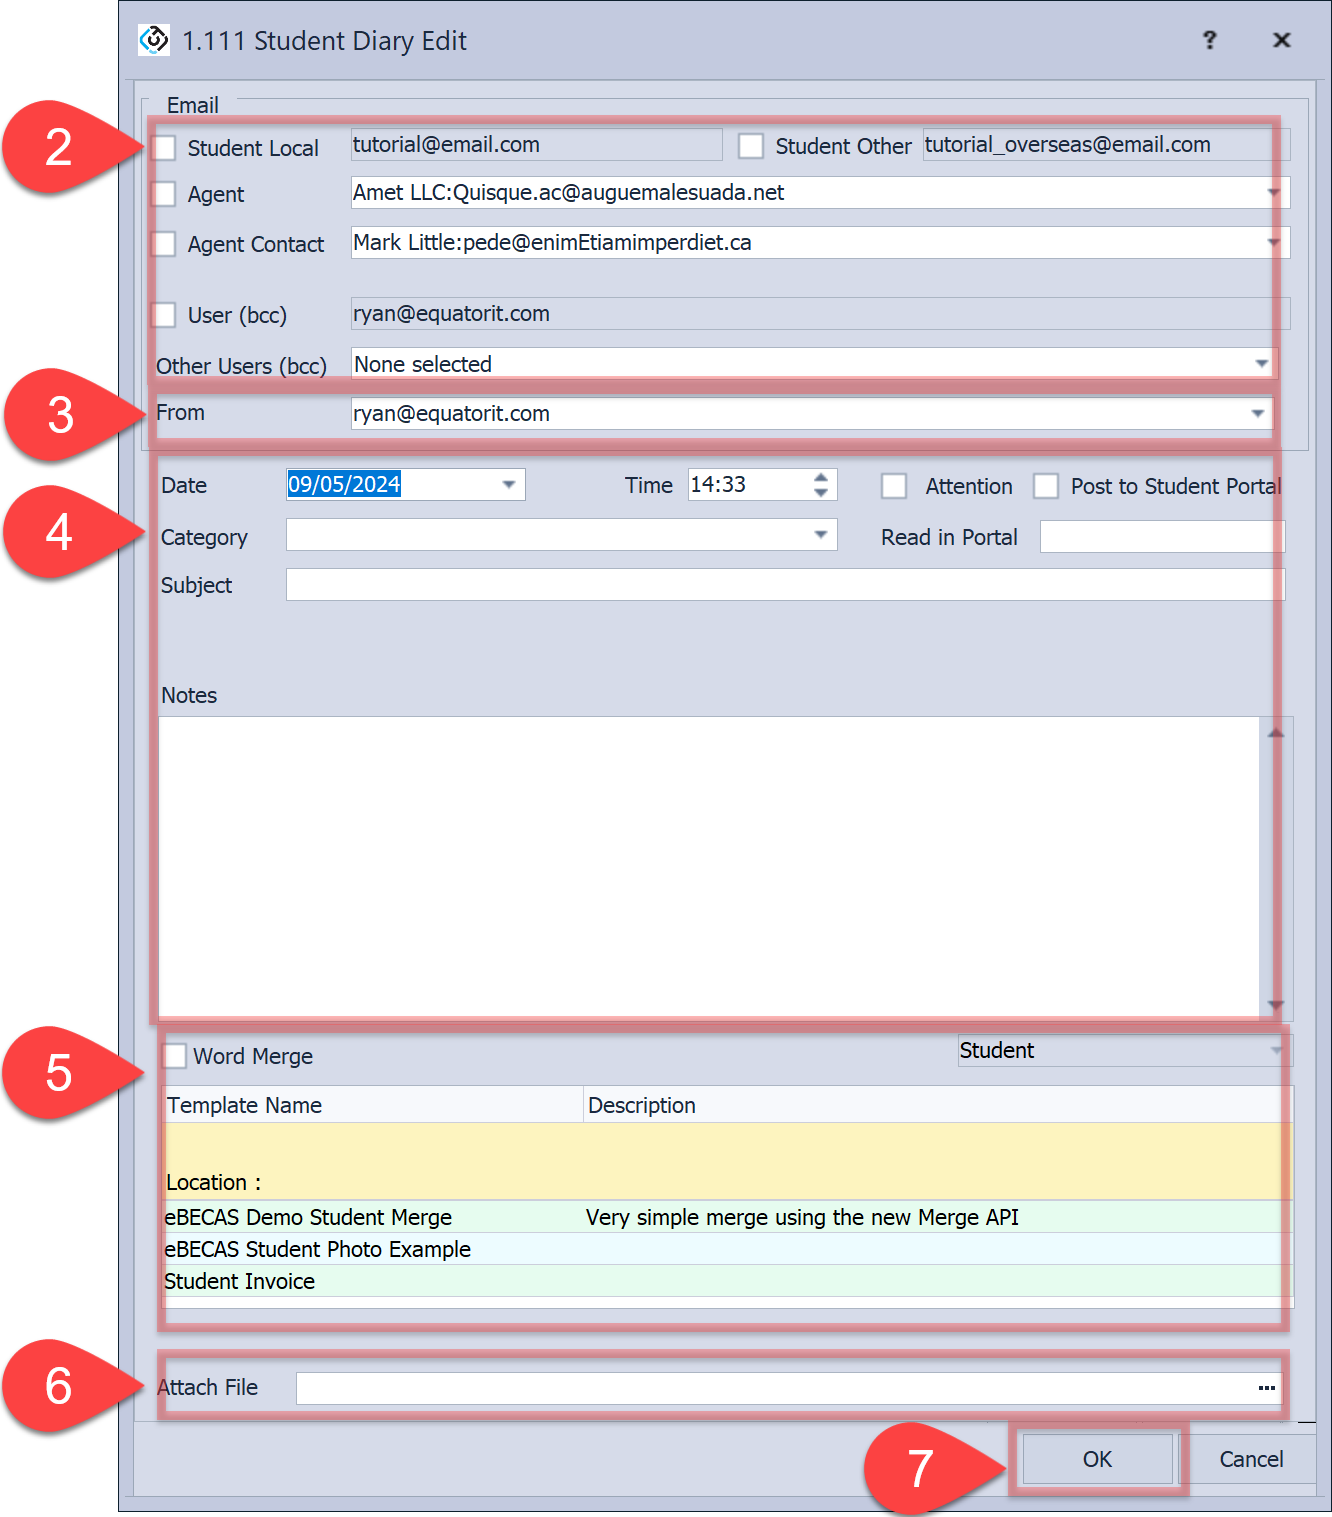
Select recipients' email addresses to receive the email:
-
Local Student email address, Other Student email address
-
The Student’s agent’s general email, the agent’s nominated counsellor
-
An internal College eBECAS/EDMISS user blind copy address
-
Any other blind copy email address
-
-
Select sender’s email address.
-
Set options for this email.
-
Date: The sent email will be logged in the student diary, and the Date and Time will automatically be set as the sent date. If the entry is about an event in the past or is intended as a future reminder, change the date/time to the desired date.
-
Post to Student Portal STUDENT OBJECT ONLY Check this option to publish this email to the student portal. Students can receive and read this through the student portal.
-
Category: You can choose the category for classifying this email.
-
Subject: Set the subject for the email.
-
Notes: Enter the content for the email.
-
-
(Optional) Select a registered Word Merge template in this area to attach a pdf generated from a Microsoft Word Template in the email.
-
(Optional) Attach a separate file using the Attach File option.
-
Click on OK to send the email.
-
Details are logged in the Contact/Diary for each student or agent or homestay provider.
Send Bulk Emails
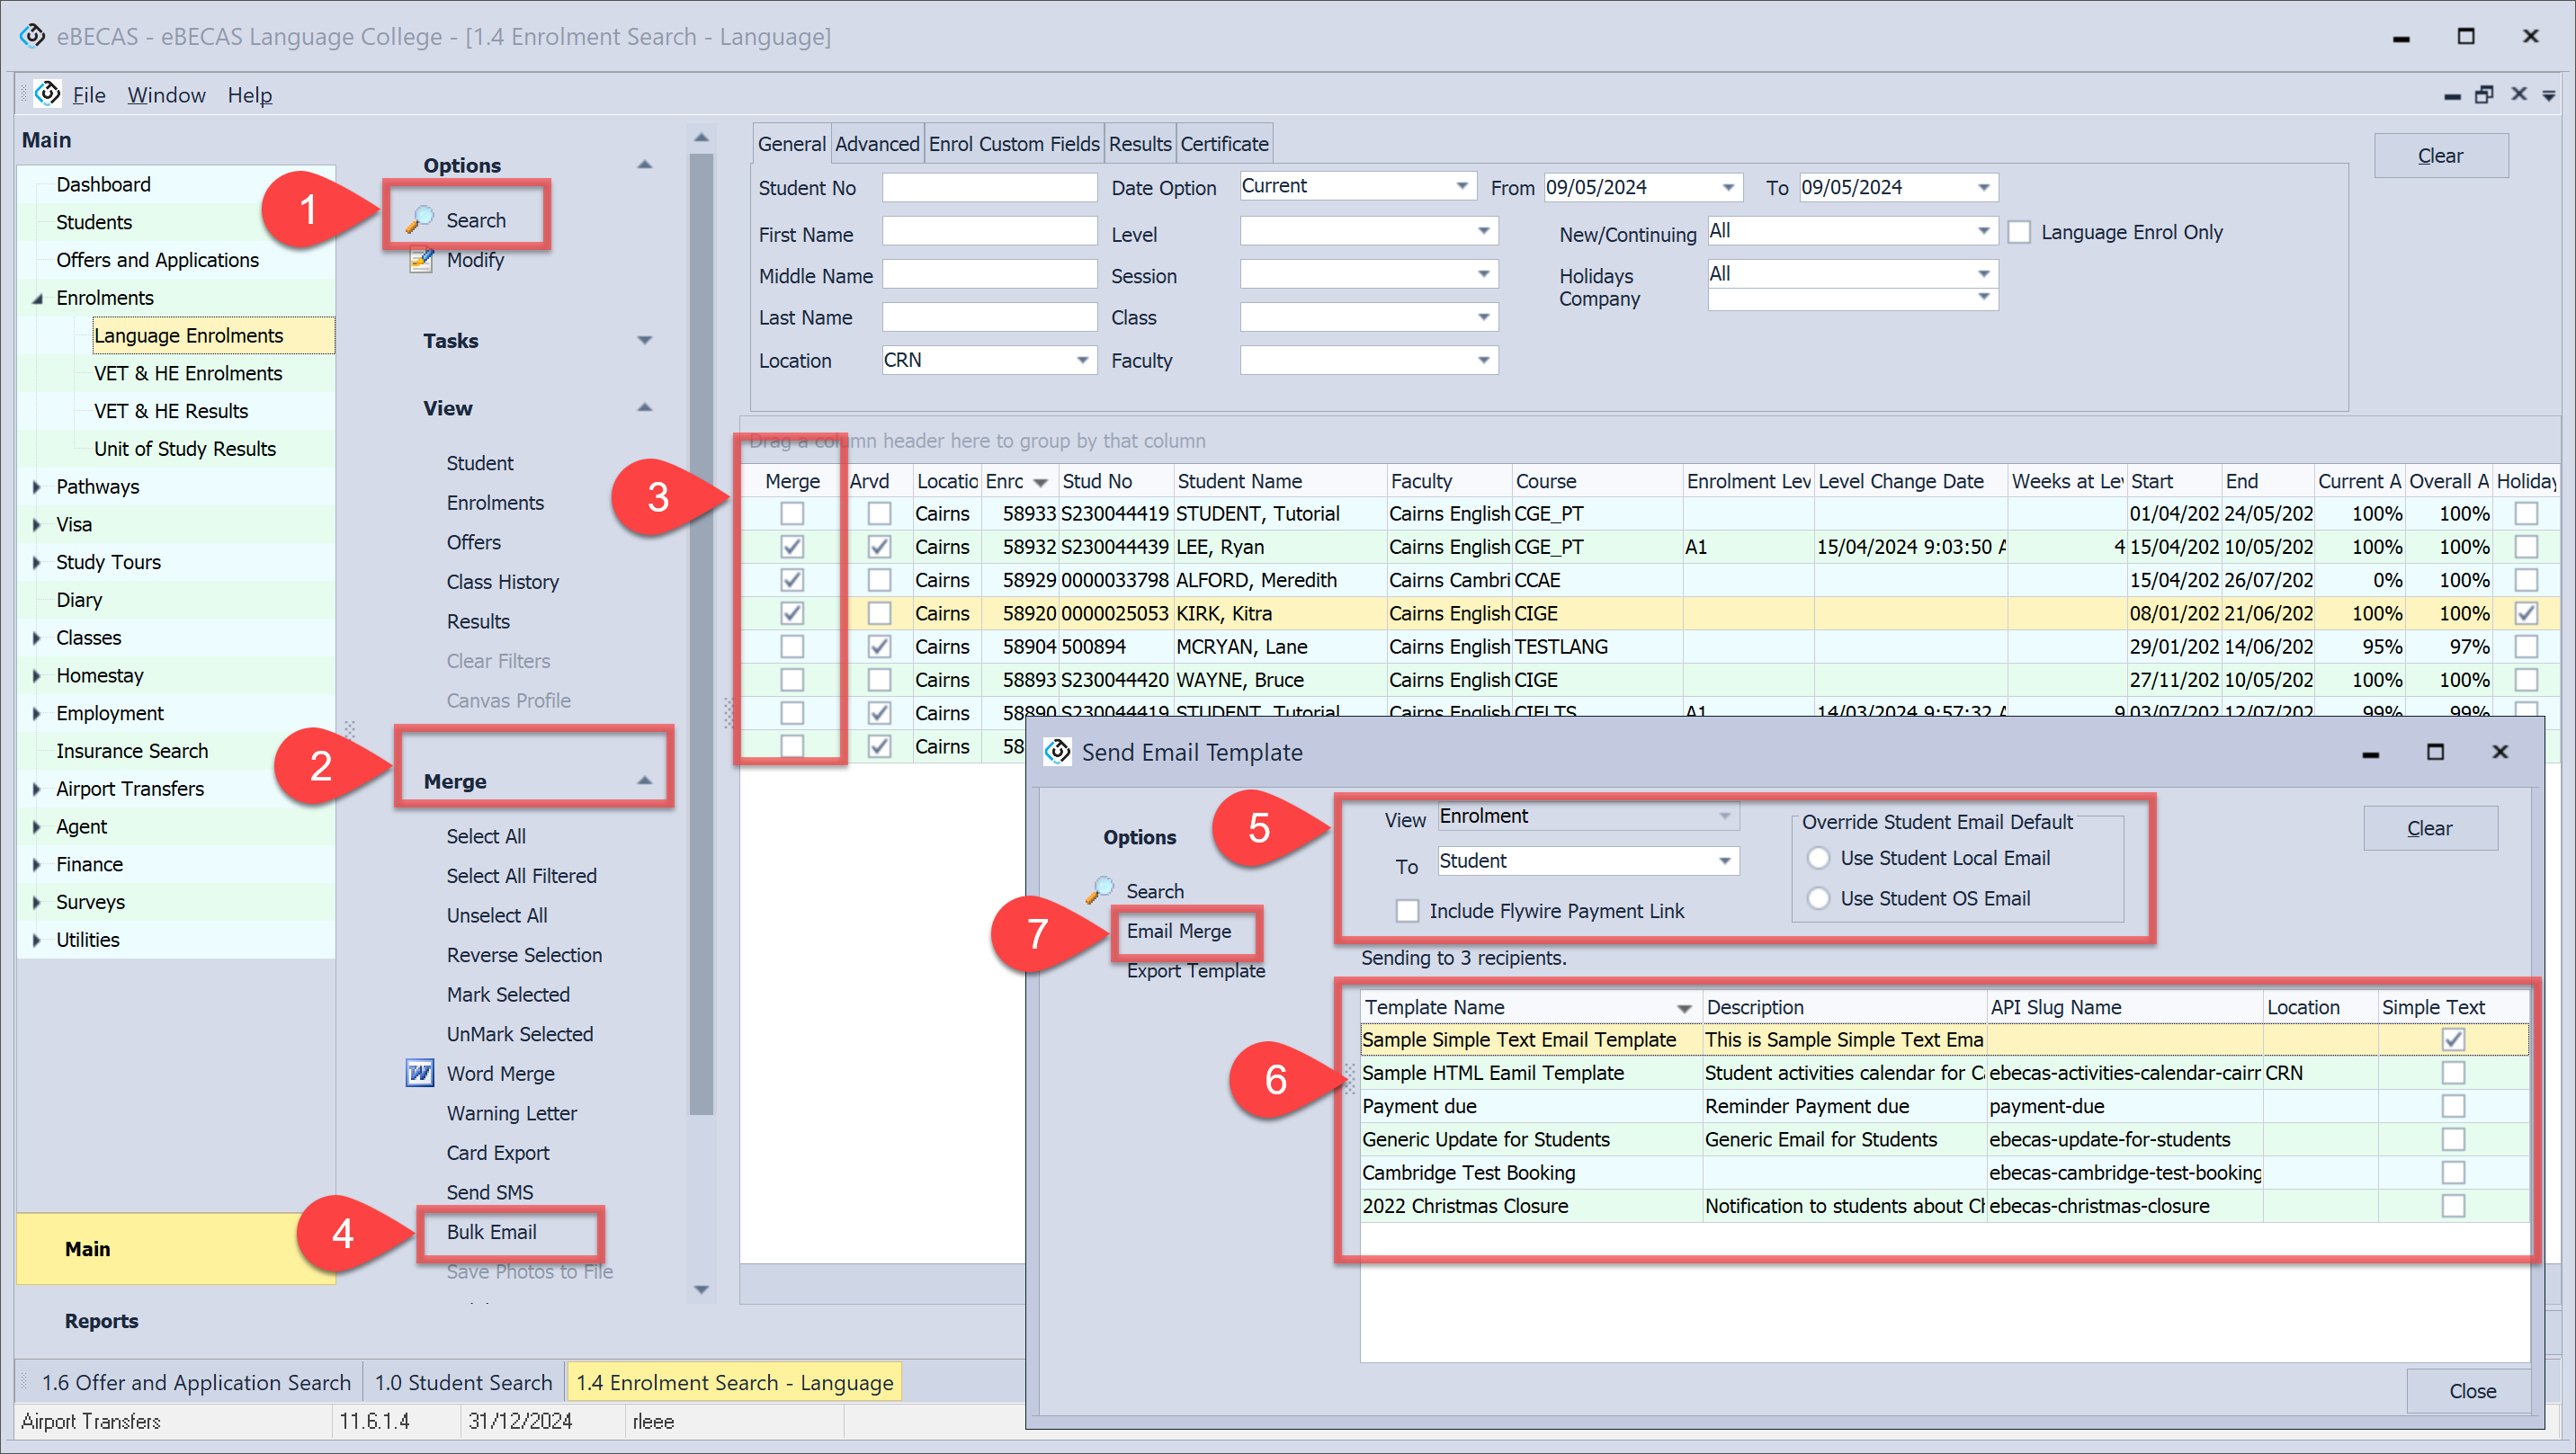
-
Go to the search window of the desired object and search for the records you wish to send emails to.
-
Click on Merge in the side menu, and the Merge column is displayed on the grid.
-
Select the records you want to send the email to (you can filter the grid by any field – right click the column title bar)
-
Click on Bulk Email in Merge menu.
-
Select options for this email.
-
Message To: Select the recipient for this email. The type of recipient varies depending on the object.
-
Include Flywire Payment Link ENROLMENT OBJECT ONLY : Select this option if you want to include payment link into the email through the payment link bookmark.
-
Override Student Email Default: Choose the recipient’s default email address for receiving this email.
-
-
Select a Email template for this email.
-
Click on Email Merge to send it.
-
Details are logged in the Contact/Diary for each student or agent or homestay provider.