Views
Views are a powerful feature that lets you personalise how you view and interact with Data Grids.
In simple words, a View is a saved configuration of a Grid.
When using the Grids, you will customise it with different columns, columns orders, filters, and sorting. As you do not want to do this process over and over again, you can save the configuration as a View, so when you come back and want to see the same grid, you just need to load the View.
Example
Let’s explore a quick example with Maria, a Recruitment manager for Spain. As part of her role, Maria needs to easily view the Offers that are not converted yet for students from Spain. To achieve this, Maria uses the Offers Grid and add the relevant columns and filters to get the records she needs. As Maria frequently needs access to this filtered data set, she saves the configuration of the Grid in a View, let’s call it ‘Spain Unconverted Offers’ . Now, every time Maria needs to see this data set, she does not need to do go through the Grid configuration process again, she only needs to select the View to load the configuration for the Grid that she saved.
Overview
While all Views have the same structure, the available options vary based on the View's context. For instance, the options for Students differ from those for the Offer.
Also, it is important to note that Views are specific to individual users and at this stage, they cannot be shared with other users.
Views have two sections: a Header and and Grid.
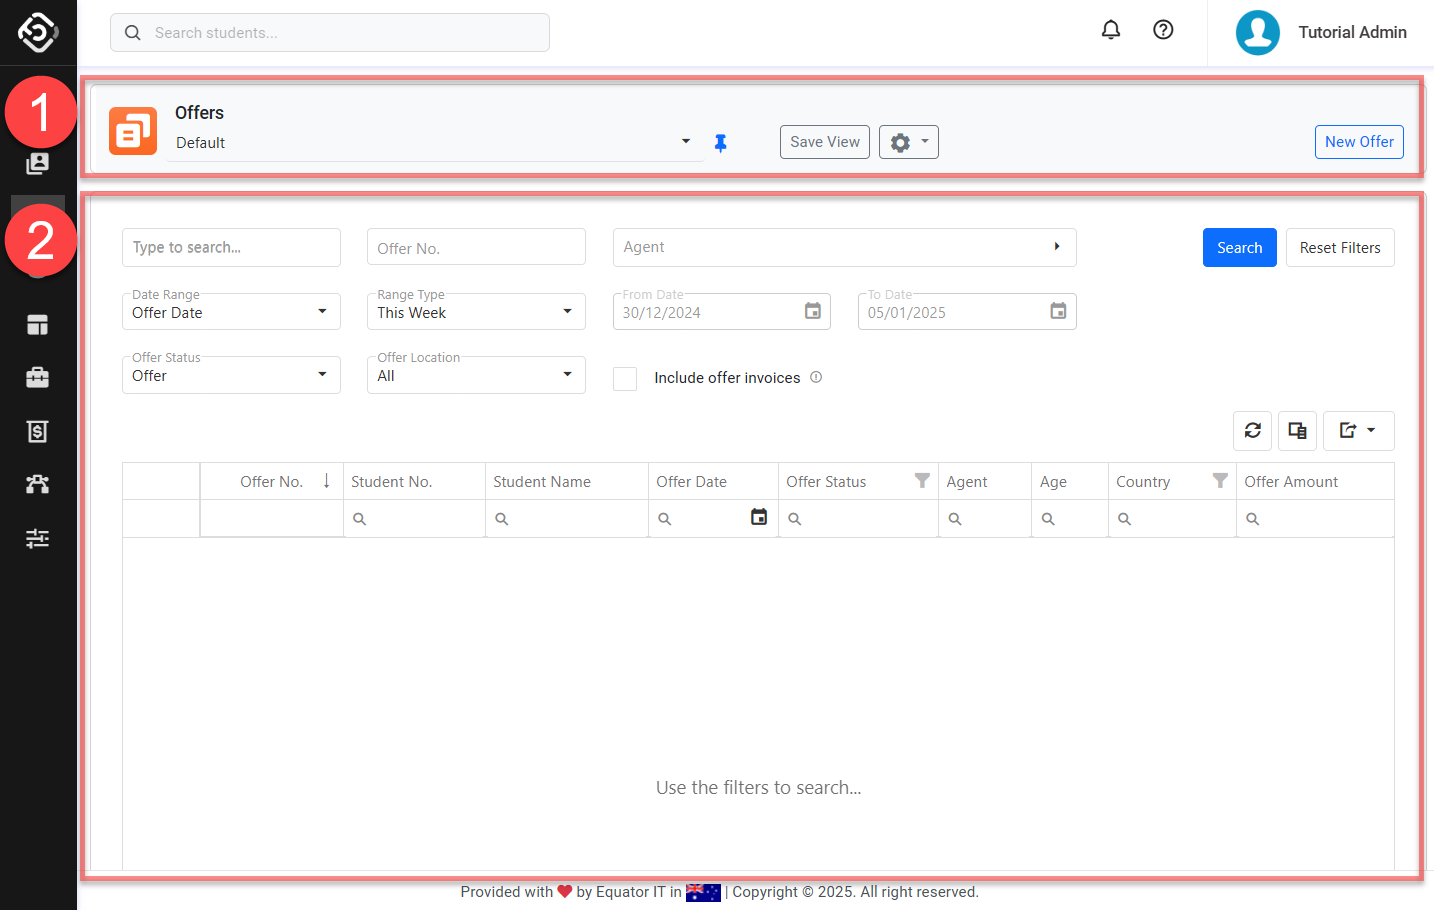
Header:
From the Header you can manage the Views and also take some actions.
[Example] Offers View Header
View List: A collection of available Views in the current object.
Pinned: It represents that the current view is pinned or set as a default view.
Save View: The button to save the configuration of the current view.
View Action: Click to open a collection of actions available for the Views.
Action Buttons: A group of buttons to take some actions.
Data Grid: See more details about Grids here.
Create a New View
The number of Views that can be created depends on your subscription plan. Contact your system administrator for details.
Every user starts with the Default View. You can modify this view and save it as a new View, or create a completely new View from scratch with your own preferred settings.
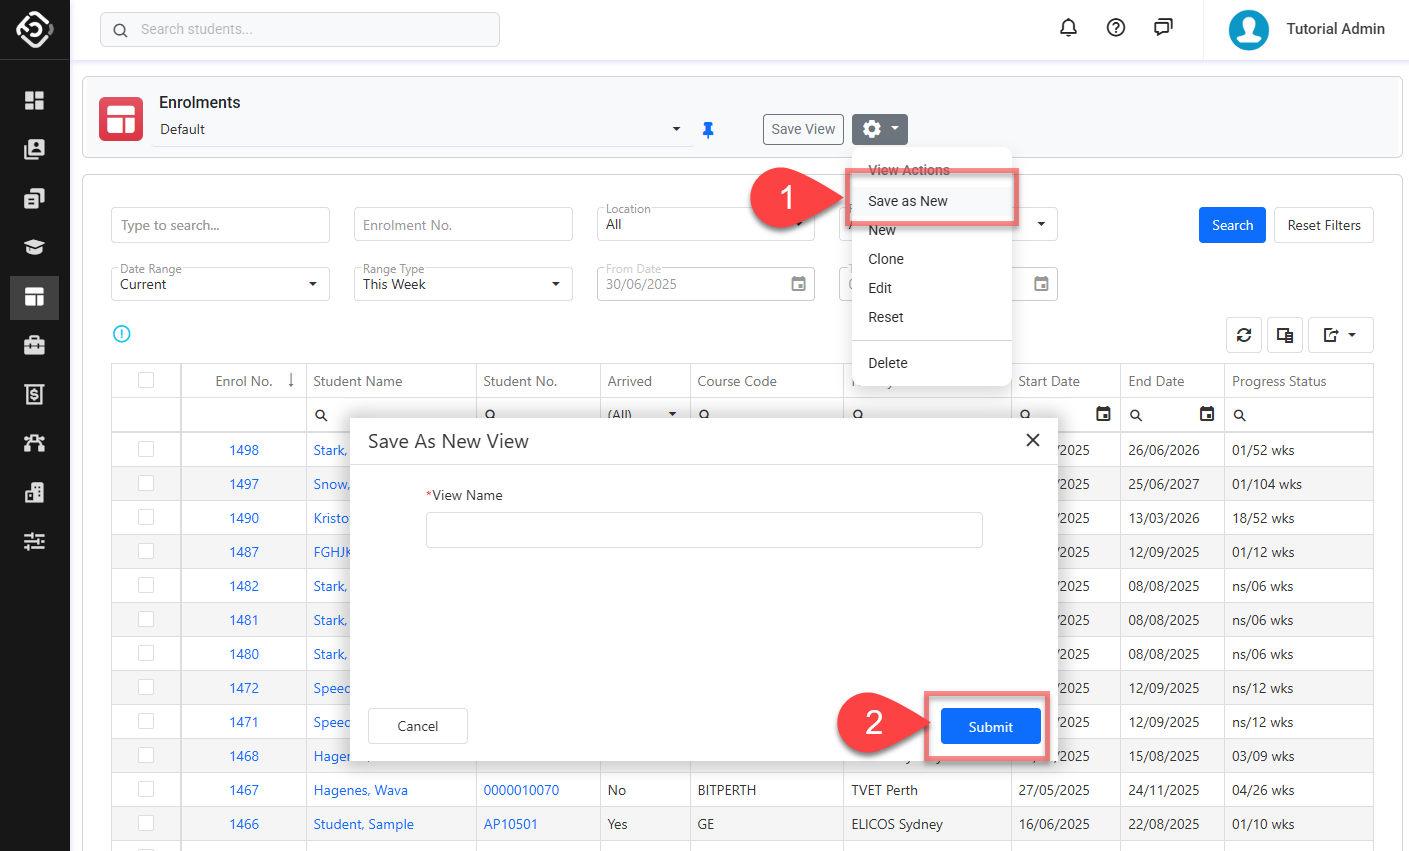
Save the Current View as New View
The easiest way to create a new View is by saving your current view— including filters, columns, and sorting — exactly as it is.
Use this when you've made changes to an existing view and want to keep those changes under a new name.
To use Save as New View:
Adjust the current view as needed (e.g., filters, columns, sorting).
Click the View Action button > Save as New.
Enter a name for your new view and click Submit.
Manually Create a New View
If you prefer to build a View from scratch, you can manually create a new one and set up your own filters, columns, and sorting options.
This method is useful when you want full control over how the data is displayed, rather than basing it on an existing View.
Click on the View Action button > New.
Enter the View Name and click Submit.
A new view will be created.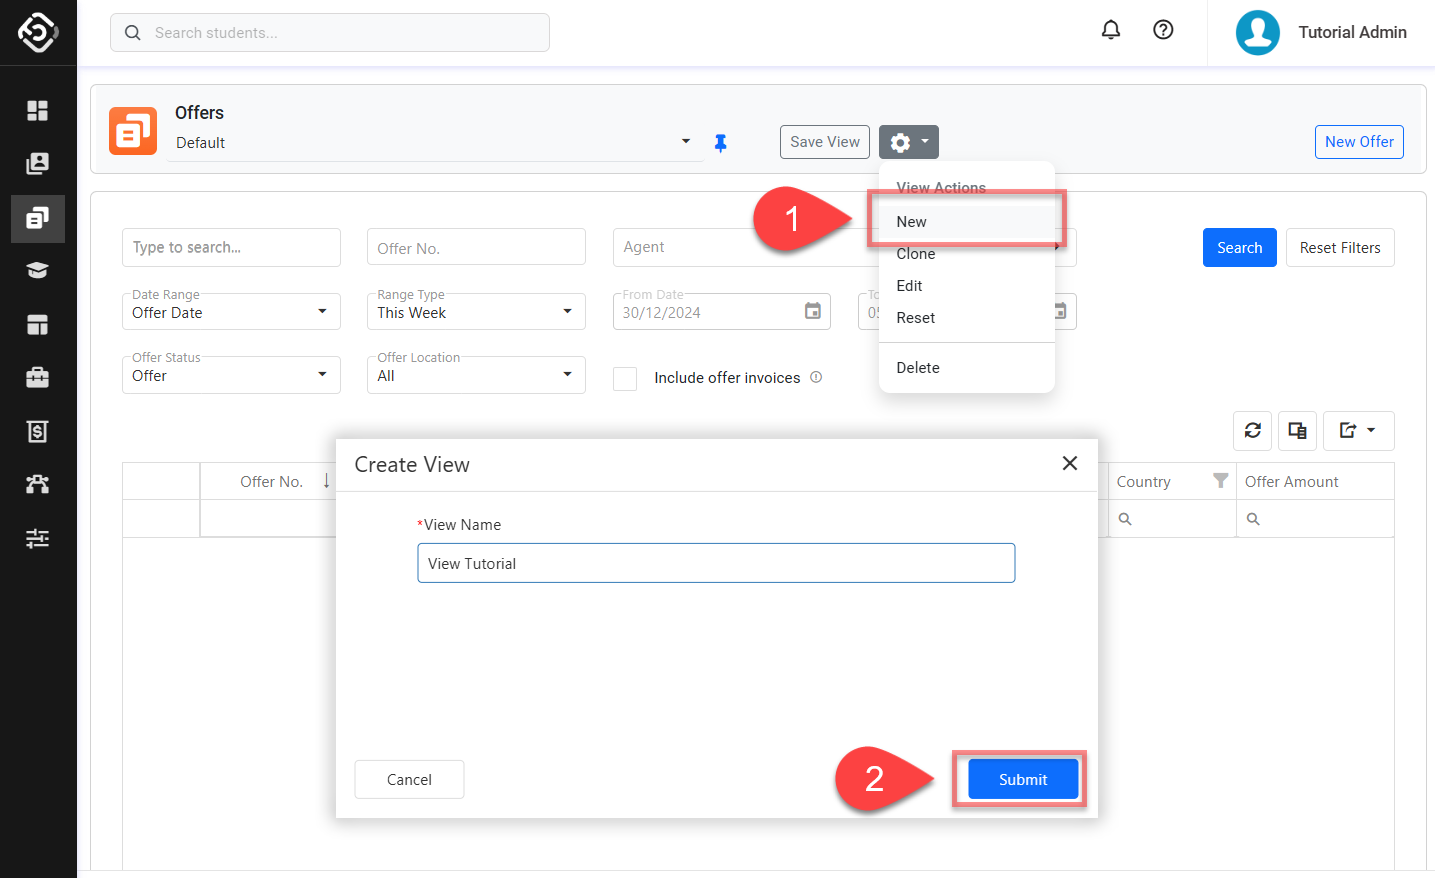
Customise a View
Select the view that you’d like to customize from the Views available.
Click on the View Actions button and click on Edit.
Update the View Name and click Submit.
The name of the view will be updated.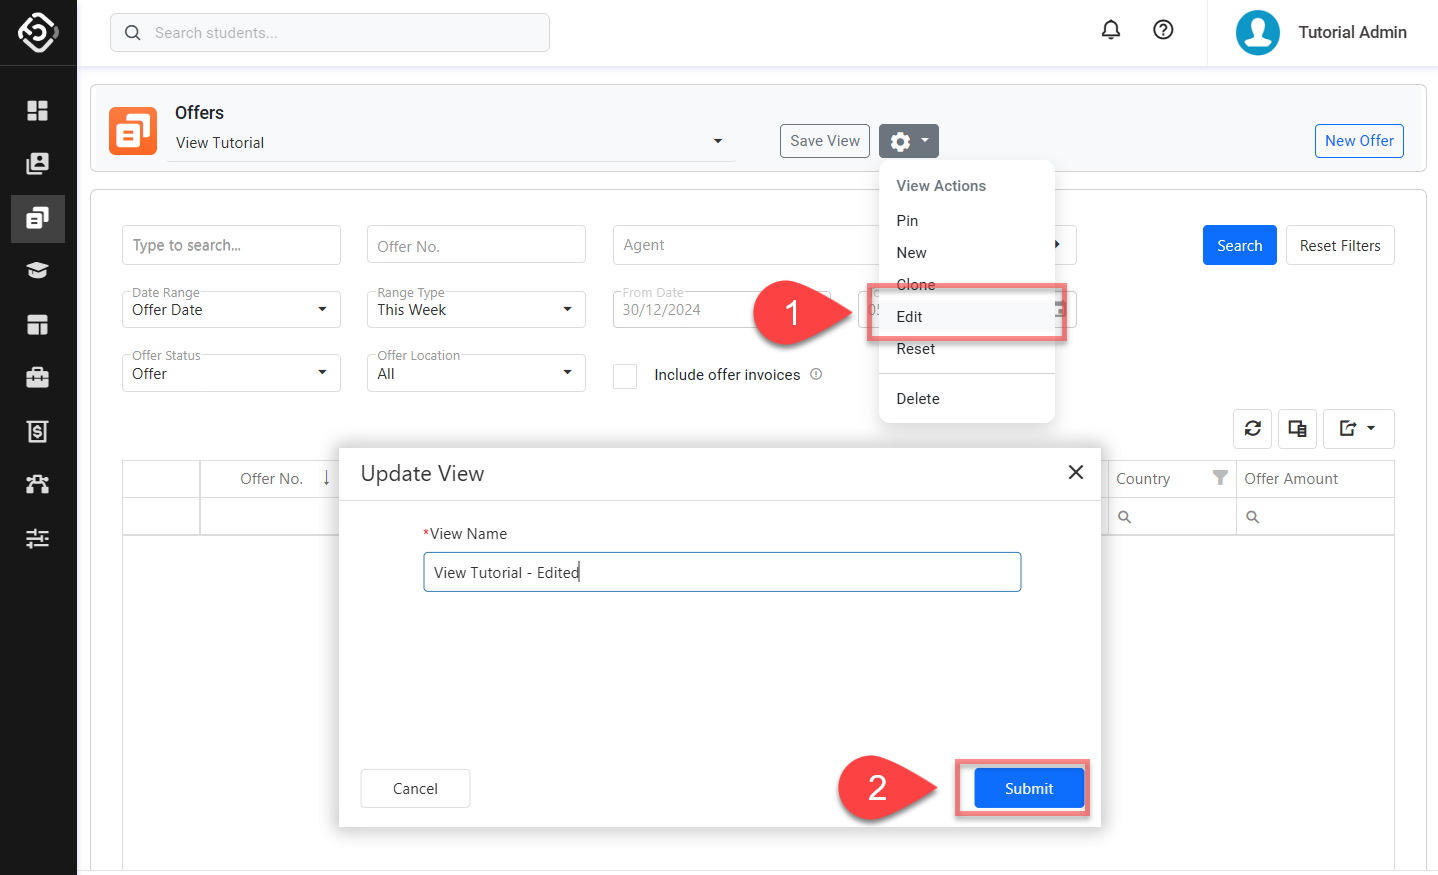
Save a View
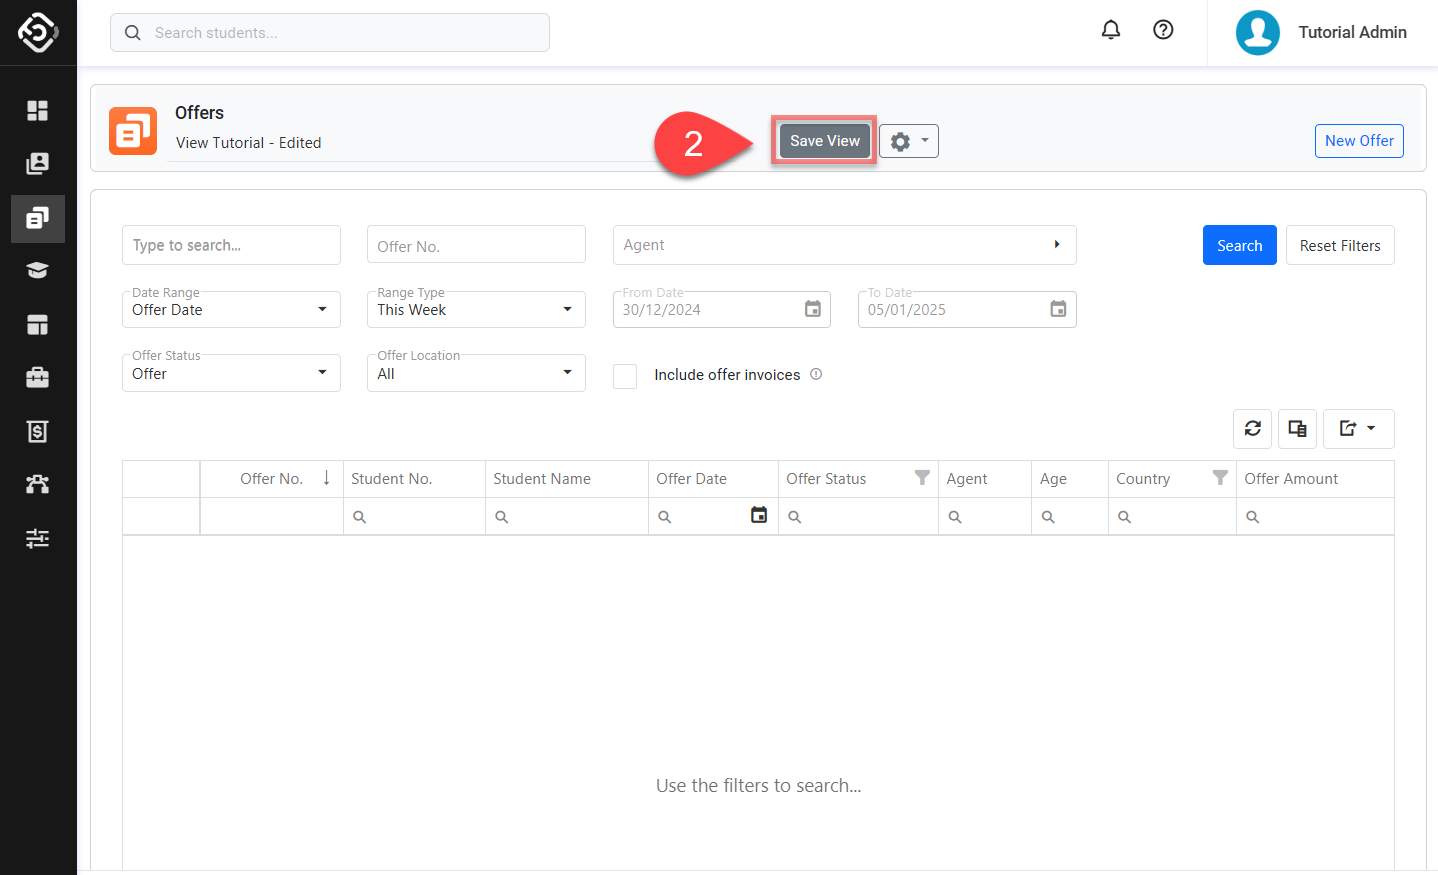
Once you've configured the current view to your desired settings, make sure to save those changes.
Customize the current view as you required.
Go to the view header and click Save View.
A customized view applies filters configured in the view to display search results immediately upon loading. This helps users efficiently access the desired data.
Set a View as Default / Pin a View
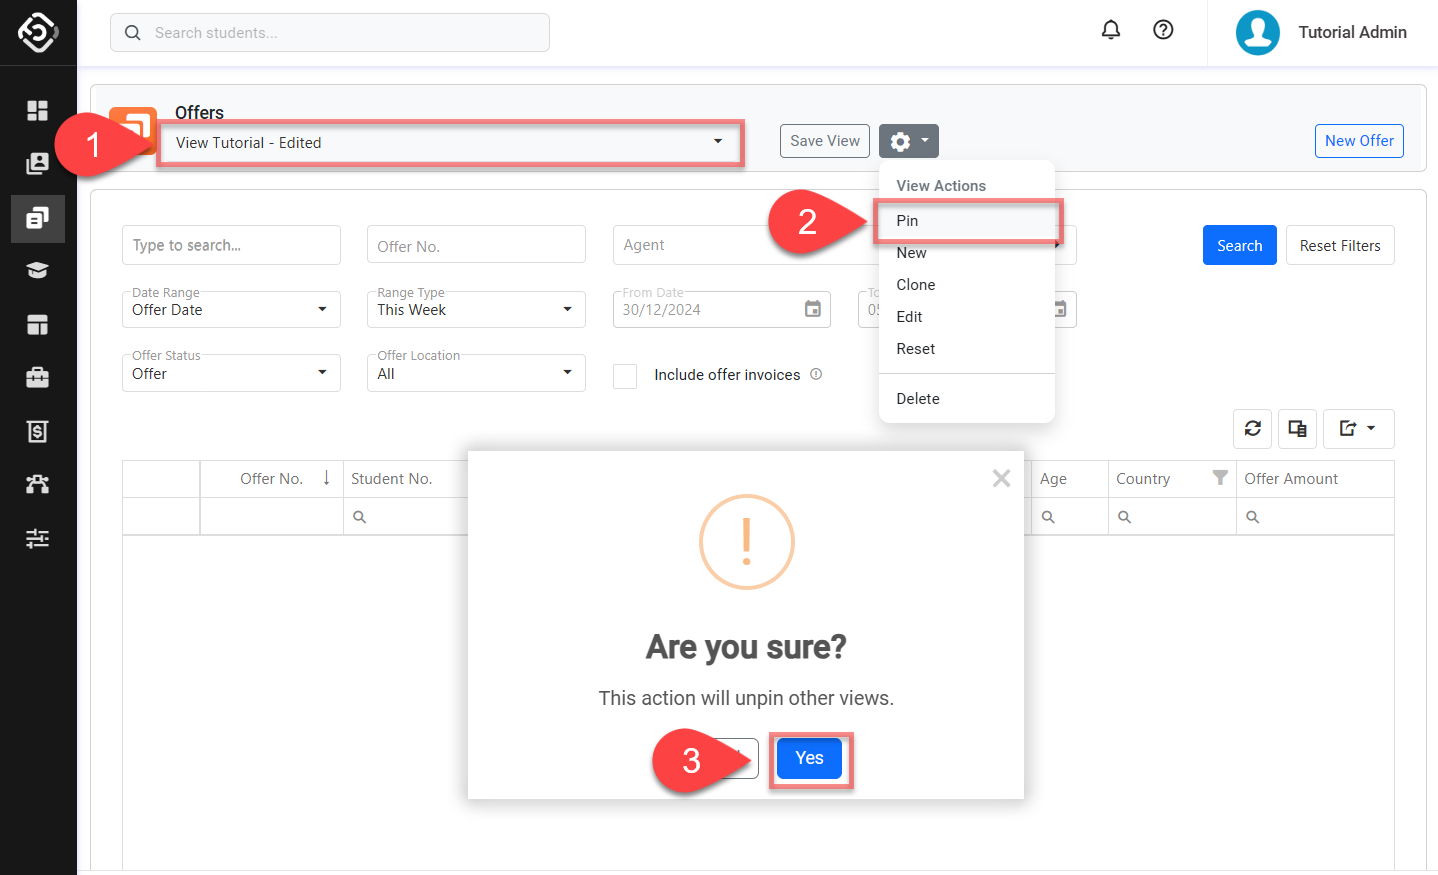
When you have multiple views, you might one to have one as a default (pinned) so every time you come to the same page, you will see that View by default.
Select the view that you’d like to pin as default.
Click View Actions button and Select Pin.
Click Yes to confirm.
Reset a View
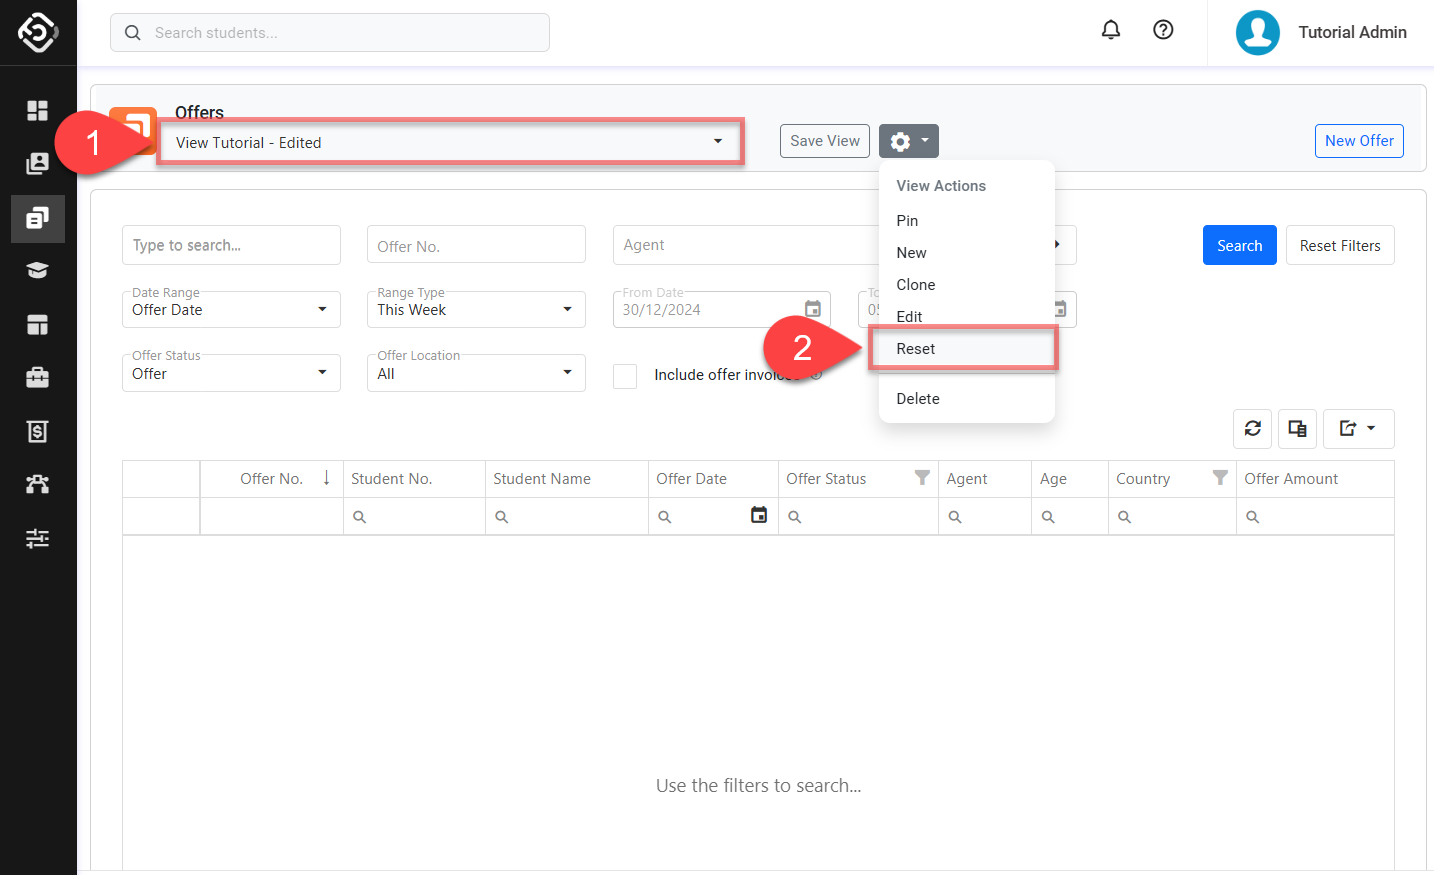
For many reasons, if you wish to reset the current view to its initial setting, simply follow the steps below.
After resetting a View, it will automatically be saved with the default configuration.
Select the view that you’d like to reset from View List in the view header.
Click Action Buttons and click Reset.
Clone a View
Cloning a view allows you to create a new view by using the configuration of an existing view.
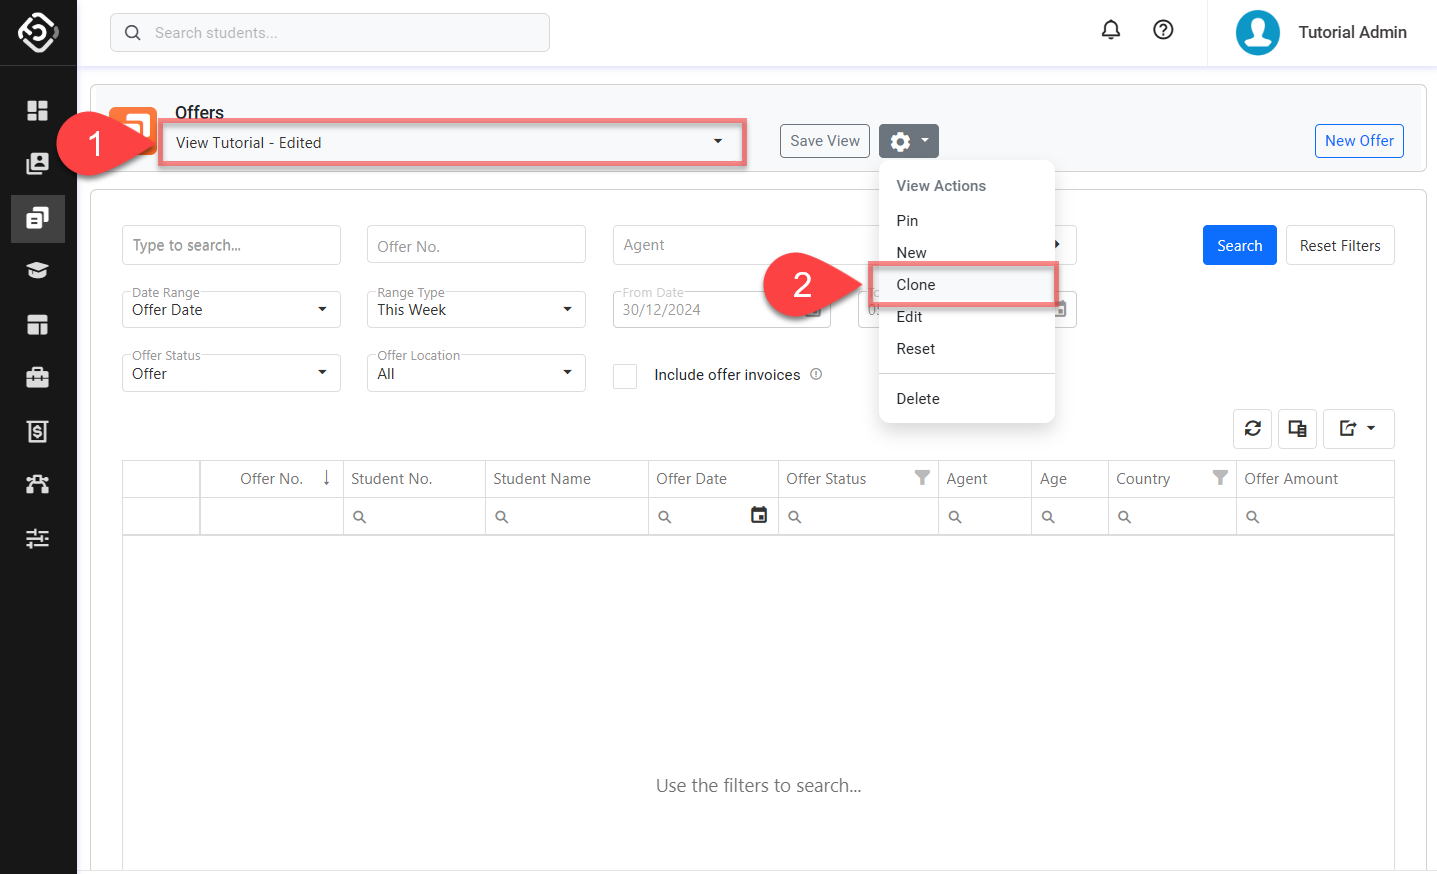
Select the view that you’d like to clone from the View Chooser.
Click on the View Actions button and select Clone.
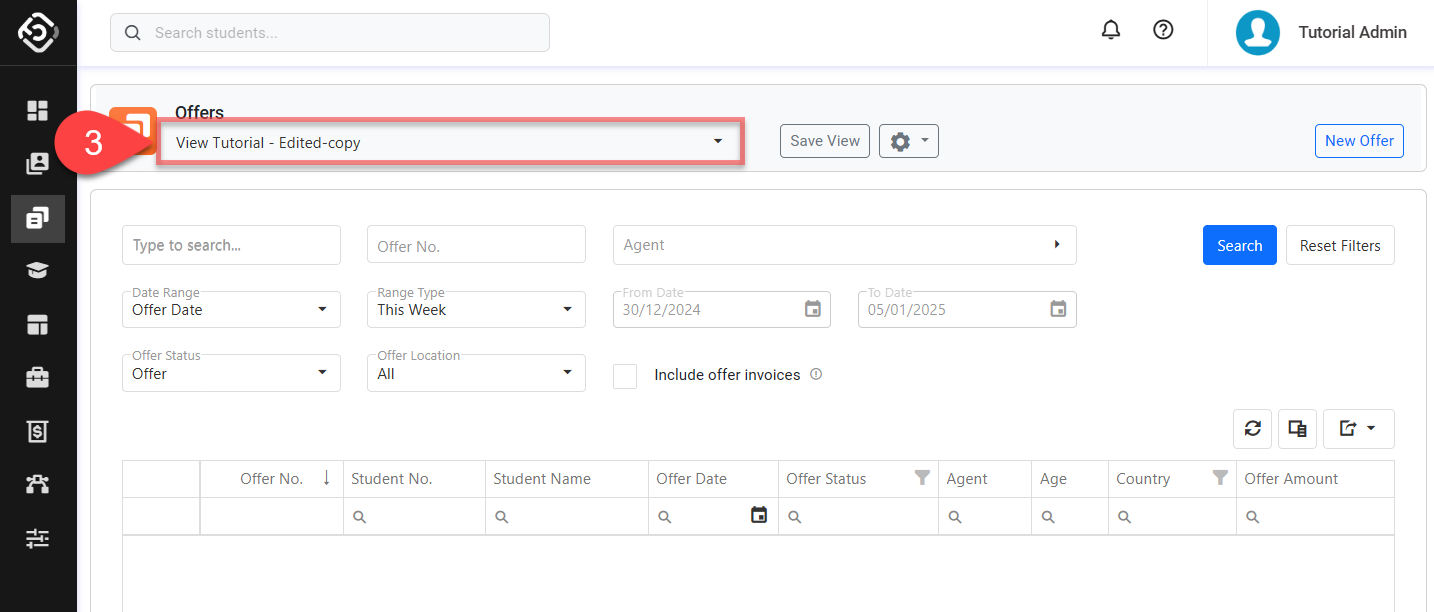
A cloned view with the suffix '-copy' appended to the original view's name will be created.
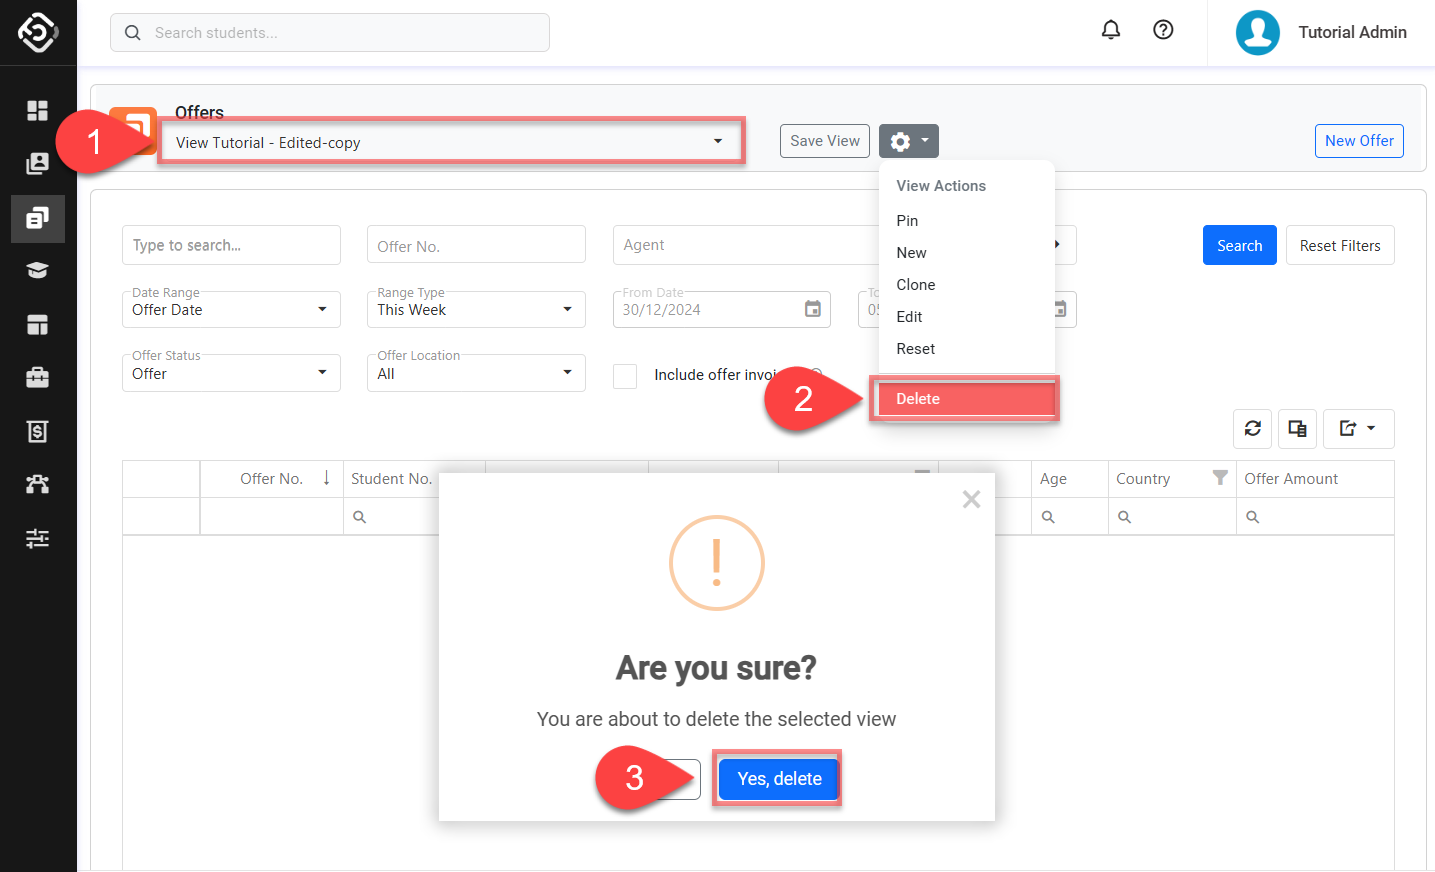
Delete a View
You can only delete views that aren't set as default (pinned). Please switch to another view and set it as default before proceeding with the deletion steps.
Select the view that you’d like to delete from View Chooser.
Click View Actions button and select Delete.
Click on Yes to delete.
