Study Tour Offers are used to prepare, review, and finalise group bookings before enrolments are created. They allow colleges to define fees, services, payment structures, and participating students as part of a structured offer for a Study Tour Group.
The lifecycle of a Study Tour Offer typically includes creating an offer, making adjustments during the planning stage, and accepting the final version to generate enrolments and financial records.
Create Study Tour Offers
You start creating study tour offers in 2 ways:
-
From the Study Tour Offer Search Page: Using this method, you can search and select the study tour group that the offer is for.
-
From the Study Tour Group Details Page: This method will automatically select the study tour group for the offer.
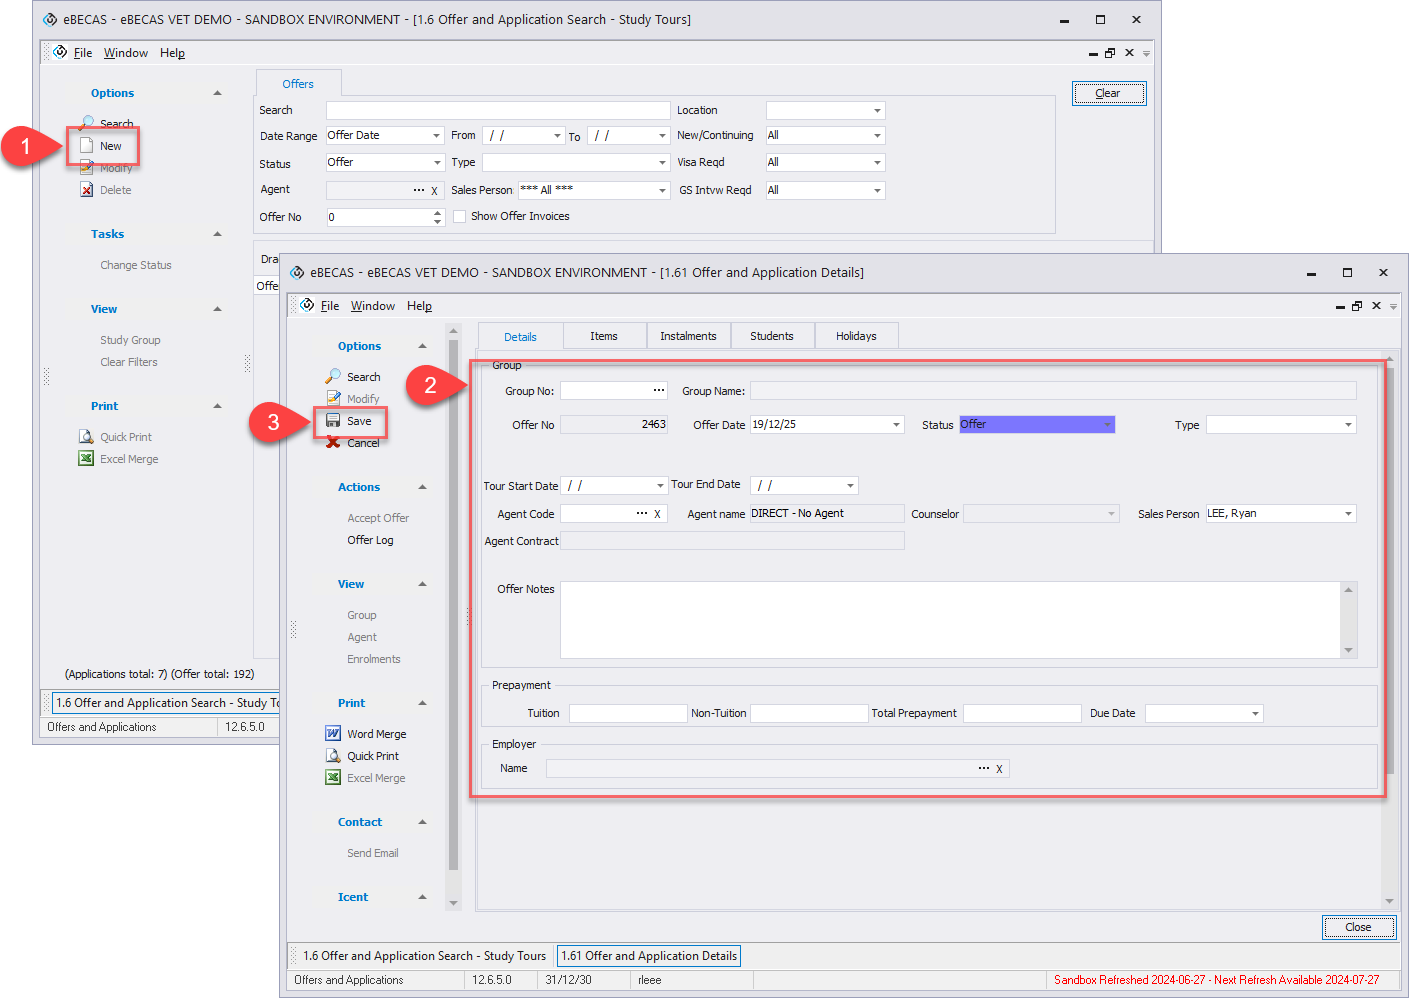
Create an Offer from the Study Tour Offers Search Page
-
From the Main menu, go to Study Tours > Offers and Applications, and click on New button in the side menu.
-
Enter the Offer Details. You can search a study tour group by their name or code.
-
Click on Save to finish.
Create an Offer from the Study Tour Group Details Page
-
Go to the Offer tab of the details page for the study tour group that you intend to create the offer for, and click on New in the side menu.
-
Enter the Offer Details.
-
Click on Save.
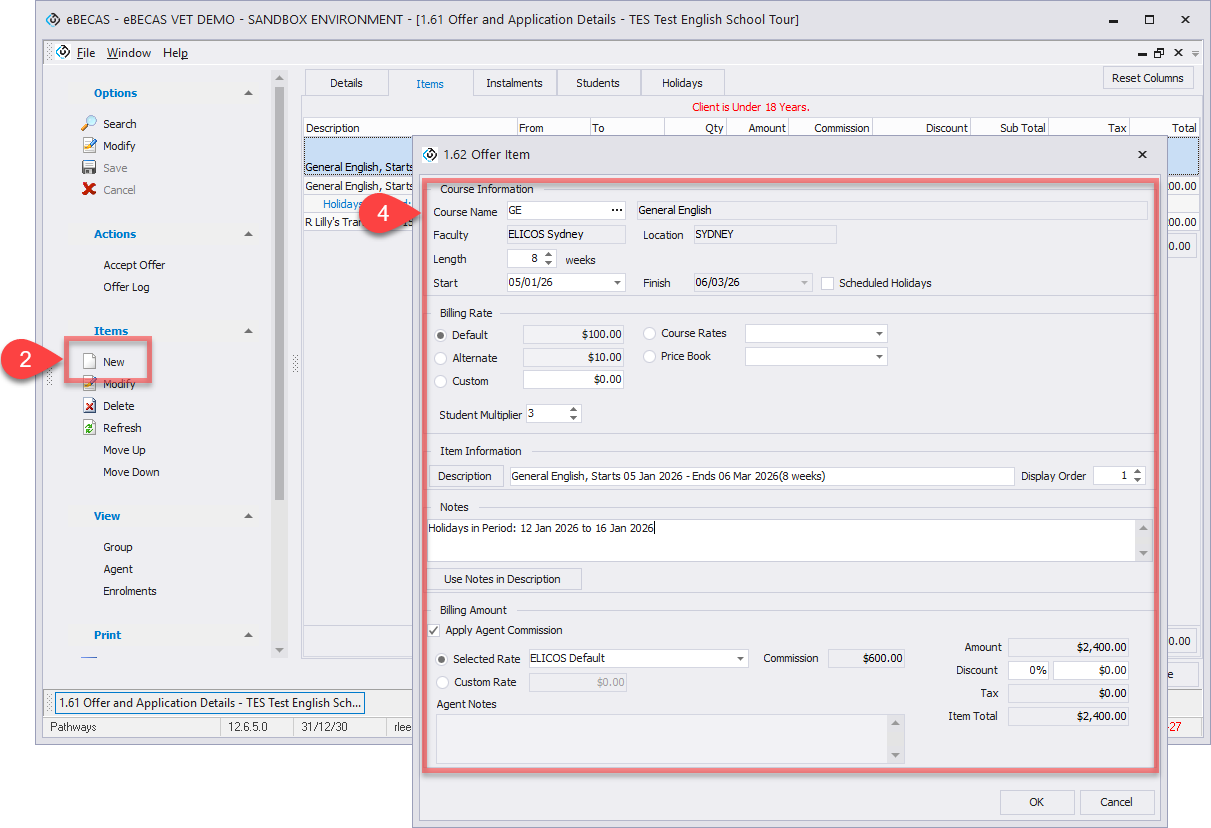
Offer Items
Once you've created an offer, you need to add items to the offer.
New items cannot be added to an offer that has already been accepted/converted.
Tip
It's advisable to add a course as the first item. This recommendation is based on the fact that certain components of the offer may be contingent upon the length and dates of the course.
-
Go to the offer items tab.
-
Click on the New button in the side menu, and select the type of item that you want to add.
-
Search for the item and select it by clicking the Select button.
-
Enter the details for the selected item type. Depending on the item, additional options may be available.
-
Student Multiplier: Enter a number to multiply Course, Insurance, and Accommodation product amounts by the number of students in the group.
-
Service Option: For Insurance and Accommodation Request, specify how entries should be created by selecting one of the following options: Group Only or Per Student
-
For Insurance: when applied to Per Students, an Insurance entry is added to each student details, helping you track requirements more clearly.
-
For Accommodation: when added at the Study Tour Group Offer stage, entries also appear as Tentative placements in each student’s details.
-
-
Offer Instalments and Payment Plans
Instalment or payment plans are used to split the amount of an offer item into multiple partial payments. Each of these payments can have different amounts and due dates. When the offer is accepted or converted, an invoice will be generated for each of these instalments.
For detailed instructions on how to set up instalments and payment plans, please refer to the following article: Instalments and Payment Plans
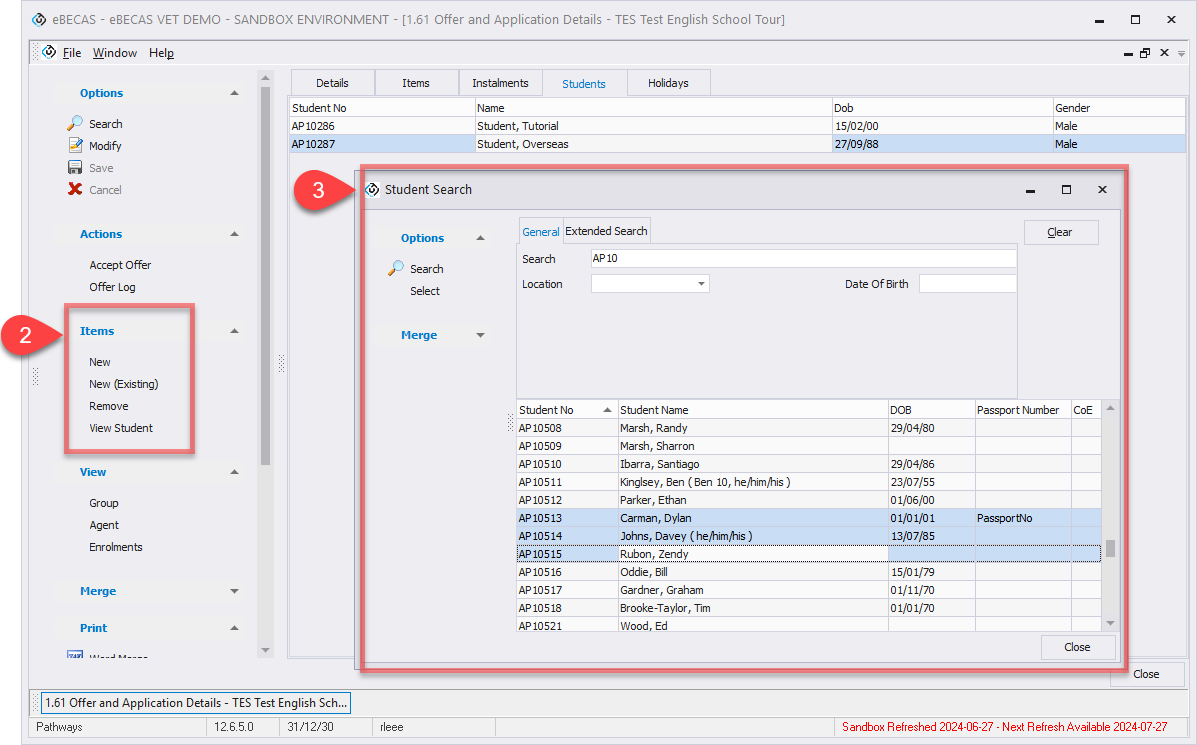
Students
Students participating in the study tour are added to the offer at this stage. Adding students to the offer ensures that group enrolments are created correctly once the offer is accepted.
Students can be added as new students or selected from existing student records.
To manage students in a Study Tour Offer:
-
Go to the Students tab within the offer.
-
Use the side menu to add or manage students.
-
Add New Students
To add a new student to the offer:-
Click the New button in the side menu.
-
Enter the student’s details using the standard student details screen.
-
This action creates a new student record in the system and adds the student to the Study Tour Offer. Before adding a new student, it is recommended to check whether the student already exists in the system to avoid creating duplicate records.
-
-
Add Existing Students
To add an existing student to the offer:-
Click the New (Existing) button in the side menu.
-
Search for and select an existing student from the system.
-
This allows an existing student record to be linked to the Study Tour Offer without creating a duplicate.
-
-
Remove Students from the Offer
If a student needs to be excluded from the offer:-
Select the student in the list.
-
Click the Remove button to remove the student from the Study Tour Offer.
-
Removing a student from the offer does not delete the student record from the system.
-
-
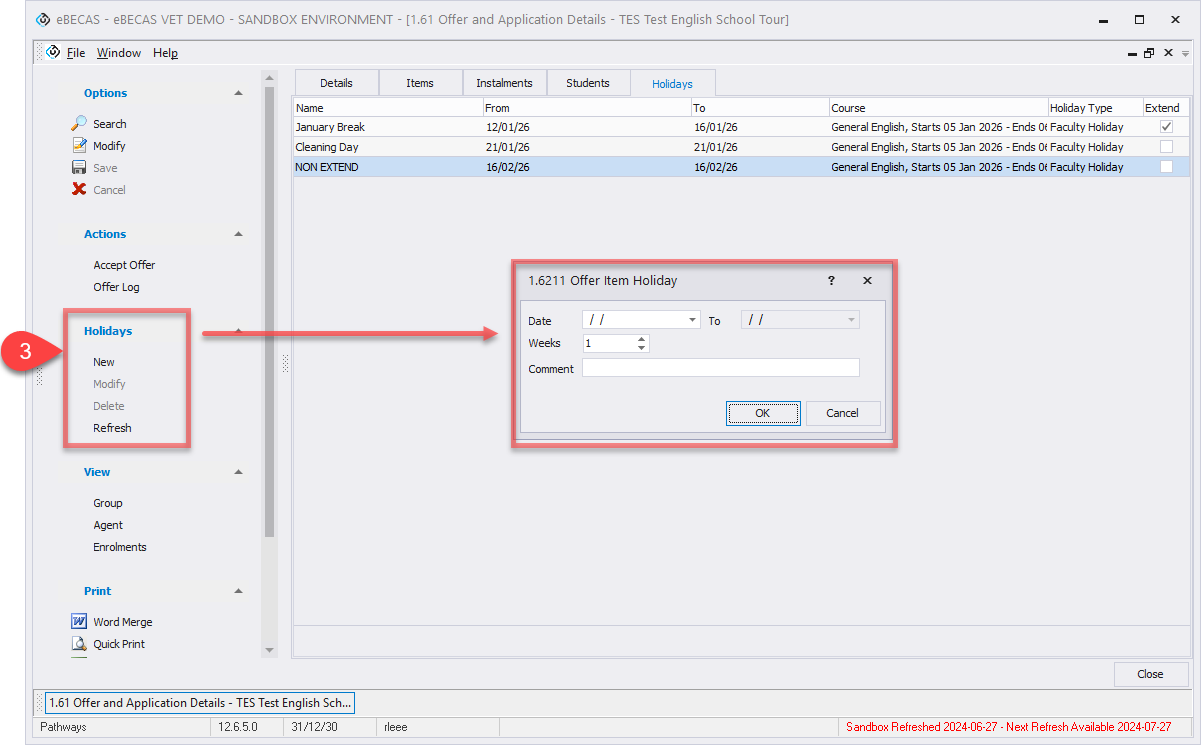
Holidays
Holidays can be applied to a Study Tour Offer to account for non-study periods that may affect course schedules, durations, or fee calculations. Holidays added at the offer stage will be carried through when the offer is accepted and converted into enrolments.
To manage holidays in a Study Tour Offer:
-
Go to the Holidays tab within the offer.
-
When the Holidays tab is first opened, all holidays currently applied to the offer are displayed in a grid. For detailed information about holiday types and how they affect offers and courses, please refer to the following eBECAS/EDMISS Next Generation article: Offer Holidays
-
Click the New button in the side menu to add a holiday, and enter the required holiday details.
-
To remove a holiday, select the holiday entry in the grid and click the Remove button. Faculty holidays cannot be removed from the offer.
You can modify holidays associated with an offer only before the offer is converted or accepted. Once the offer is converted, these offer holidays transform into enrolment holidays, and any changes or updates must be made at the enrolment level.
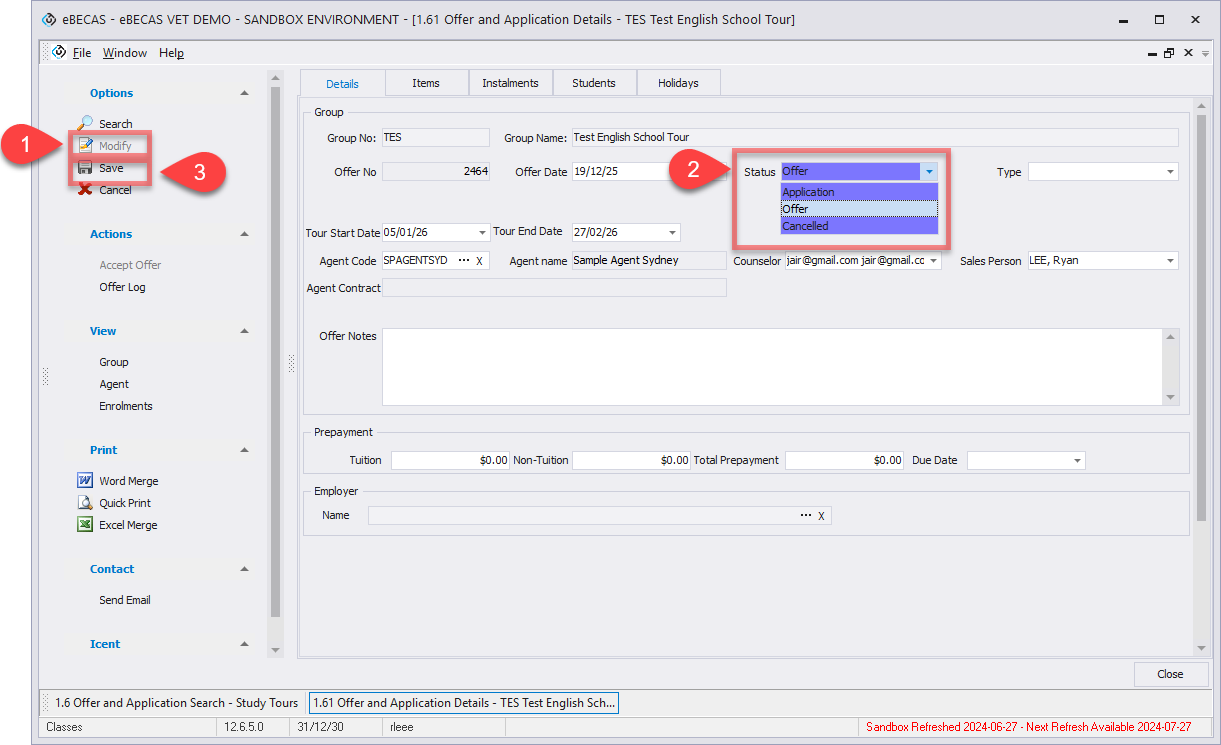
Edit Study Tour Offer Details
Considerations for editing offers details
-
It is not possible to update the offer details after it has been accepted/converted.
-
Changing the agent or agent contract on an offer with existing course items will reset the commission for these items to $0. You will need to update all course items in the offer (and their respective instalments) to apply the new commission.
-
From the Main menu, go to Study Tours > Offers and Applications, and go to the offer details of interest.
-
Click on the Modify button in the side menu.
-
Edit the details as required.
-
Click on Save to finish.
Change Offer Status
The offer status indicates on what stage of the enrolment process, the study tour is at. Before we explore how to update the offer status, let’s explore what statuses are available.
Offer statuses
-
Application: This is very first status on the enrolment process. It can be used to indicate that an application has been received but it requires review or it is not ready to progress to the next status: Offer.
-
Offer: The Offer status indicates an application has been processes and products and services have been formally offered to the student.
-
Accepted: This status indicates that an offer has been accepted or converted. Once an offer is accepted, corresponding enrolments are created, and the offer is locked to prevent any further modifications.
-
Cancelled: This status indicates the study tour group, agent or college have cancelled or withdrawn the offer. When an offer is cancelled, you must specify the reason. Typically these reasons may be administrative error, visa refusal, withdrew request, went to another College or any other reason you would like to identify in reports. The Cancelled status may also represent instances where the offer has lapsed due to no feedback or acceptance from the study tour group or agent, and the Course has passed (this can be scheduled automatically for offers with passed course start dates in setup configuration. See details in the following article: Automation of Offers Cancellation).
Now that we know what each offer status mean, let’s see how to change the offer status:
-
From the Main menu, go to Study Tours > Offers and Applications, and go to the offer details of interest. Click on the Modify button in the side menu.
-
Select the status that you’d like to change this offer to.
-
Click on the Save button to finish.
To change the status to Accepted, you need to Accept the Offer. See the section below.
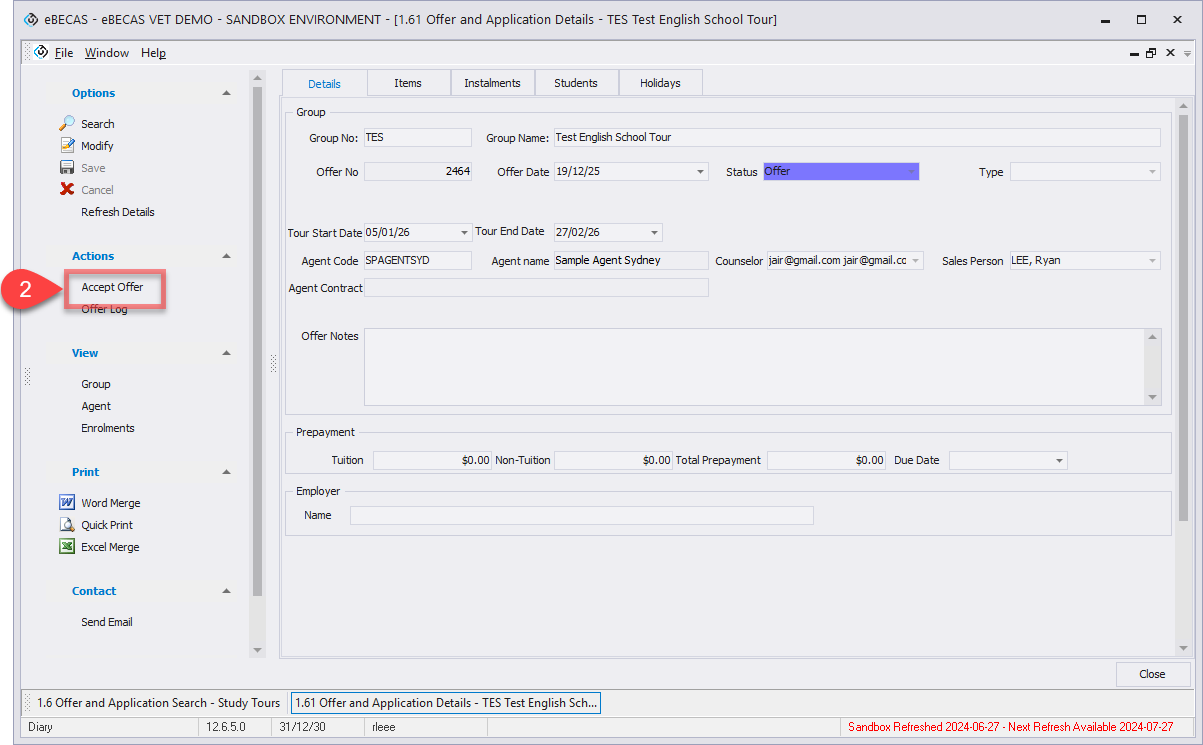
Accept an Offer
Accepting an offer is the final step of the Offer process. When a Study Tour offer is accepted, enrolments are created based on the structure of the Study Tour.
For Study Tours, accepting an offer creates a Study Tour enrolment first. This enrolment represents the overall tour and acts as the parent record for the group.
Individual enrolments are then created for each student included in the Study Tour, and these enrolments are linked to the Study Tour enrolment.
Information that applies to the entire tour, such as invoices and tour schedules, is stored and managed at the Study Tour enrolment level. Student-specific information, including class attendance and enrolment warnings, is managed within each student’s individual enrolment.
This structure allows the Study Tour to be managed as a single entity while still supporting individual student tracking.
Once an offer is accepted, it cannot be changed. The invoices have been generated and will be posted to financials. Changes to the invoices are less flexible as these changes require an audit trail.
To accept an offer:
-
From the Main menu, go to Study Tours > Offers and Applications, and go to the offer details of interest.
-
Click on Accept Offer located in the side menu. An offer with status Cancelled cannot be accepted. To do so you need to change the status to Offer and then you can accept it.
-
Click on Yes, Accept Offer to finalise the process.