
Fields (or data fields) are specific data elements within an object. They represent a single piece of information that can be captured and stored as part of a record in the database.
Every object is made up of multiple fields that collectively store all the relevant information related to that object.
Many objects allow customisations by letting you add custom fields.
Field Types
The type of the field determines the data you can enter and how you can interact with the field.
The data types available depend on the object that you are creating the field for and on your subscription. Contact your system administrator for more details.
The types available in the system are:
|
Type |
Description |
|
Address |
Allows users to enter a valid address. |
|
Checkbox |
Allows users to select a True (checked) or False (unchecked) value. |
|
Currency |
Allows users to enter a dollar or other currency amount and automatically formats the field as a currency amount. |
|
Date |
Allows users to enter a date or pick a date from a popup calendar. |
|
Date/Time |
Allows users to enter a date and time or pick a date from a popup calendar. |
|
|
Allows users to enter an email address, which is validated to ensure proper format. |
|
Number |
Allows users to enter any whole number. Leading zeros are removed. |
|
Phone |
Allows users to enter any phone number. Automatically formats it as a phone number. |
|
Percent |
Allows users to enter a percentage number, for example, and automatically adds the percent sign to the number. |
|
Picklist |
Allows users to select a single value from a list. |
|
Text |
Allows users to enter any combination of letters and numbers. |
|
Text Area |
Allows users to enter up to 255 characters on separate lines. |
|
Text Area (Long) |
Allows users to enter up to 15,000 characters on separate lines. |
|
Text Area (Rich) |
Allows users to enter formatted text. Up to 65,535 characters on separate lines |
|
URL |
Allows users to enter any valid website address. |
|
Decimal |
Allows users to enter any number. Leading zeros are removed. |
|
Document File |
Allows users attach a document. |
|
Multi-Select |
Allows users to select multiple items from a list. |
View Object Fields
Every object in the system has different fields of different types with different properties.
To view the fields that make up a specific object:
-
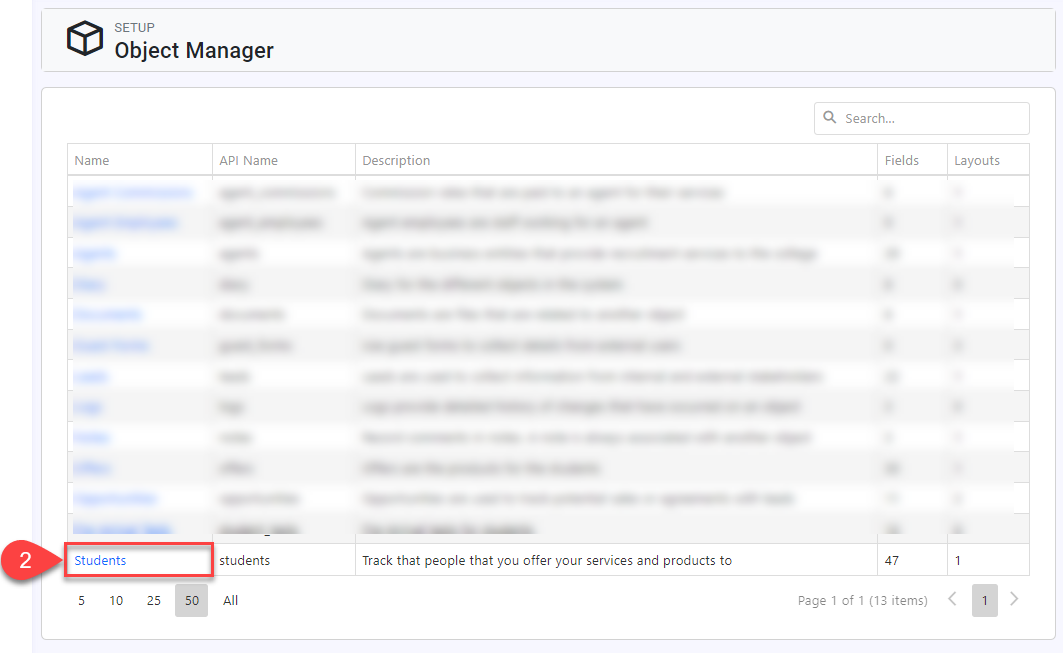
From the Utilities menu, go to Object Manager.
-
Click on the object that you intend to view the fields for.
-
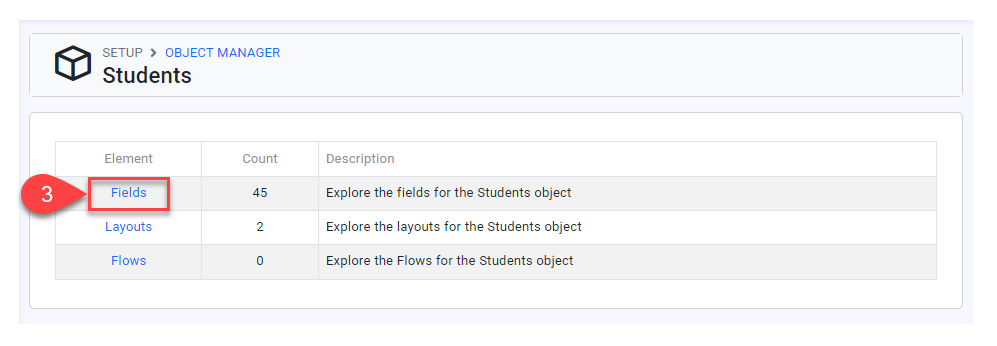
Click Fields.
-
The list of fields for the object selected will display.
-
Click on a field to see the field details.
Create a Custom Field
The type and number of custom fields that you can create depend on the object and on your subscription. Contact your System Administrator for details.
-
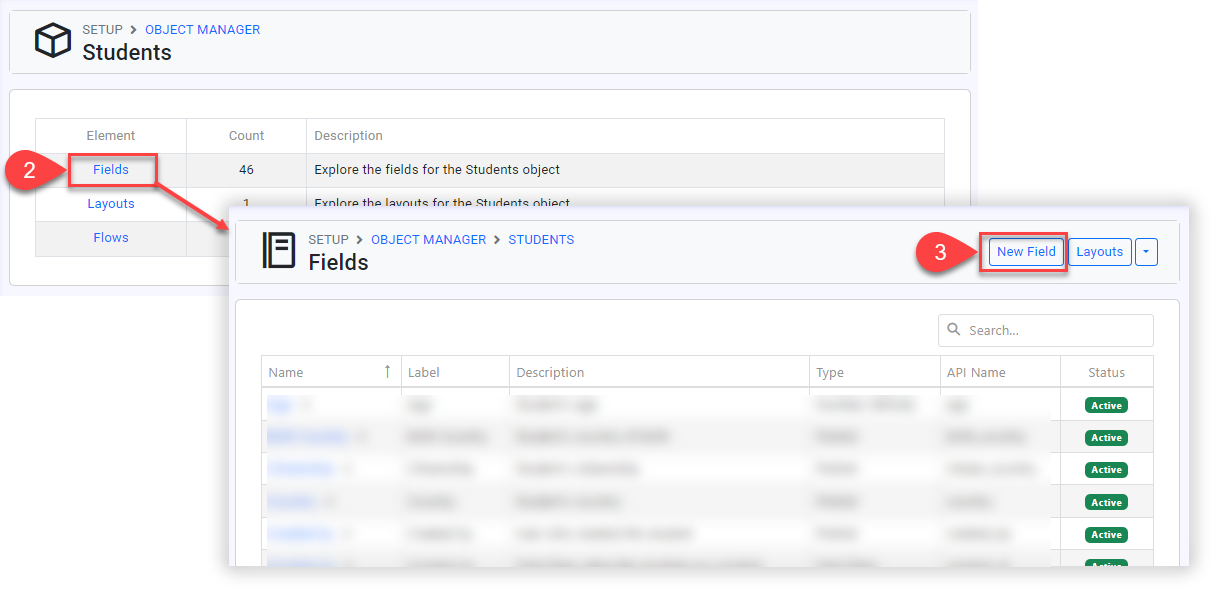
From the Object Manager, locate the Object that you want to create the custom field for.
-
Click on Fields.
-
Click on New Field.
-
Choose the field type.
The options available might vary depending on the object and on your subscription plan.
See above Fields' Types. -
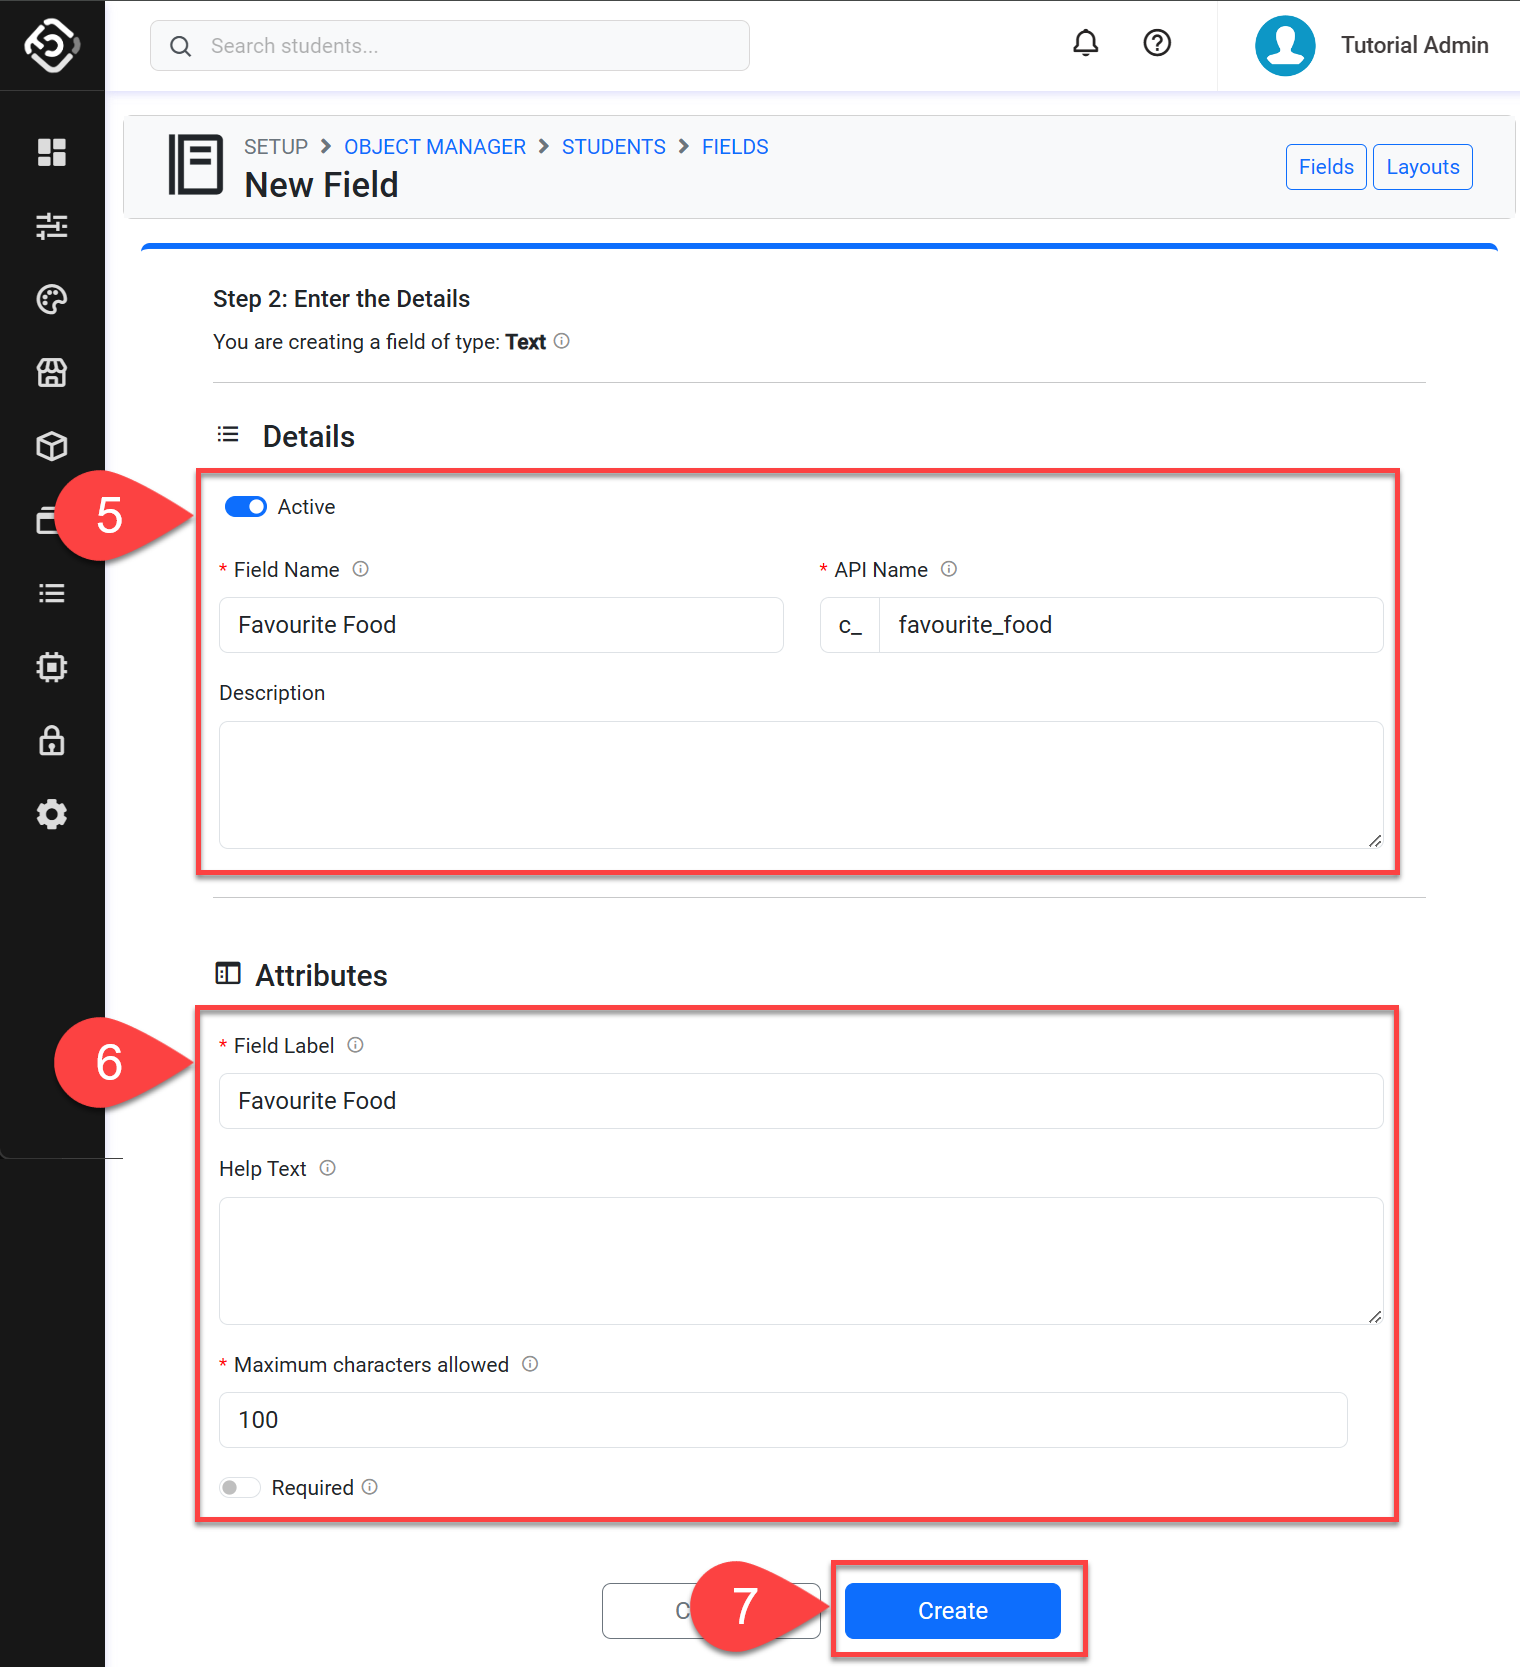
Enter the details in Details section.
-
Name: Enter the name to be used for this custom datafield. The Field name is the name that will be displayed in the list of fields and in the grids. Please note that it is not the label that will be used in a form.
-
API Name: This name is used to identify the custom datafield in the API. Based on the name you enter, the system will automatically generate the API Name. If needed, change it to your desired API Name. Only alphanumeric characters and the underscore (_) symbol are allowed. The API Name must be unique within the system.
-
Description: Provide a brief explanation of the datafield.
-
-
Enter the field's Attributes.
Attributes can vary depends on the type of the field. The field label is the actual text displayed on the forms. -
Click Create.
New fields will not be displayed to any users on the forms automatically until they are added to a layout. See this article for details: Layouts.
Although a field might not be on any layout, it will still be visible on the grids.
Update a Custom Field
-
From the field detail page, click Edit the top right.
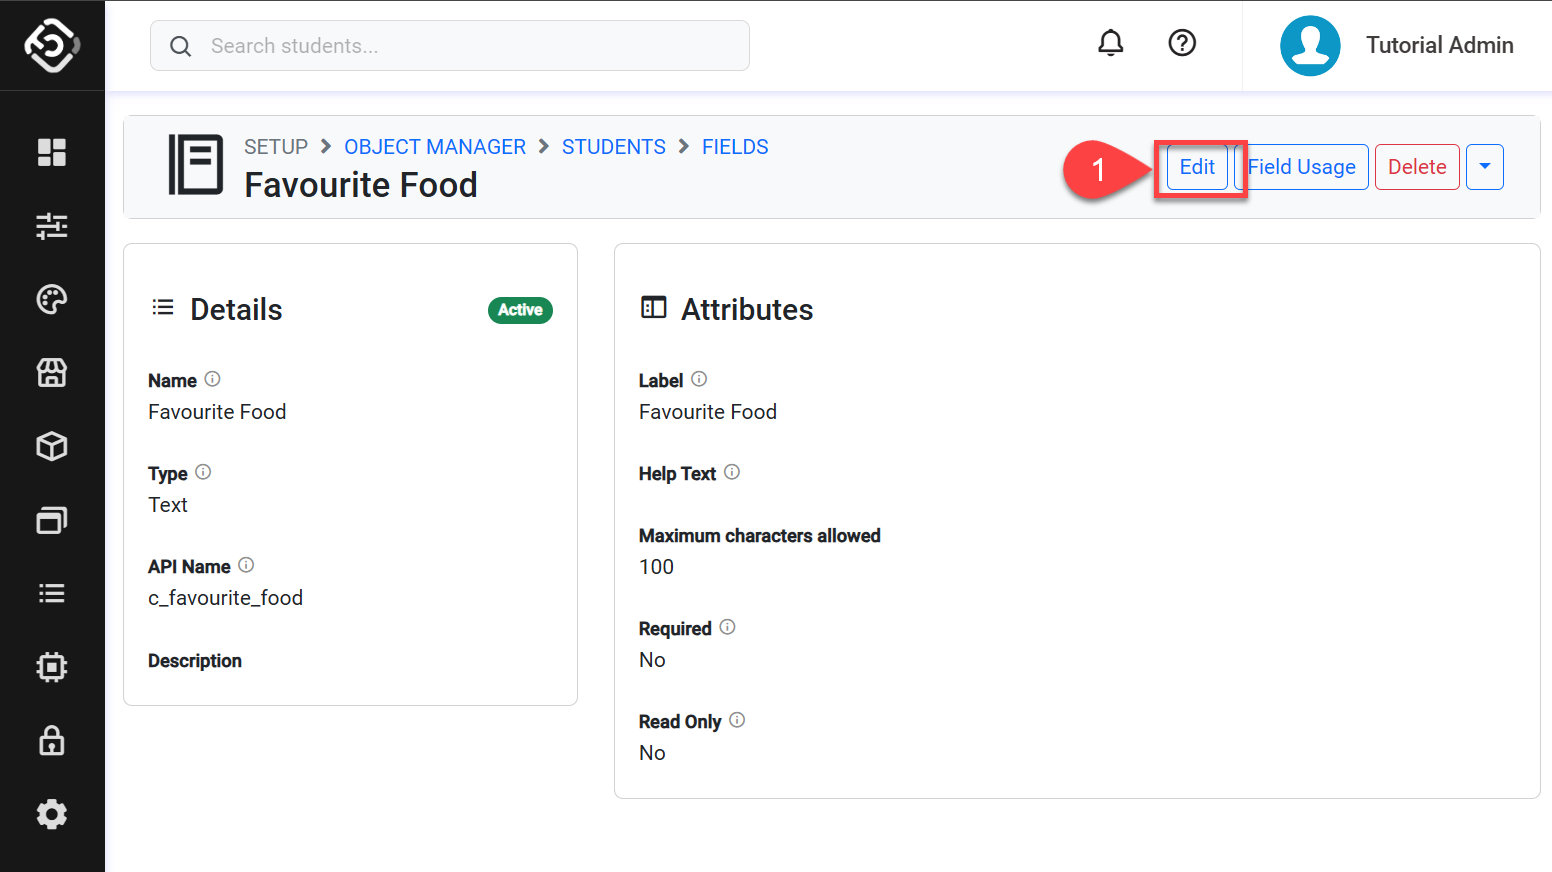
-
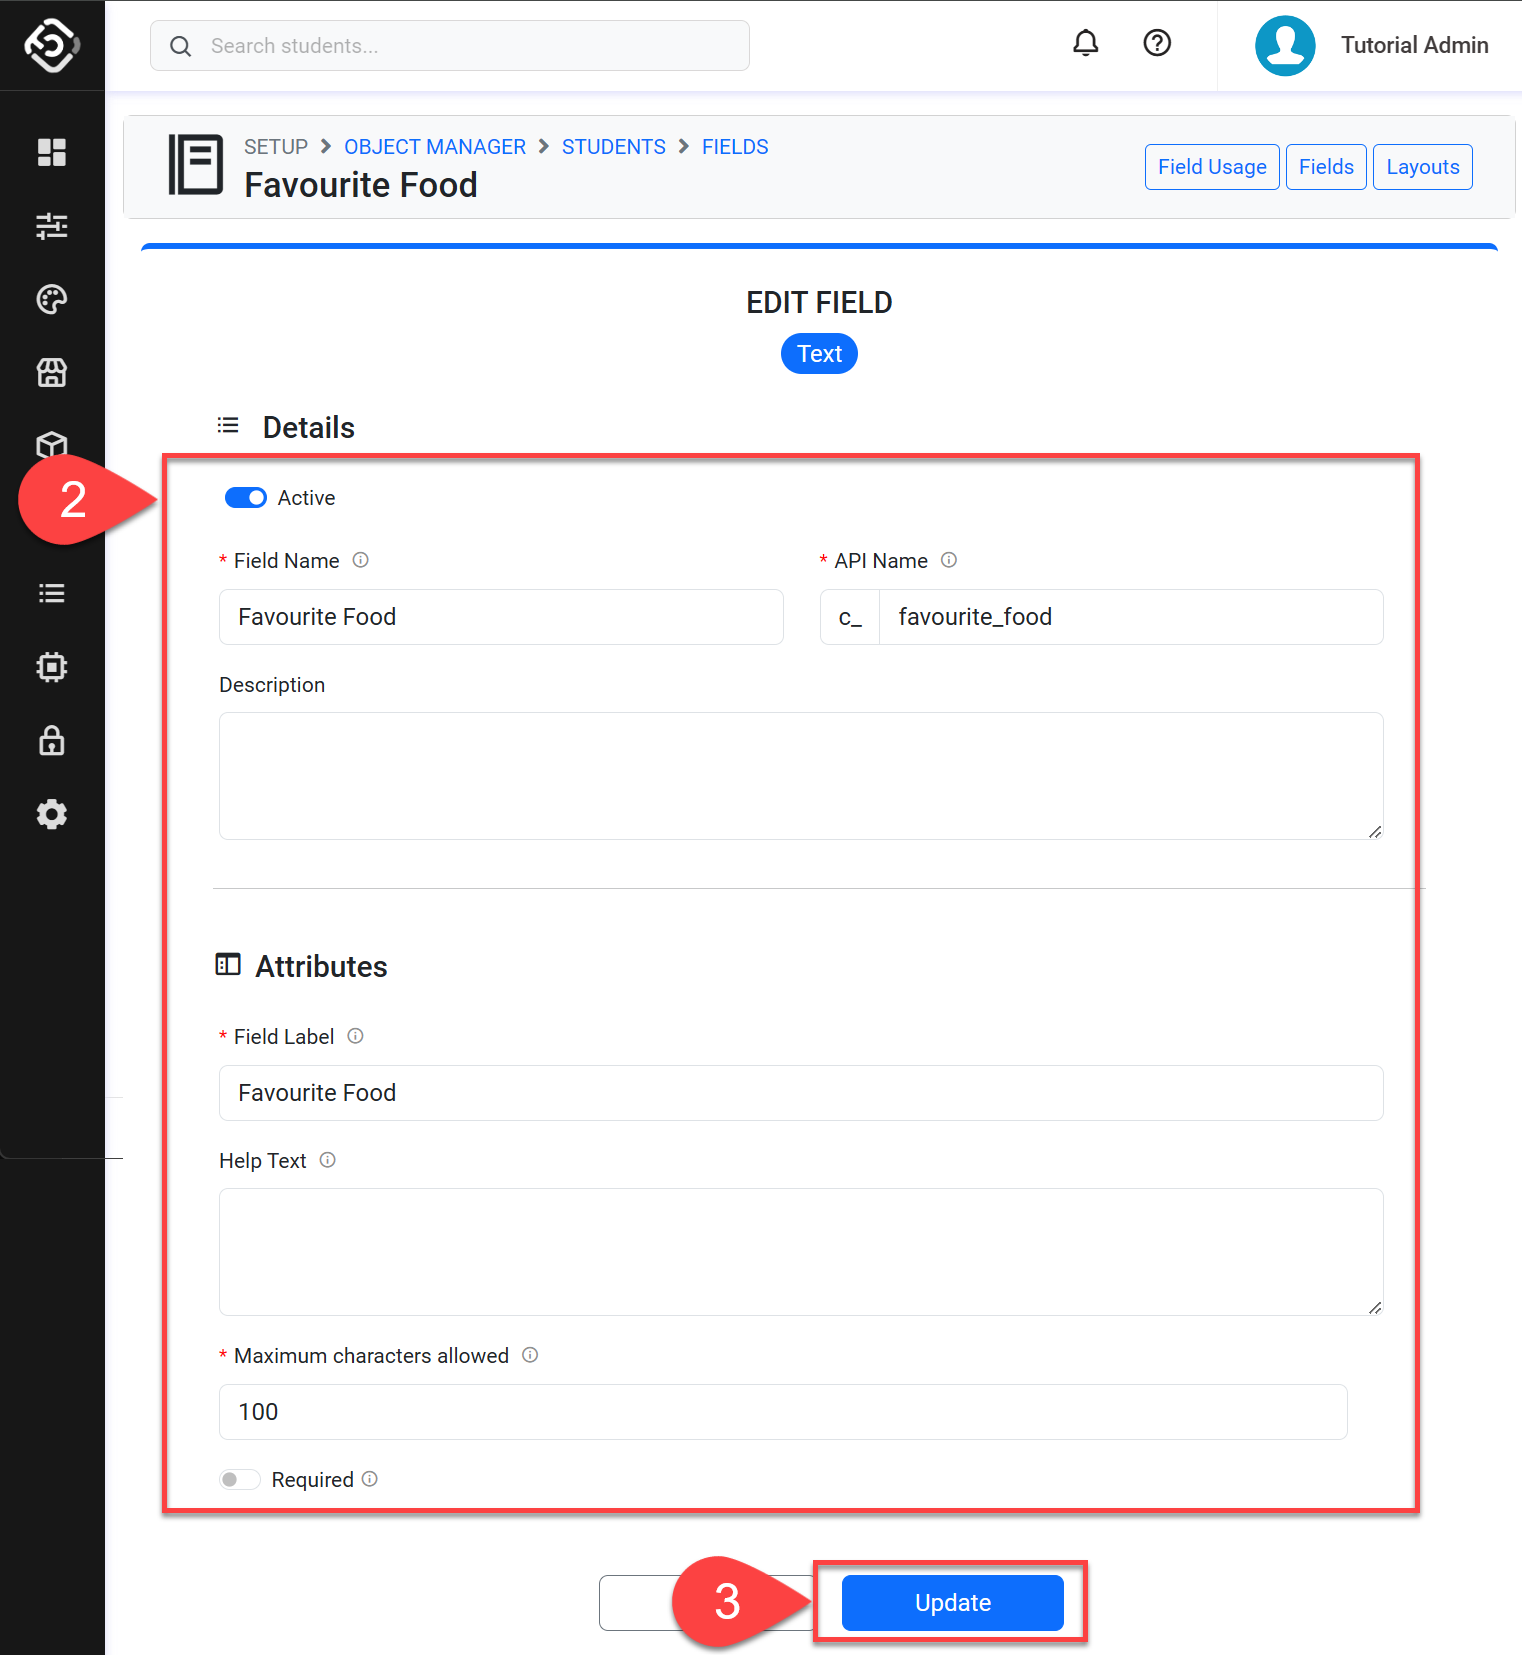
Modify the field details and attributes.
-
Click Update to save.
Field Access Levels
Field Access Levels provide additional control over which information can be accessed through the API.
Field Access Levels currently apply only to information accessed through the API.
There are three access levels:
-
Standard - Fields that can be accessed through the API without additional field access permissions.
-
Personal - Fields containing personal information. Users require additional permission to access these fields through the API.
-
Restricted - Fields containing information that requires a higher level of access. Users require additional permission to access these fields through the API.
Edit Field Access Level
Some fields have a default Access Level, but this can be changed as required, including for system fields.
To update the Access Level for one or more fields:
-
From the list of fields for an object, use the Select column to select the fields you want to update.
-
From the grid Actions panel, select Set API Access Level and choose the required Access Level.
-
Confirm the change.
Delete a Custom Field
Before deleting, a field must not be used in any layouts. You can check easily which layouts are using a field by clicking on Field Usage from the Field detail page.
Consider deactivating the field instead of deleting. Deleting a field cannot be undone and it will delete actual data entered previously using the field.
This will delete the field permanently in the system.
-
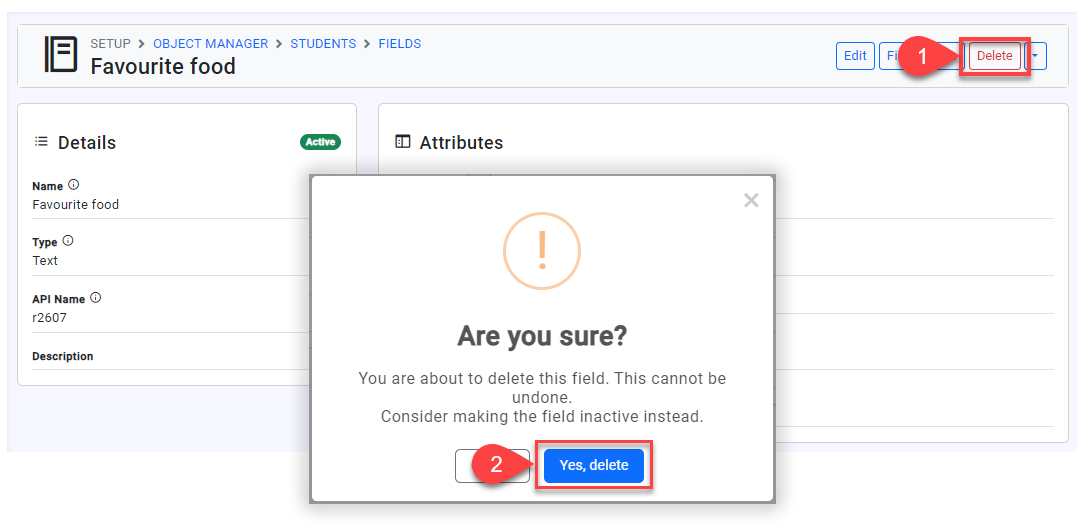
From the field detail page, click Delete on the top right.
-
Confirm to delete.
View a Field Usage
To view the elements that are using a field:
-
Go to view the details for the field of interest.
-
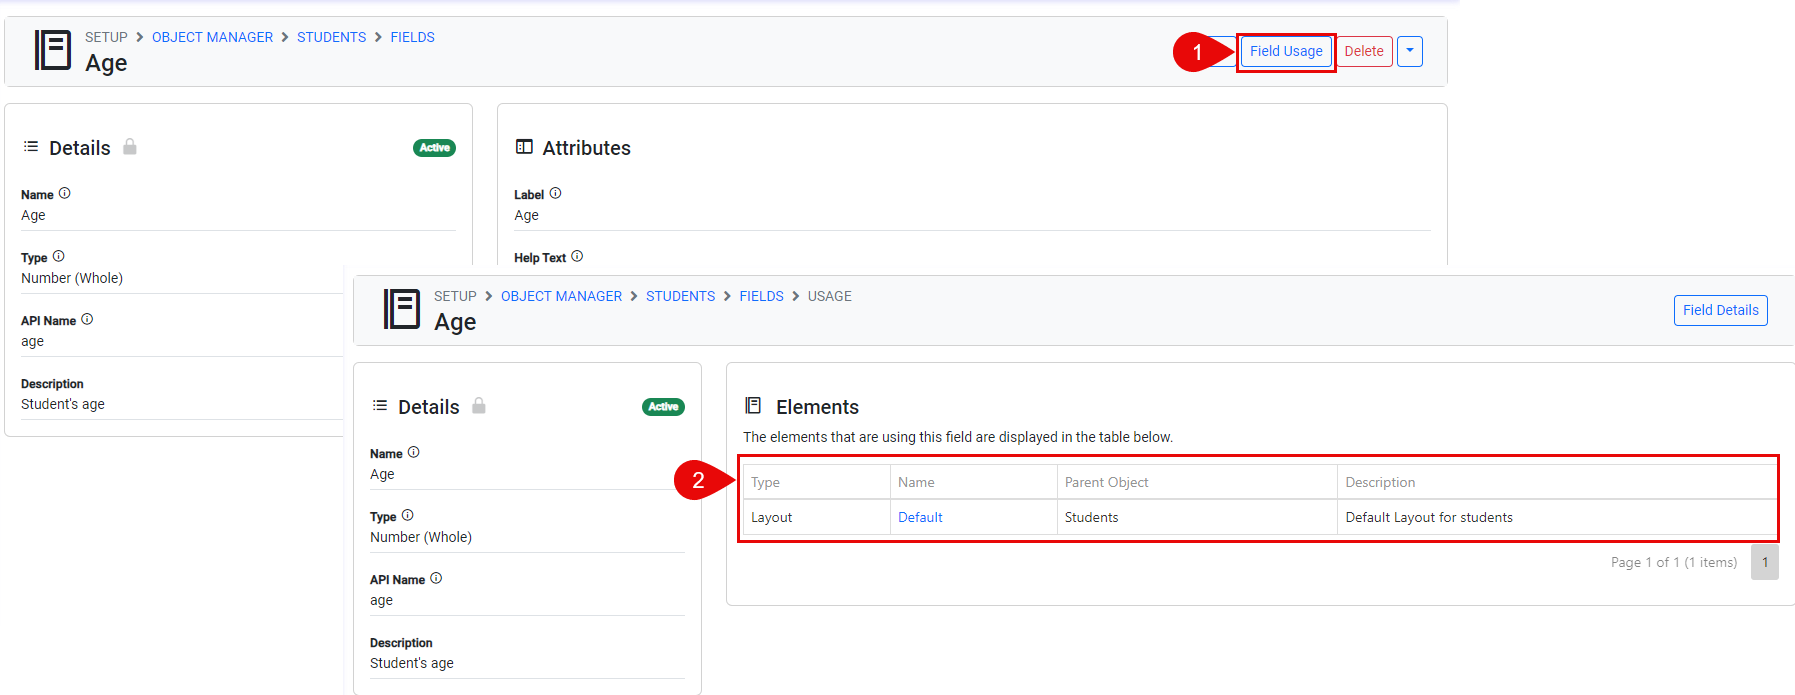
Click Field Usage.
-
You can see the elements that are using this field in the table.
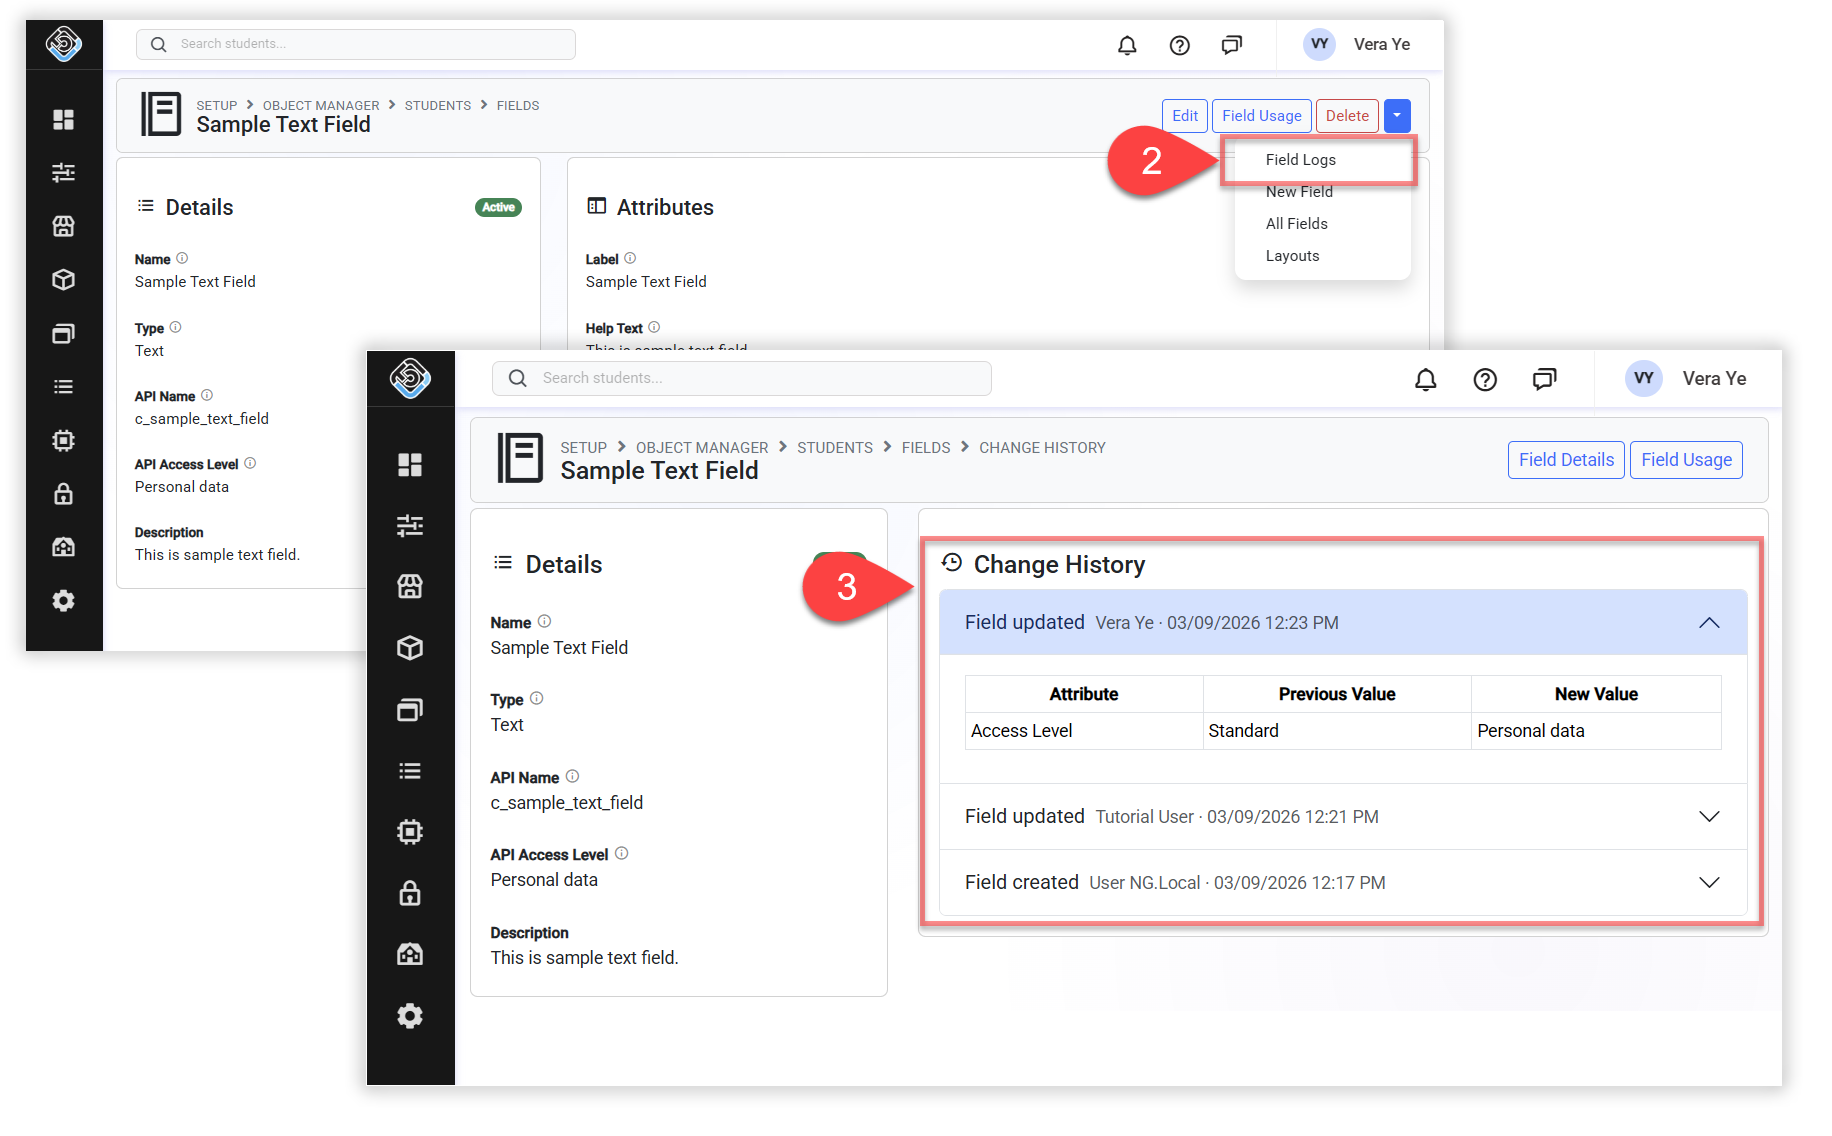
View Field Logs
The Field Logs provides a history of changes made to a field's configuration.
-
Go to view the details for the field of interest.
-
Click Field Logs in the menu on the header.
-
Review what was changed, the previous and new values, when the change was made, and the user who made it.
Custom Legacy Fields
Legacy Fields refer to the custom fields inherent to eBECAS/EDMISS Classic (desktop app). While they appear similar to custom fields in eBECAS/EDMISS Next Generation (web app), they are classified as legacy due to their limited functionality and exclusive manageability within the desktop application.
For details on how to manage these legacy fields, view the article: Custom Legacy Fields