
Overview
Offer Items are the products and/or services that are offered to the students as part of an offer. These items can be courses (tuition), materials fees, application fee or other services such as insurance, transport or accommodation.
Considerations for Managing Offer Items
Before we start exploring the Offer Items, it is important to understand some concepts:
Offer Item Types
There is a variety of offer item types that you can create:
-
Course (tuition): A Course is the basic item in an offer. It refers to the course or program that a student intends to study.
-
Insurance: This item type is to offer insurance services. These services can be set up as a monthly or daily fee.
-
Accommodation: With this item type you can offer and manage accommodation (e.g. homestay) placements.
-
Accommodation Arrangement: This item type is used to offer an accommodation arrangement/placement fee.
-
Airport Transfer: This item type let’s you offer and manage Airport transfer services.
-
Other: Others items refer to items that do not fit into other categories. Typically, these can be used to offer products or services such as materials, application fees, etc. This offer type can be set as a single or a weekly amount (useful for fees that depend on the duration of the course).
Primary Course
For offers that include multiple courses, you can designate one course as the primary course. This helps clearly identify the main course and allows its details to be used in templates.
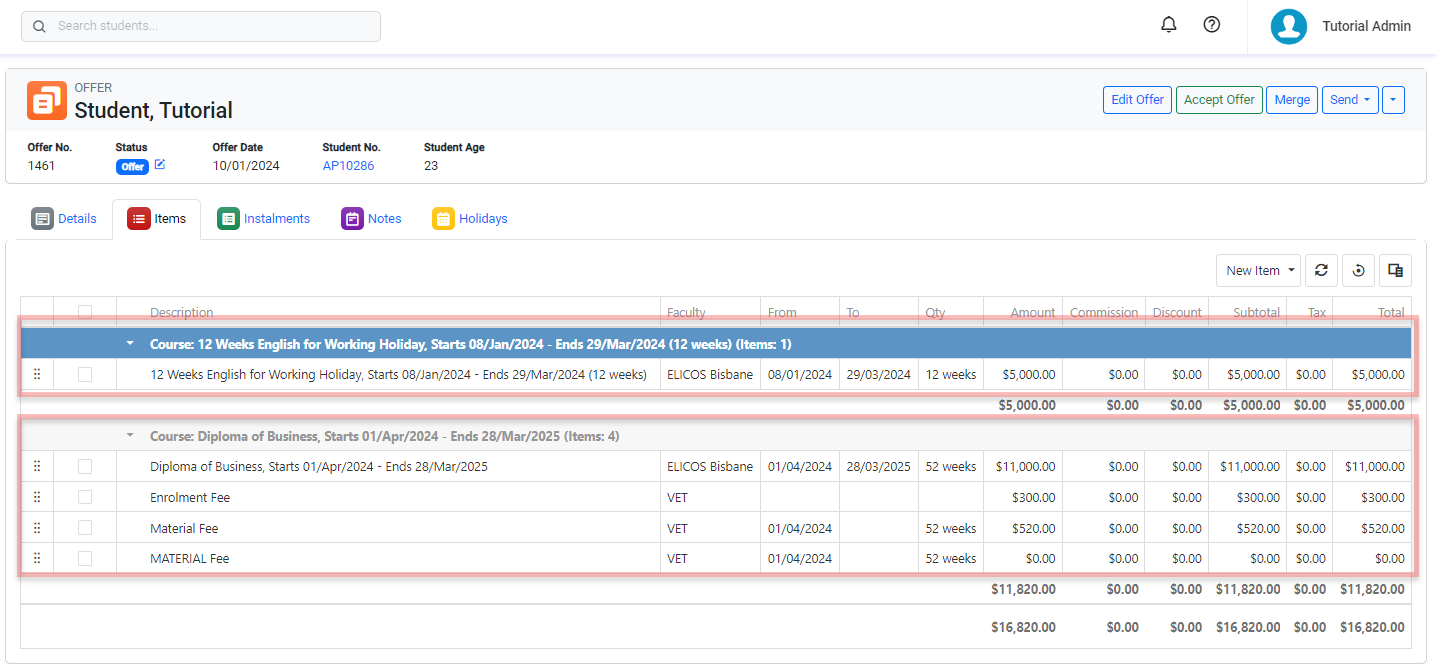
Offer Items Groups
Offer Items are grouped around the courses that are part of the offer. When a course is added to an offer, a new offer item group is created for that course. An offer has as many groups as courses, with one and only one course on each group. These groups not only organise the offer items but also define the enrolments that will be created upon acceptance—each group corresponds to a separate enrolment.
The instalments for each offer item are also organized within the same offer item group, helping you identify which fees apply to each enrolment.
All non-course items must be added to one of the existing groups. If no courses exist when any of those items are created, they will be added automatically to the group of the first course added to the offer.
Offer groups are important as they determine what enrolment, the non-course items are added to, when the offer is converted.
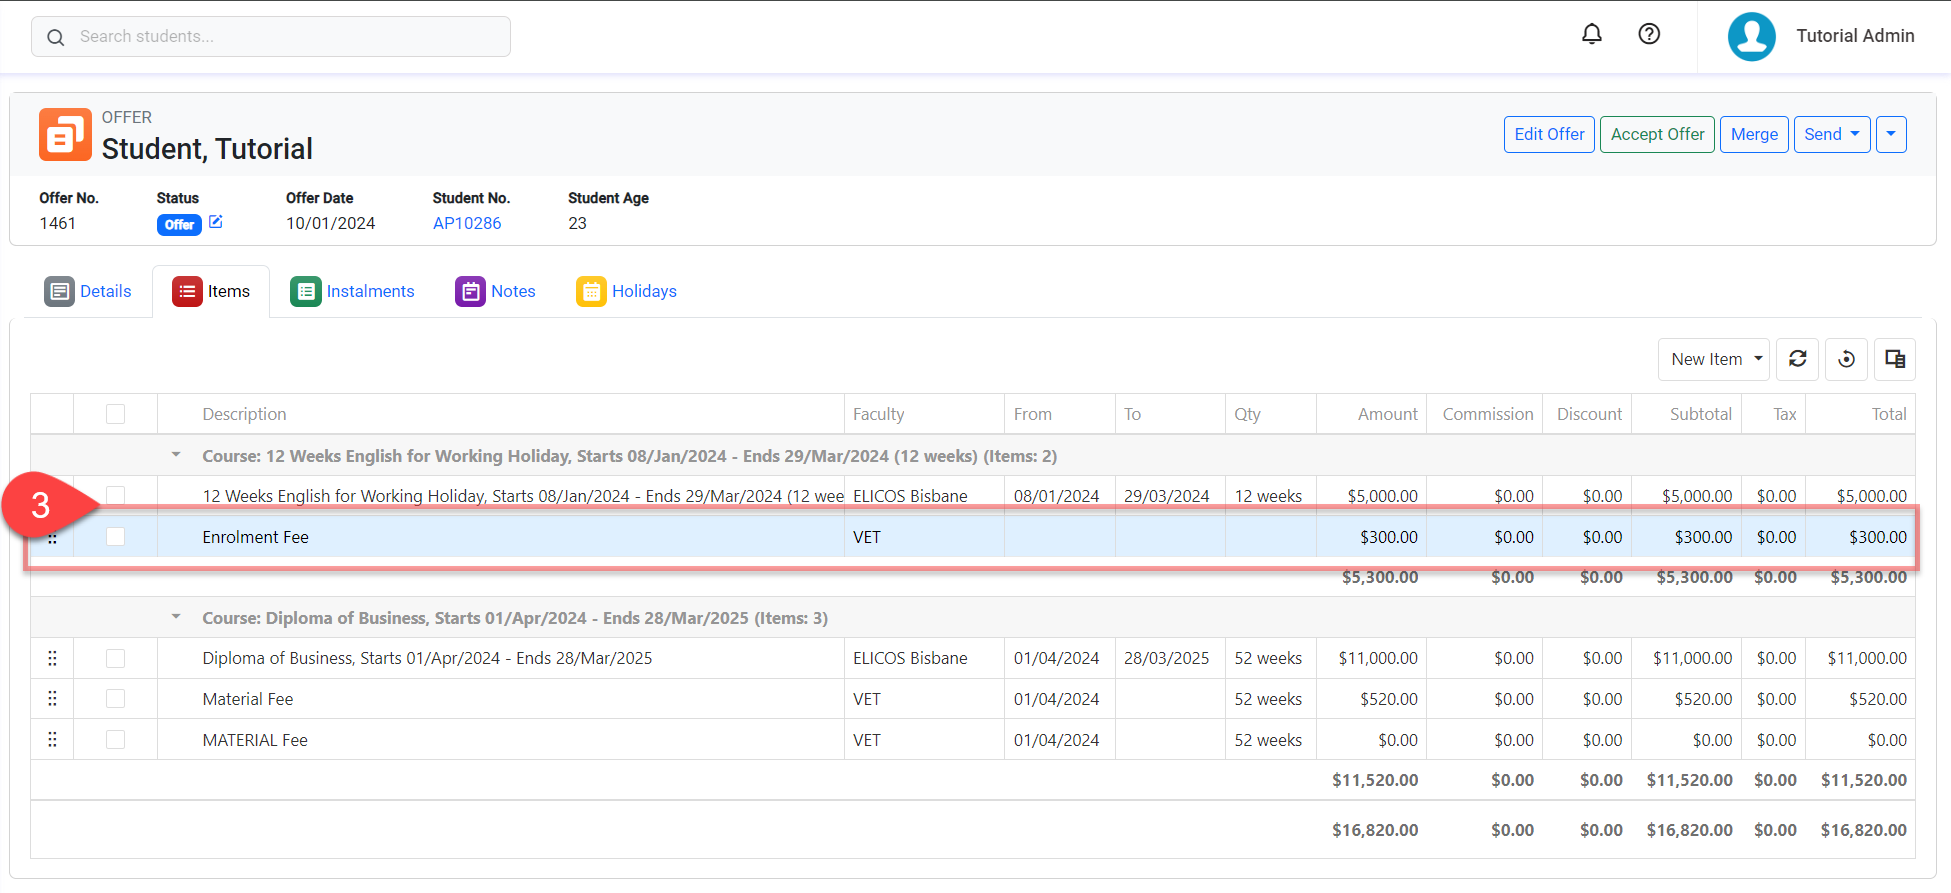
Move Offer Items between Offer Groups
If you want to move non-course offer items between the groups, you can do so by following these steps.
-
Go to the Offer Items tab on the offer of interest.
-
Click on the move icon and Drag and Drop the offer item into the desired group.
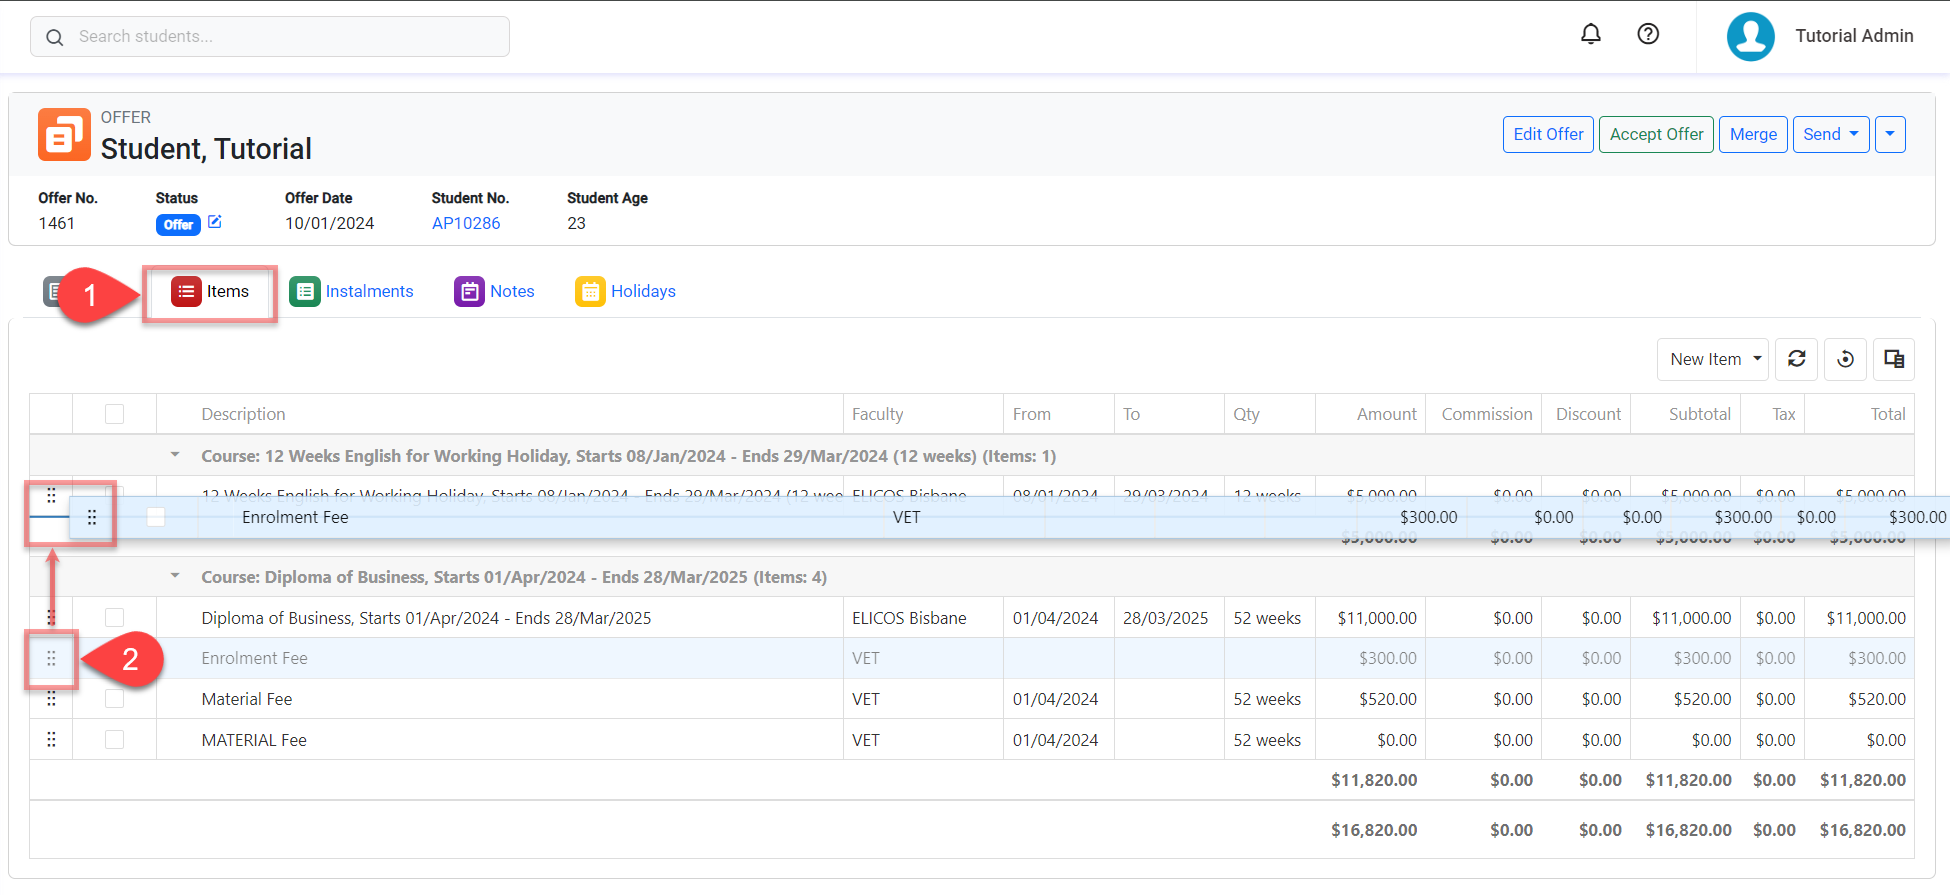
-
The offer item is moved successfully.
-
Course Items can’t be moved to another group.
-
The Start date, End date, and Length of the moved offer item will not be altered after the move. You have to update them manually if necessary.
-
For Other type items with the Match Course Dates option enabled and is being transferred to another group within the same faculty, the dates, length, and amounts for this item will be recalculated automatically to match the course in the target group. These can't be modified manually.
If the item is moved to a group of a different faculty, the dates, length, and amounts for this item will be automatically reset to default values. These can't be modified manually.
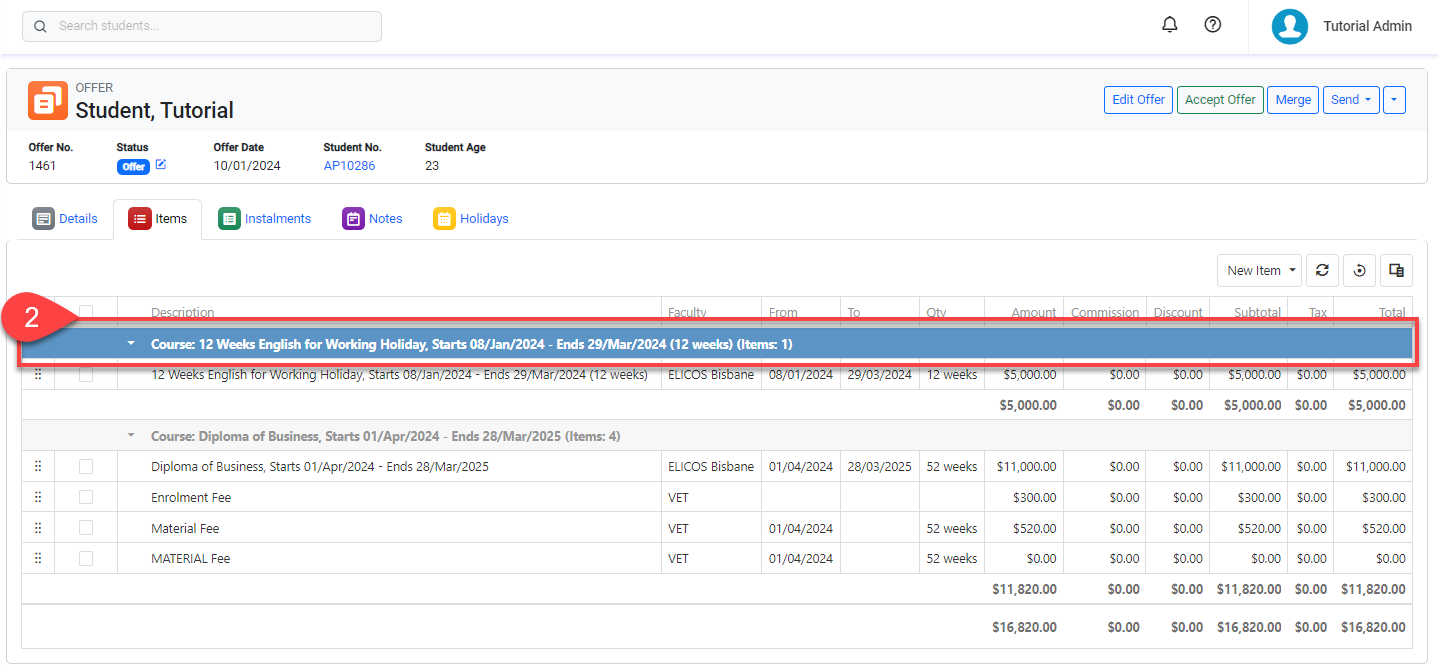
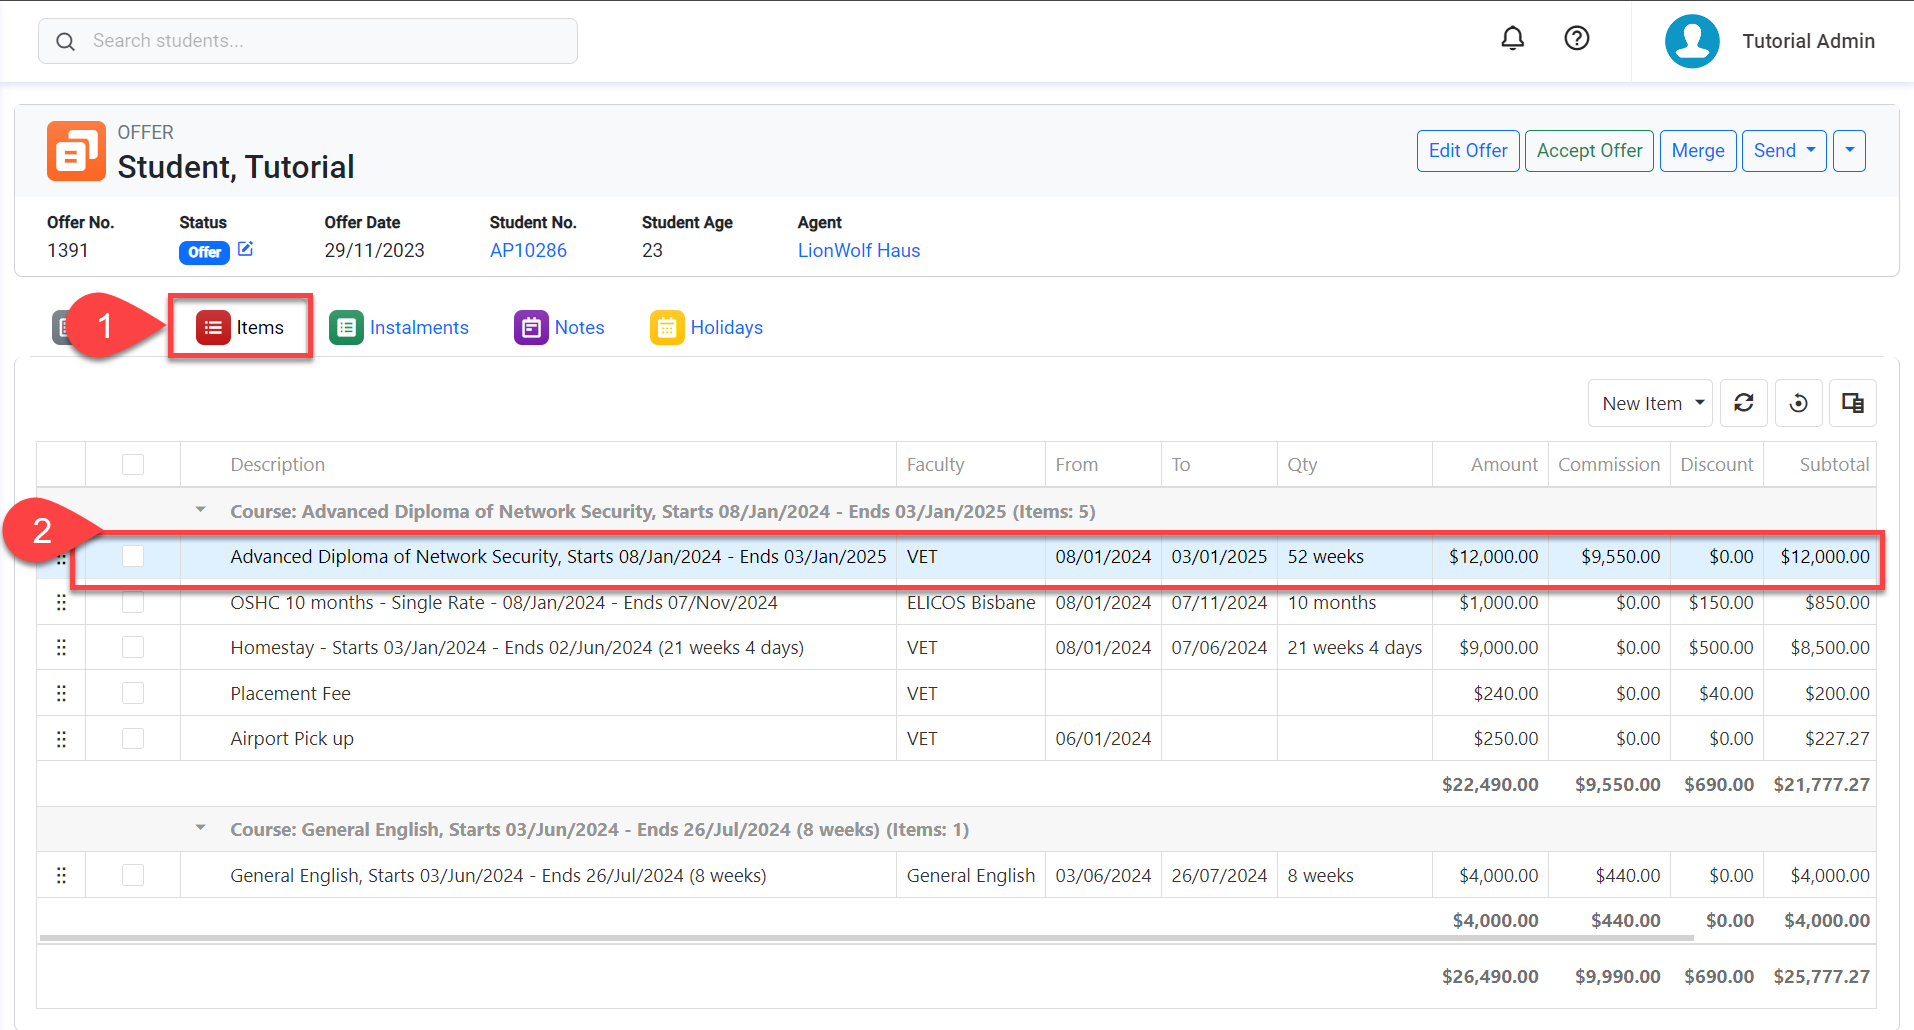
View Offer Items
Follow these steps to view the offer items for a specific offer.
-
Go to the offer that you want to see the items for.
-
Go to the Items tab.
-
You’ll see the data grid with the Offer Items.

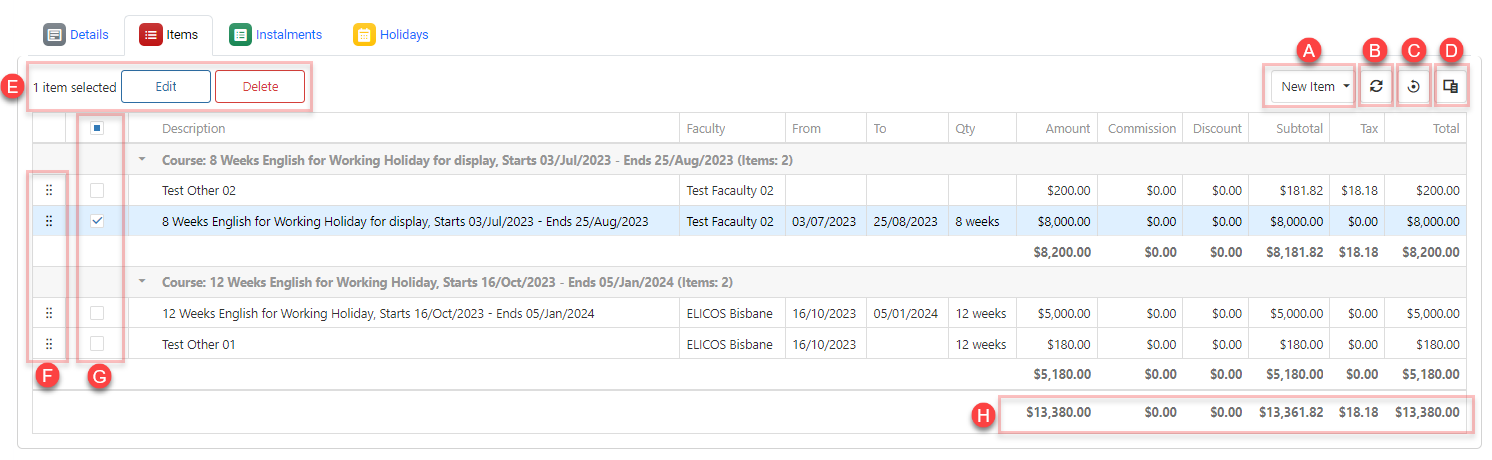
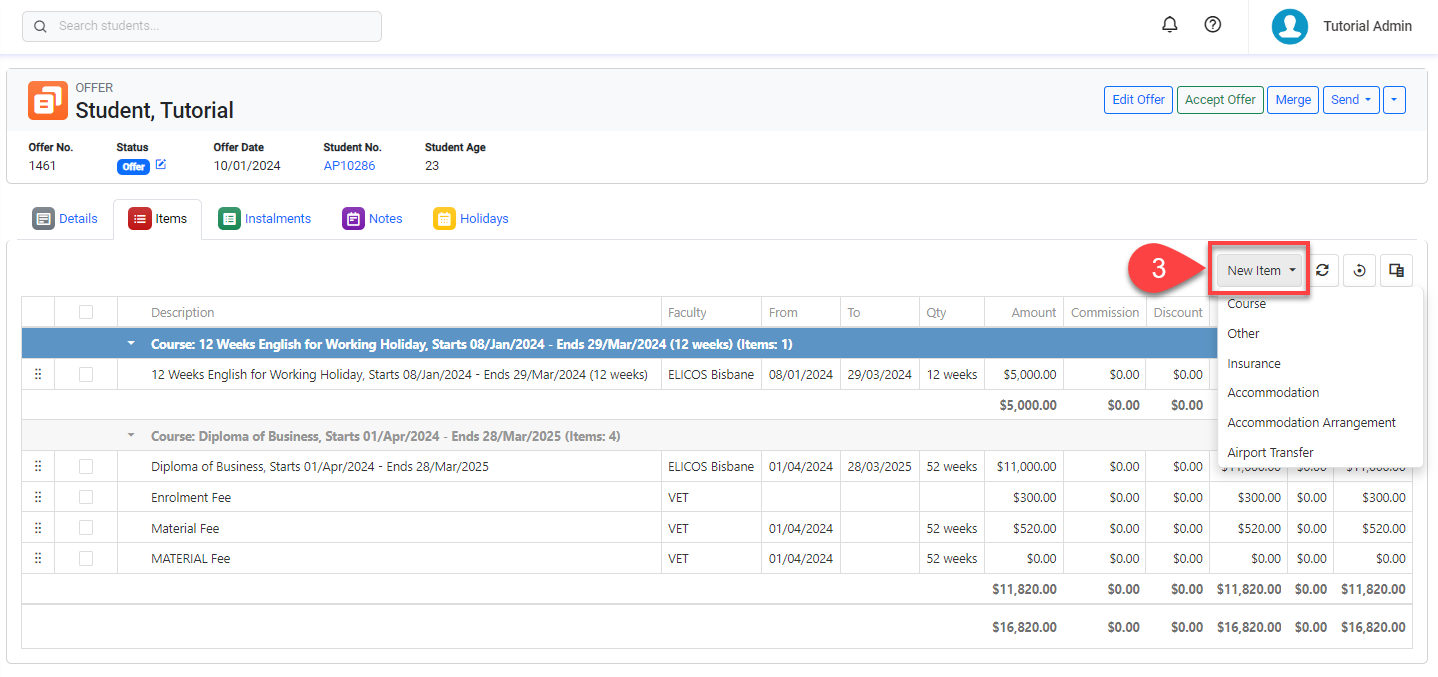
The Offer Items Grid
All the options available to manage the offer items are on the offer items grid.
Let’s explore the offer items grid.
A. New Item: Click on this button to add new items to the offer.
B. Refresh: Refresh the current data grid to latest values.
C. Reset View: Reset the current data grid’s columns to the default ones.
D. Column Chooser: Add or remove columns to and from the grid. Any changes made to the grid will be saved automatically so they will remain when you come back. Click on Reset View to reset the changes you have made to the grid.
E. Actions panel: Execute actions on the items selected within the data grid.
F. Sort: Sort and move items within a group or to a different group.
G. Select Box: Select one or multiple items.
H. Total Amount Row: View the total amounts for the columns.
Create Offer Items
Once you've created an offer, you need to add items to the offer.
New items cannot be added to an offer that has already been accepted/converted.
Tip
It's advisable to add a course as the first item. This recommendation is based on the fact that certain components of the offer may be contingent upon the length and dates of the course.
-
Go to the offer items tab on the offer of interest.
-
If there are multiple courses within an offer, meaning more than one offer group, choose the specific group to which the item will be added.
-
Click on the New Item button, and select the type of item that you want to create. If you cannot see the item type that you intend to create, contact your system administrator to ensure the related App is installed on your system.
For specific details on each offer item type, click on the respective link below:
View Offer Item Details
Although the main details for each offer item are displayed on the offer items grid (you can customise the columns on the grid), you can also view the details for each item as follows:
-
Go to the Items tab in the offer of interest.
-
Double click on the item that you’d like to view.
-
The Offer Item Details will display on pop-up window.
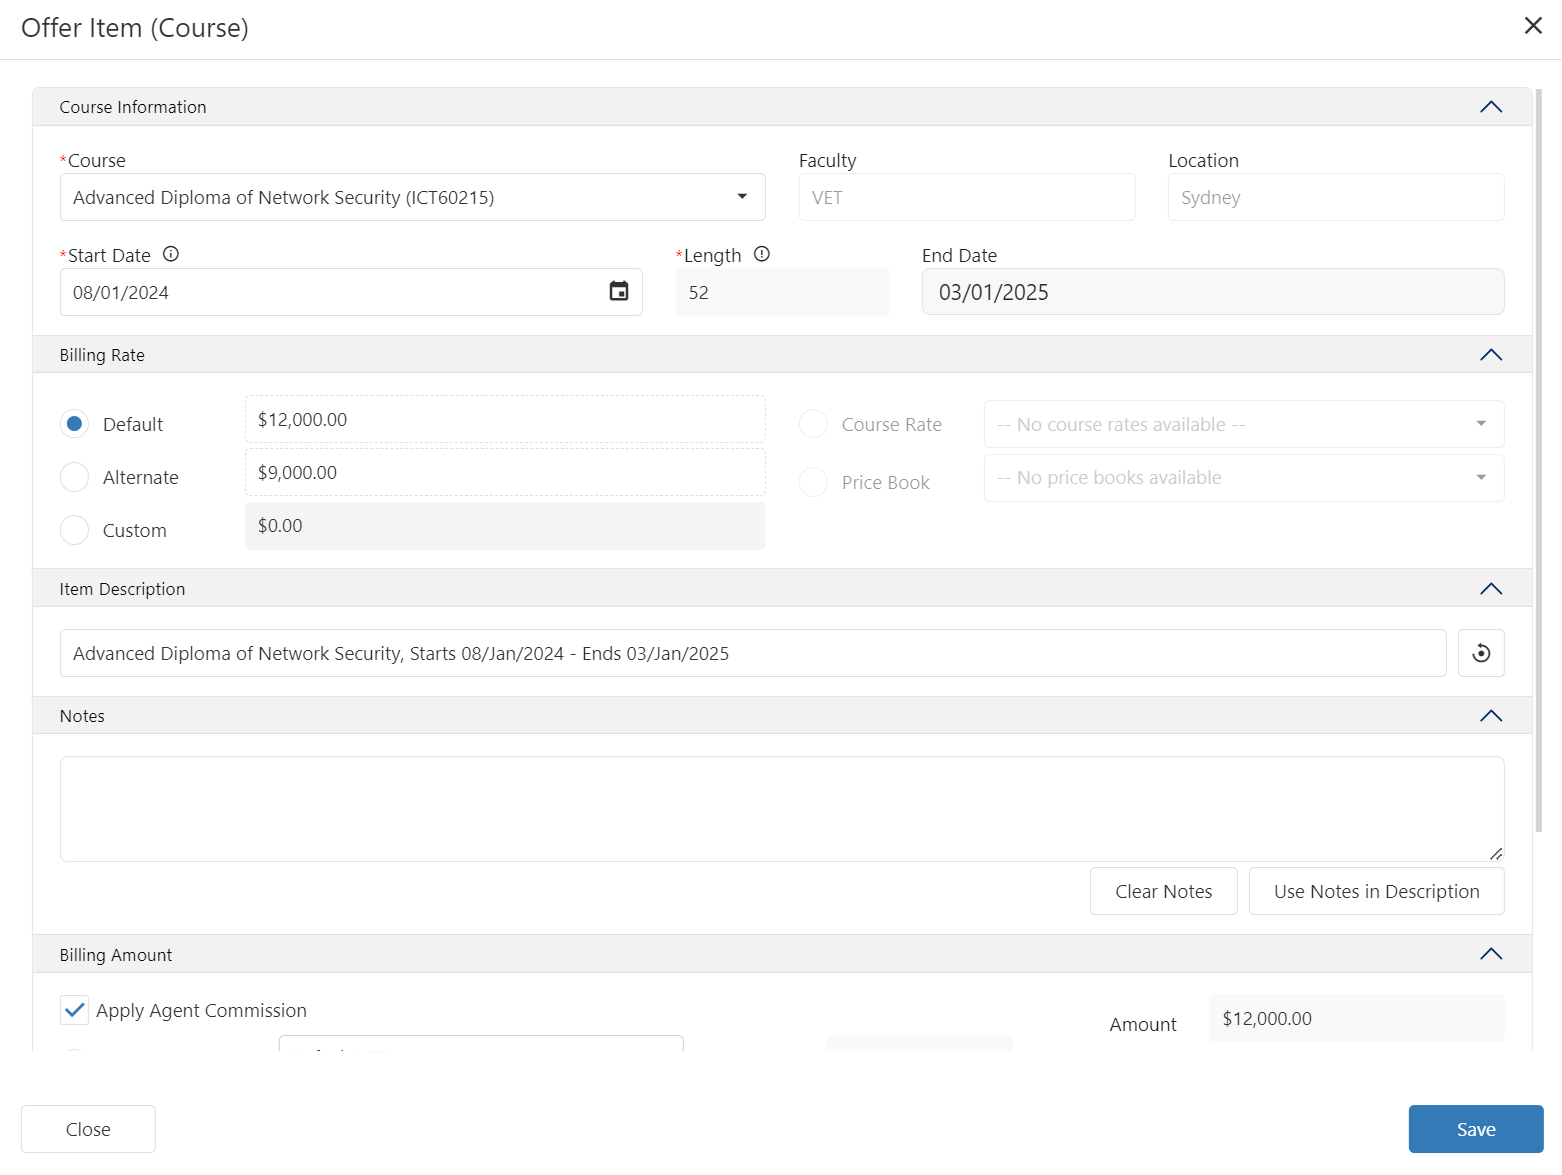
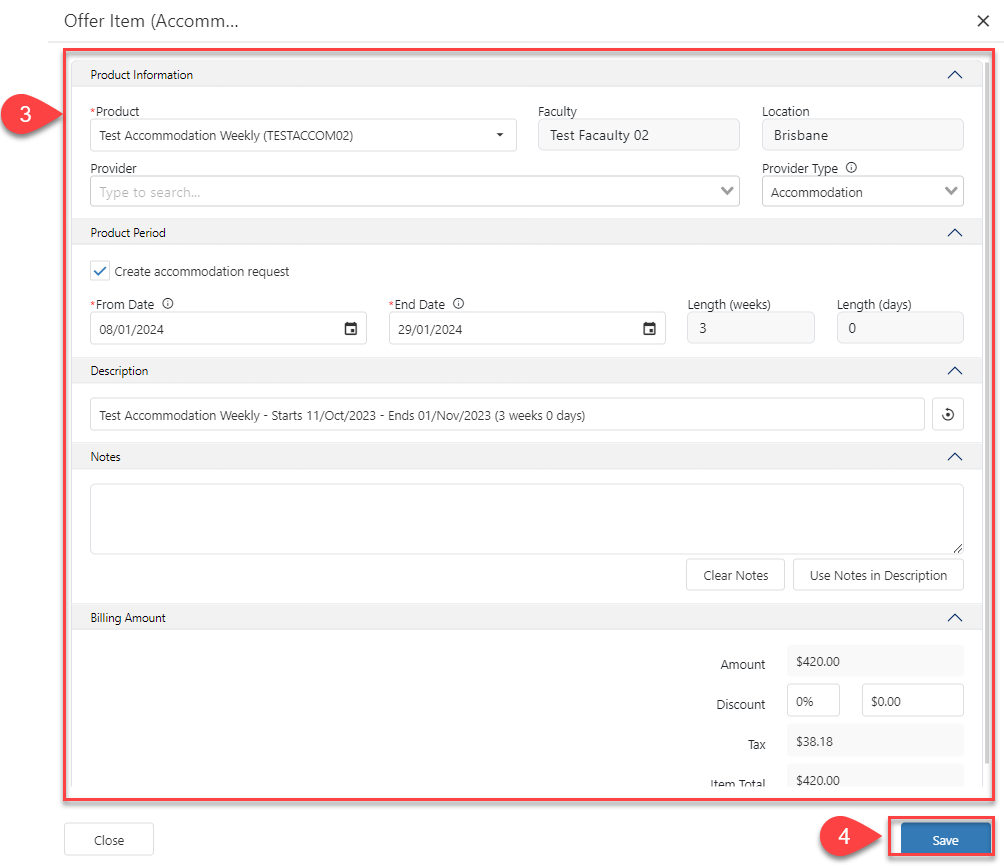
Edit Offer Items Details
Offer Items cannot be modified after the offer is accepted/converted.
Edit Item Details
-
Go to the Items tab in the offer of interest.
-
Double click on the item that you’d like to edit. Alternately, tick the Select Box for the item and then click on the Edit button.

-
Edit the details as needed.
-
Click on Save to finish.
Set a Course as Primary
By default, the system assumes the course in the first group is the primary course for the offer. If the offer includes multiple courses and a different course should be set as primary, you can manually update this as needed.
To set a course as Primary:
-
Go to the Items tab in the offer of interest.
-
Tick the checkbox next to the course you want to set as the primary course.
-
Click on the Set as Primary button on the Instalments Grid, and then confirm the action.
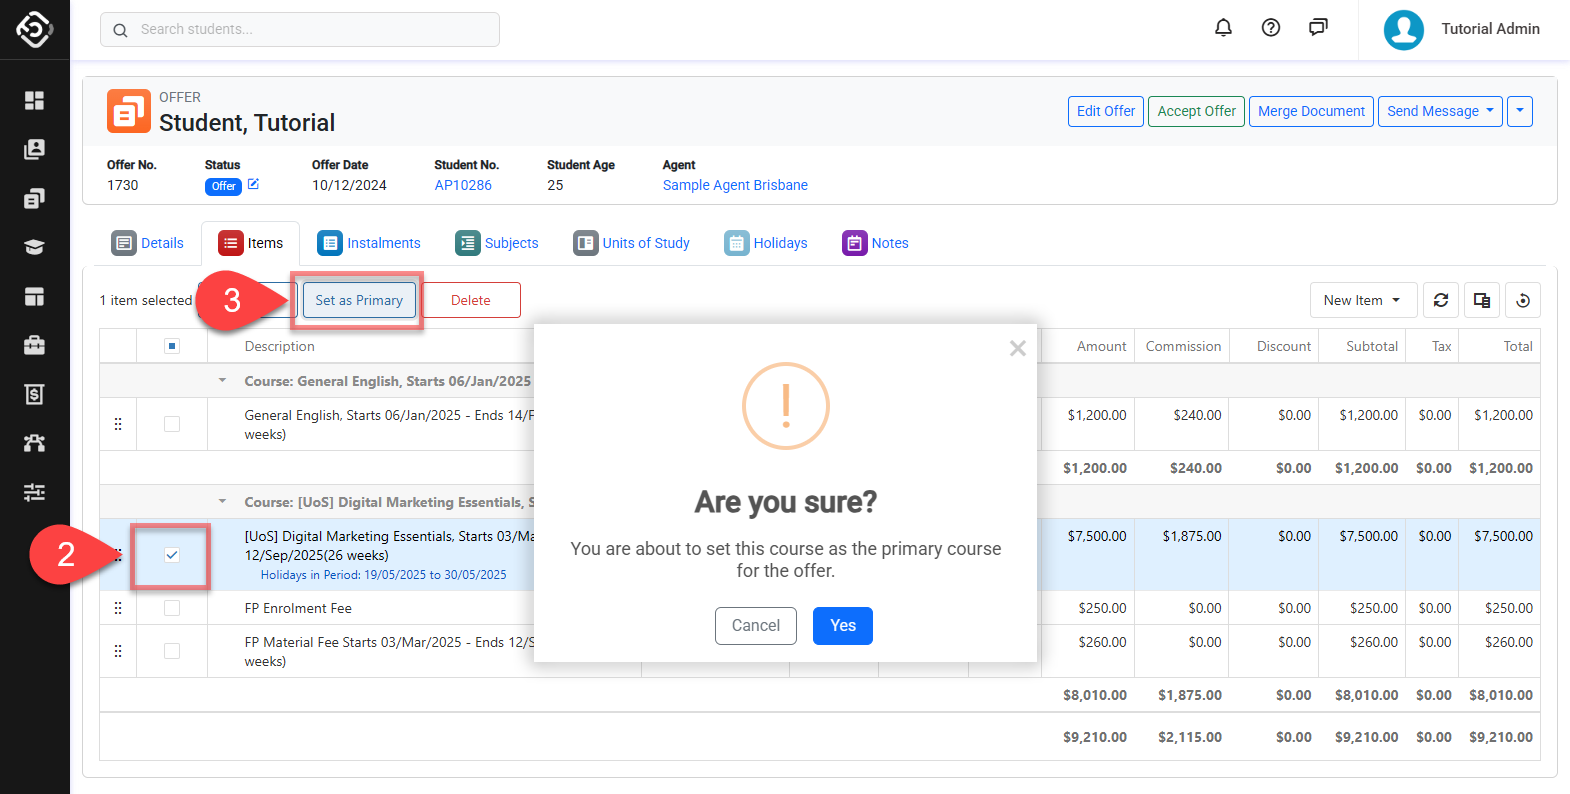
-
The selected course will be marked as the Primary Course and display the

Delete Offer Items
Offer Items cannot be deleted after the offer is accepted/converted.
-
Go to the Items tab in the offer of interest.
-
Select the item/items that you’d like to delete from the offer.
-
Click on the Delete button.
-
Confirm to delete.
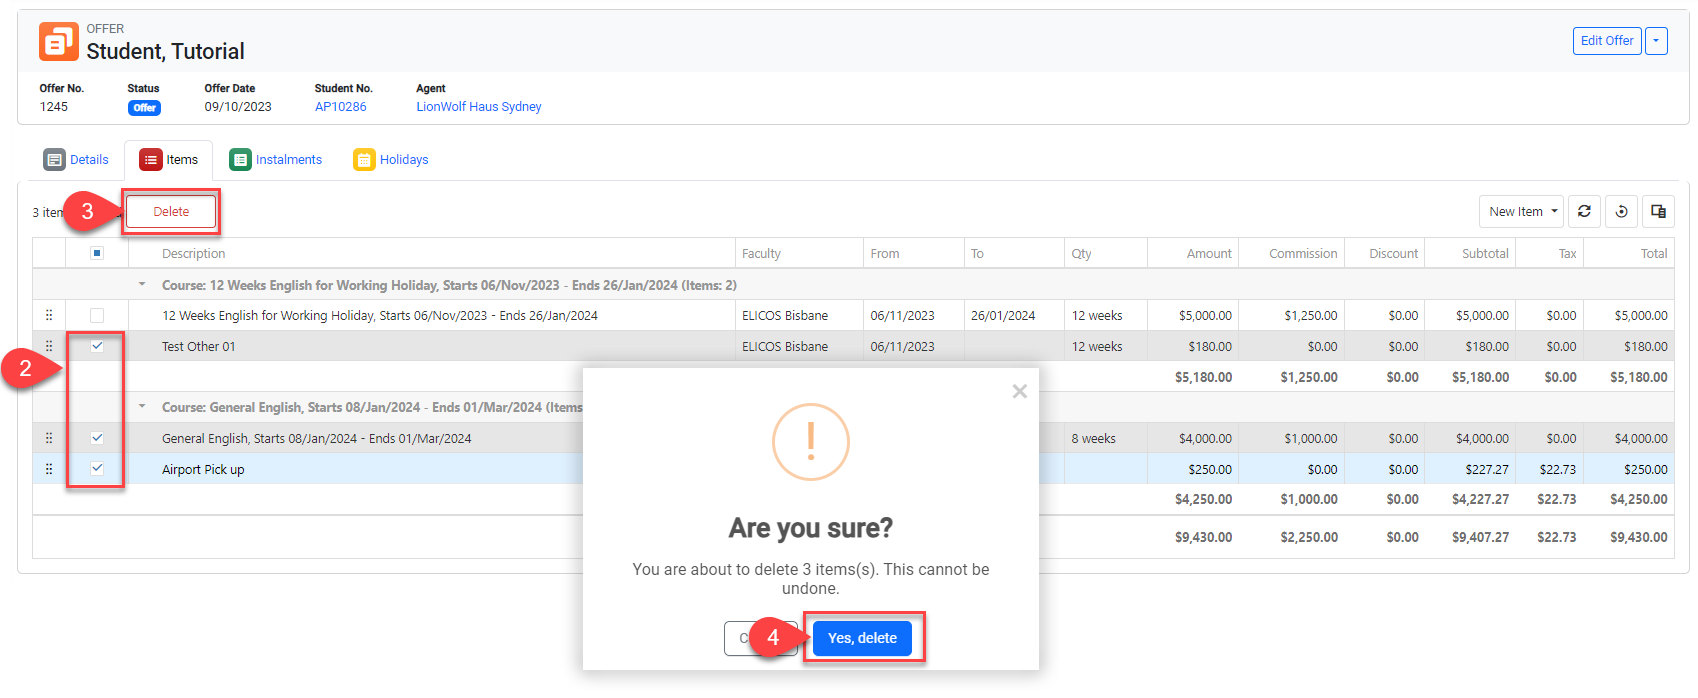
If a course item is removed, other items that were in the same group will be moved to the group with the earliest Start Date among the remaining groups. If there are no other groups, they will be classified as Ungrouped.