
Overview
When offers include courses with a Subject or Units of Study (UoS) pricing, users can manage the details of the subjects within these courses through the Offer Subjects tab. This allows users to ensure that the course subjects details align with the academic requirements and student needs before the offer is accepted.
As the cost for subject-based courses is determined by the cost of each subject, it is convenient for users to be able to modify the subjects at the offer stage, including the start and end dates, the rates and the due dates. For UoS courses, users can manage the dates and the Units-of-Study that each subject belongs to.
Once the offer is accepted, the subjects for each course will be added to the respective enrolment and even though they cannot be modified on the offer, changes to subjects are allowed on the enrolments.
View Offer Subjects
-
To view the subjects for the courses in an offer, go to the Offer of interest.
-
Click on the Subjects tab. This tab will not be visible if the offer does not have any courses that are subject or Unit of study based.
-
A page with the details for the subjects for the relevant courses will display. In the header of the grid, you can choose the relevant courses through Course Selector and the period details of the selected course through Course Period Details.
For details about available buttons, refer to this article: Data Grids | Single Grid Composition.

Edit Offer Subjects Details
Follow these steps to modify the details for a subject in the course offer item:
-
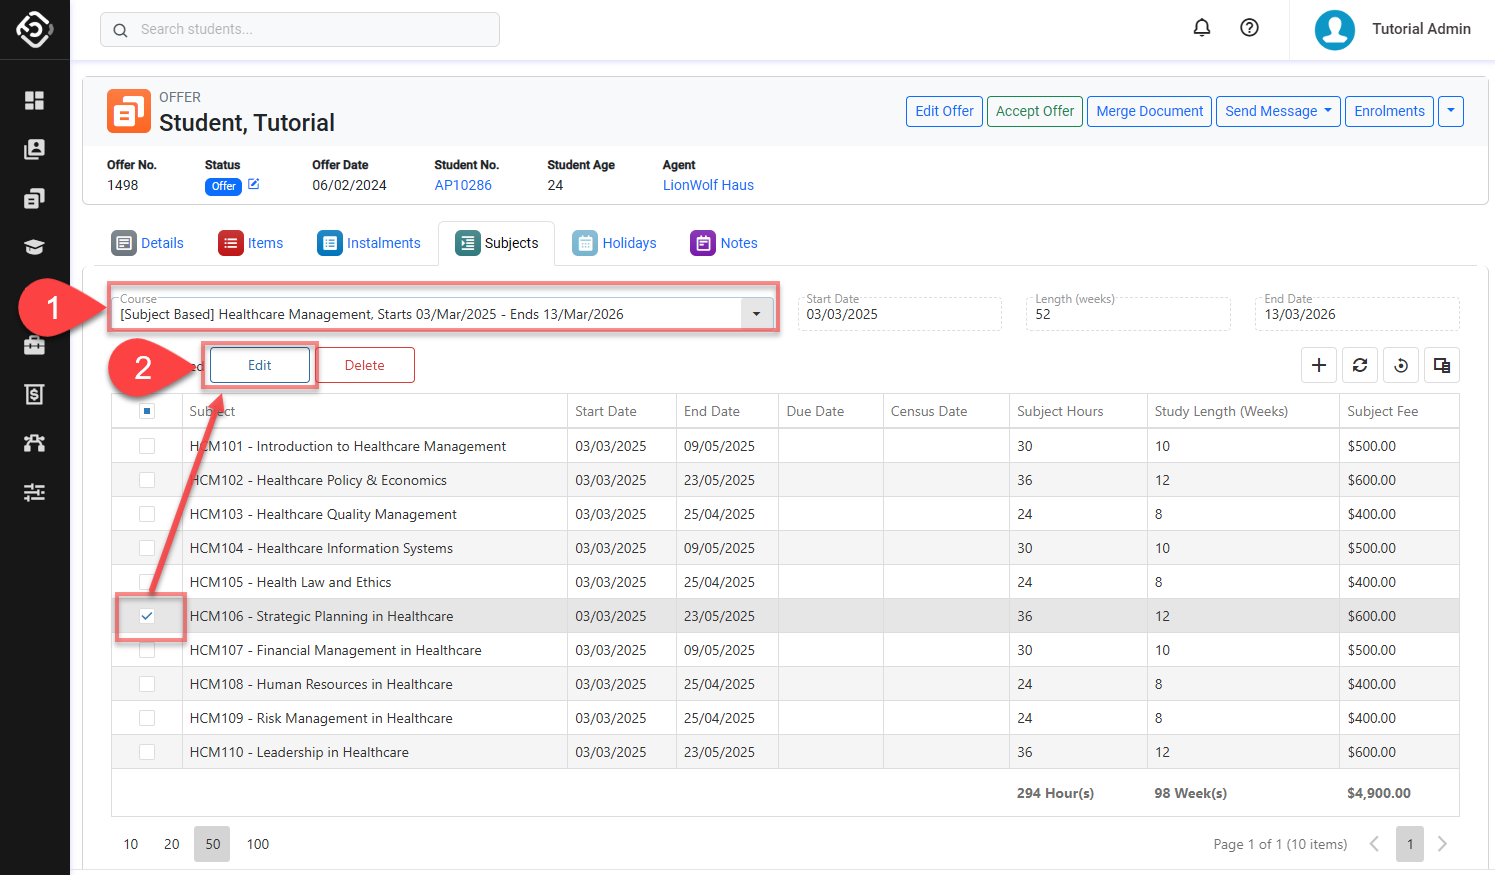
Go to the Subjects tab in the offer and select the course that you want to modify the subjects for.
-
Select the subject that you’d like to edit details for and click on the Edit button on the Actions Panel, or simply double click on the subject on the grid. A pop-up window will display with the details for the subject.
-
Update the details required. The options available depend on the course type:
-
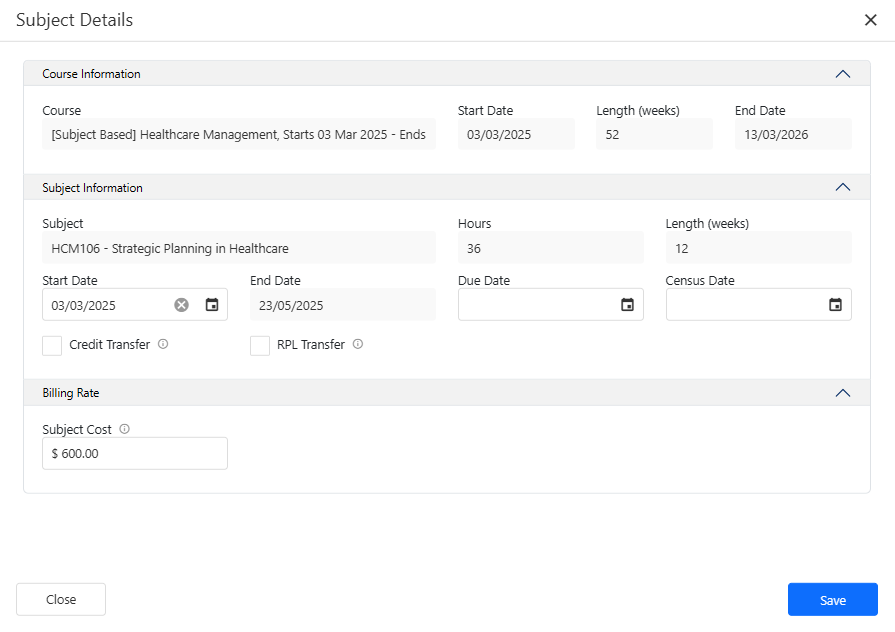
Subject-based courses
-
Start Date: Select the start date of the subject. Based on the subject's length, the end date will be automatically calculated. The start date and calculated end date must be within the course period.
-
Due Date: Select the due date for the subject. The date entered will be used as the Payment Due Date for that subject.
-
Census Date: Select the census date for the subject. The date entered will be applied as the Census Date for the subject's result in the Enrolment after the offer is accepted.
-
Credit Transfer: Select this option to mark this subject as credited through prior study or experience. When selected, the Credit Rate configured in the system settings will be applied to the subject cost. If no specific Credit Rate is set, the subject’s default rate will be used.
-
RPL Transfer: Select this option to mark this subject as granted through Recognition of Prior Learning (RPL). When selected, the RPL Rate configured in the system settings will be applied to the subject cost. If no specific RPL Rate is set, the subject’s default rate will be used.
-
Subject Cost: Enter the new rate for the subject if needed (this will override the subject default rate). Updating this rate will also update automatically the total cost of the course to reflect this change.
-
-
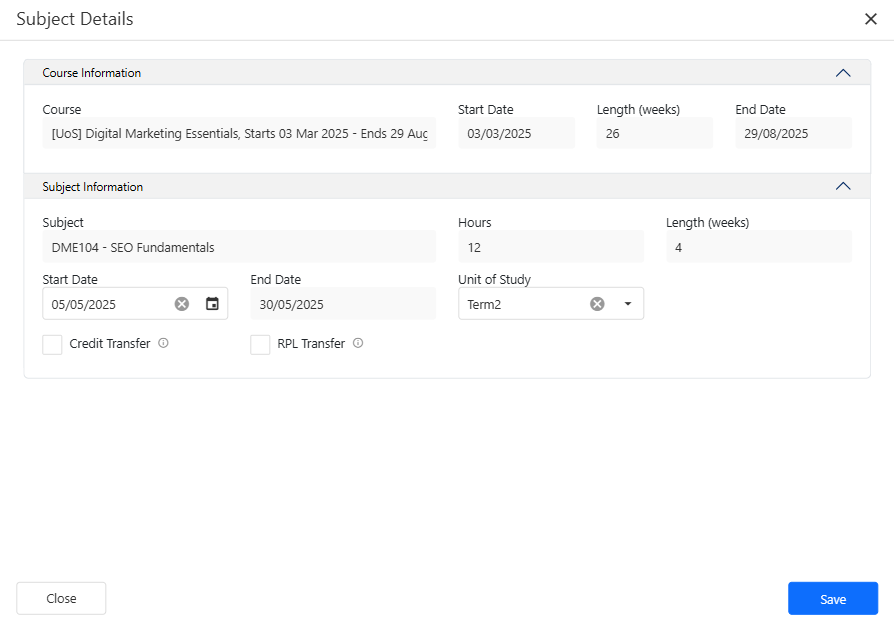
Units of Study-based Courses
-
Start Date: Select the start date of the subject. Based on the subject's length, the end date will be automatically calculated. The start date and calculated end date must be within the course's period.
-
Unit of Study: Select the Unit of Study for the subject.
-
Credit Transfer: Select this option to mark this subject as credited through prior study or experience.
-
RPL Transfer: Select this option to mark this subject as granted through Recognition of Prior Learning (RPL).
-
-
-
Click on Save to finish.
Bulk Calculation of Census Dates for Offer Subjects
Subject-based courses only
The Bulk Calculation of Census Dates enables users to automatically calculate the Census Date for all the subjects in a subject-based course.
When the system setting Set Due Date to match Census Date is enabled (enabled by default), the Due Date for each subject will be automatically set to match the Census Date.
The table below outlines the methodology for calculating the Census and Due Dates for options available, depending on the system setting Set Due Date to match Census Date.
|
|
Set Due Date to match Census Date Setting |
|
|---|---|---|
|
Enabled |
Disabled |
|
|
Census Dates |
Census Dates and Due Dates are calculated as 20% of each subject’s duration from its start date. |
Census Dates are calculated in the same way as when the option is enabled, but Due Dates are instead set to match the Start Date of each subject. |
|
Default Dates |
Census Dates and Due Dates are set to the subject’s end date. |
Census Dates are calculated in the same way as when the option is enabled, but Due Dates are instead set to match the Start Date of each subject. |
|
Standard Census Dates |
Census Dates and Due Dates are calculated as 20% of the duration from the start date of the last-starting subject. |
Census Dates are calculated in the same way as when the option is enabled, but Due Dates are instead set to match the Start Date of each subject. |
The Census Dates and Due Dates are calculated only when the Start and End Dates are defined.
Follow these steps to calculate the subjects' census dates and due dates using any of the methods above:
-
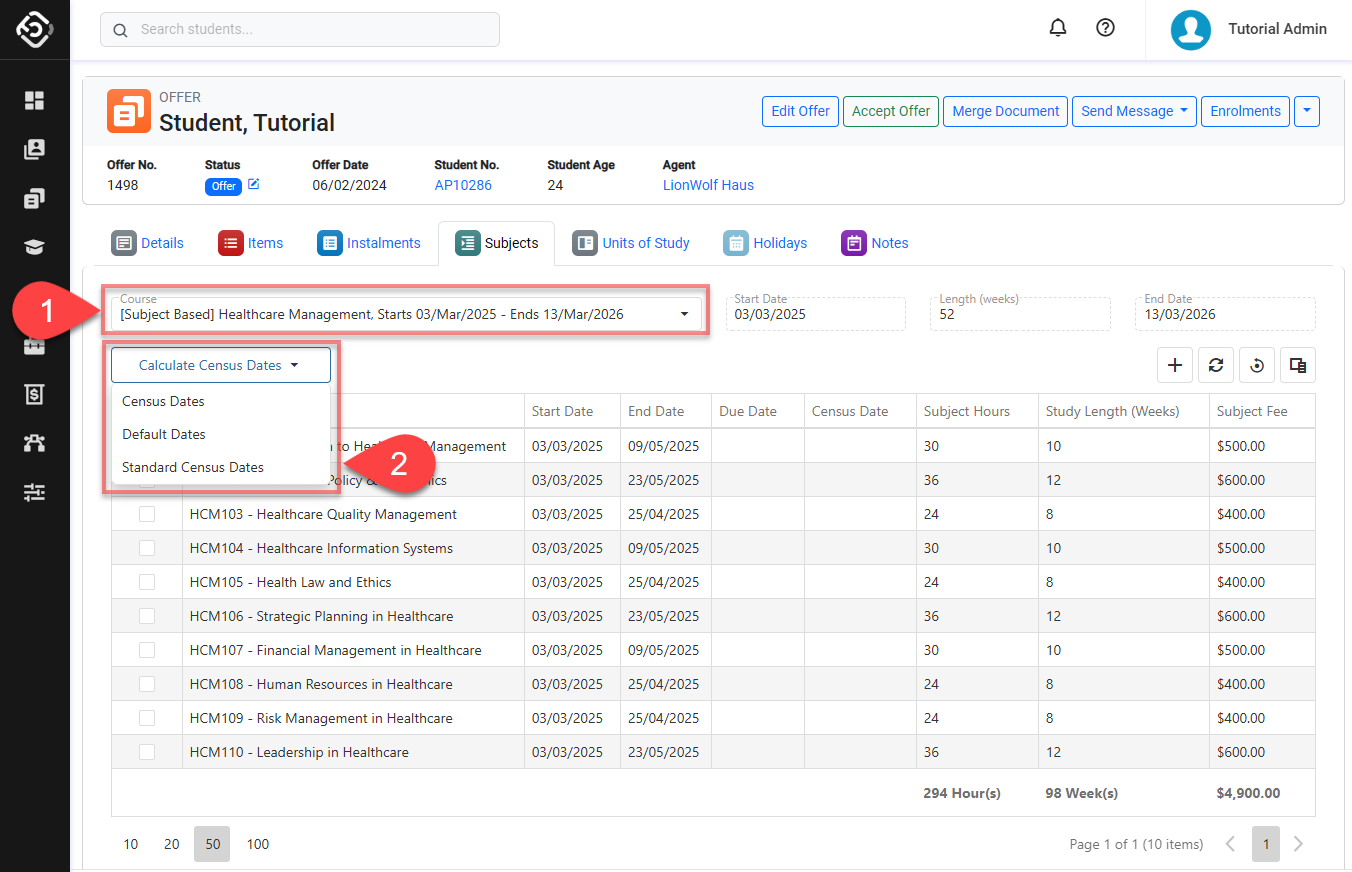
Go to the Subjects tab in the offer and select the course that you want to update the subjects for.
-
Click on the Calculate Census Dates button on the Actions Panel. The list of options will display.
-
Click on the option that you’d like to use for the calculation and confirm to apply.
-
The grid will refresh with the new calculated Census Dates and Due Dates.
Apply Unit of Study (UoS) Dates to Offer Subjects
Units of study courses only
For Units of Study-based courses, users can align each subject's Start Date with the Start Date of the Unit of Study (UoS) that the subject belongs to. When doing so, the subject end date will be recalculated automatically based on the new start date and its length.
The Start and End dates are only calculated for subjects with a Unit of Study defined.
To apply the UoS dates to the offer subjects, follow these steps:
-
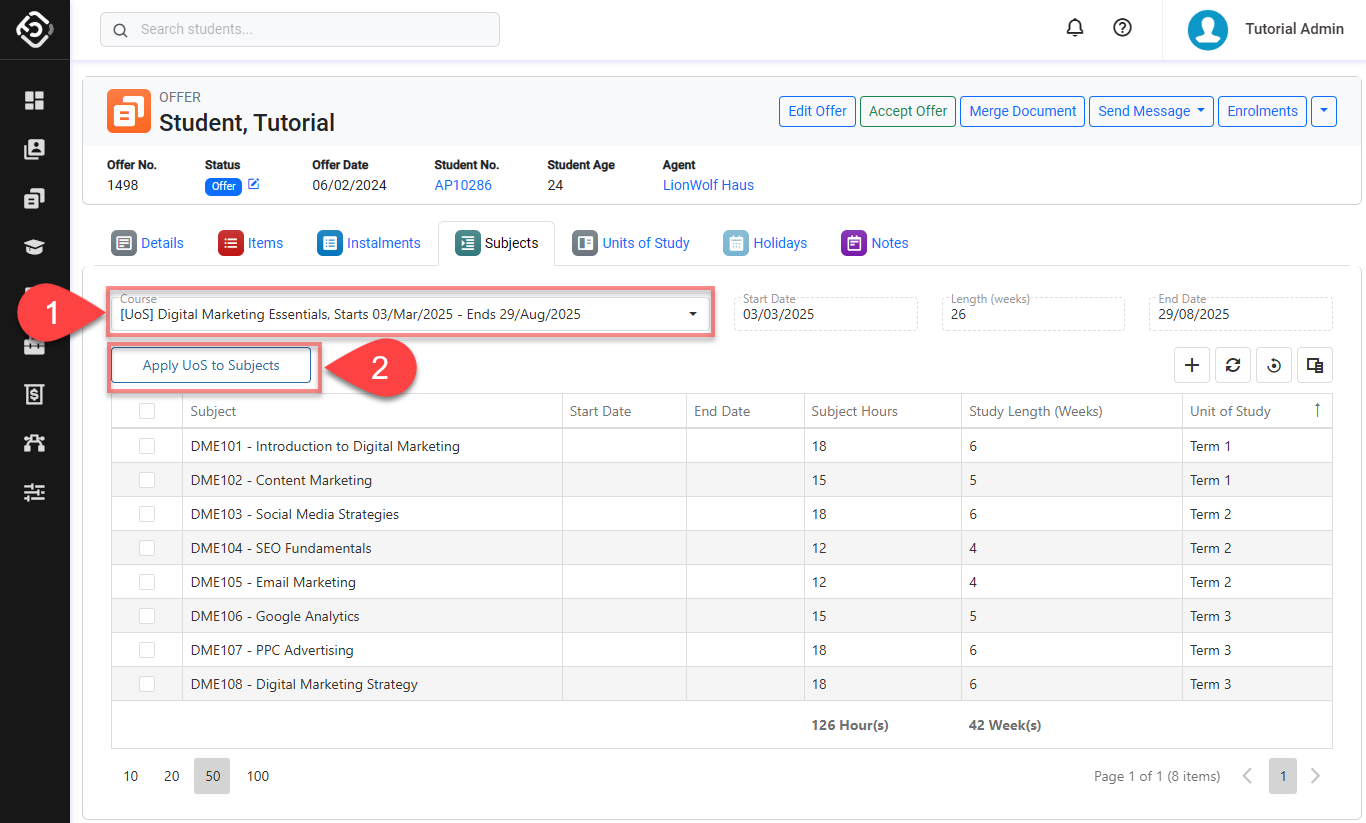
Go to the Subjects tab in the offer and select the Units of Study-based course that you want to update the subjects for.
-
Click on the Apply UoS to Subjects button on the Actions Panel and confirm to apply.
-
The grid will refresh with the new calculated Start and End Dates.
Add Subjects to Offer Courses
To add a new subject to a subject-based course or unit of study course, or to re-add subjects that were removed from the courses, follow these steps.
-
Go to the Subjects tab in the offer and select the course that you want to add the subject(s) to.
-
Click on the Add button at the top right corner of the data grid.
-
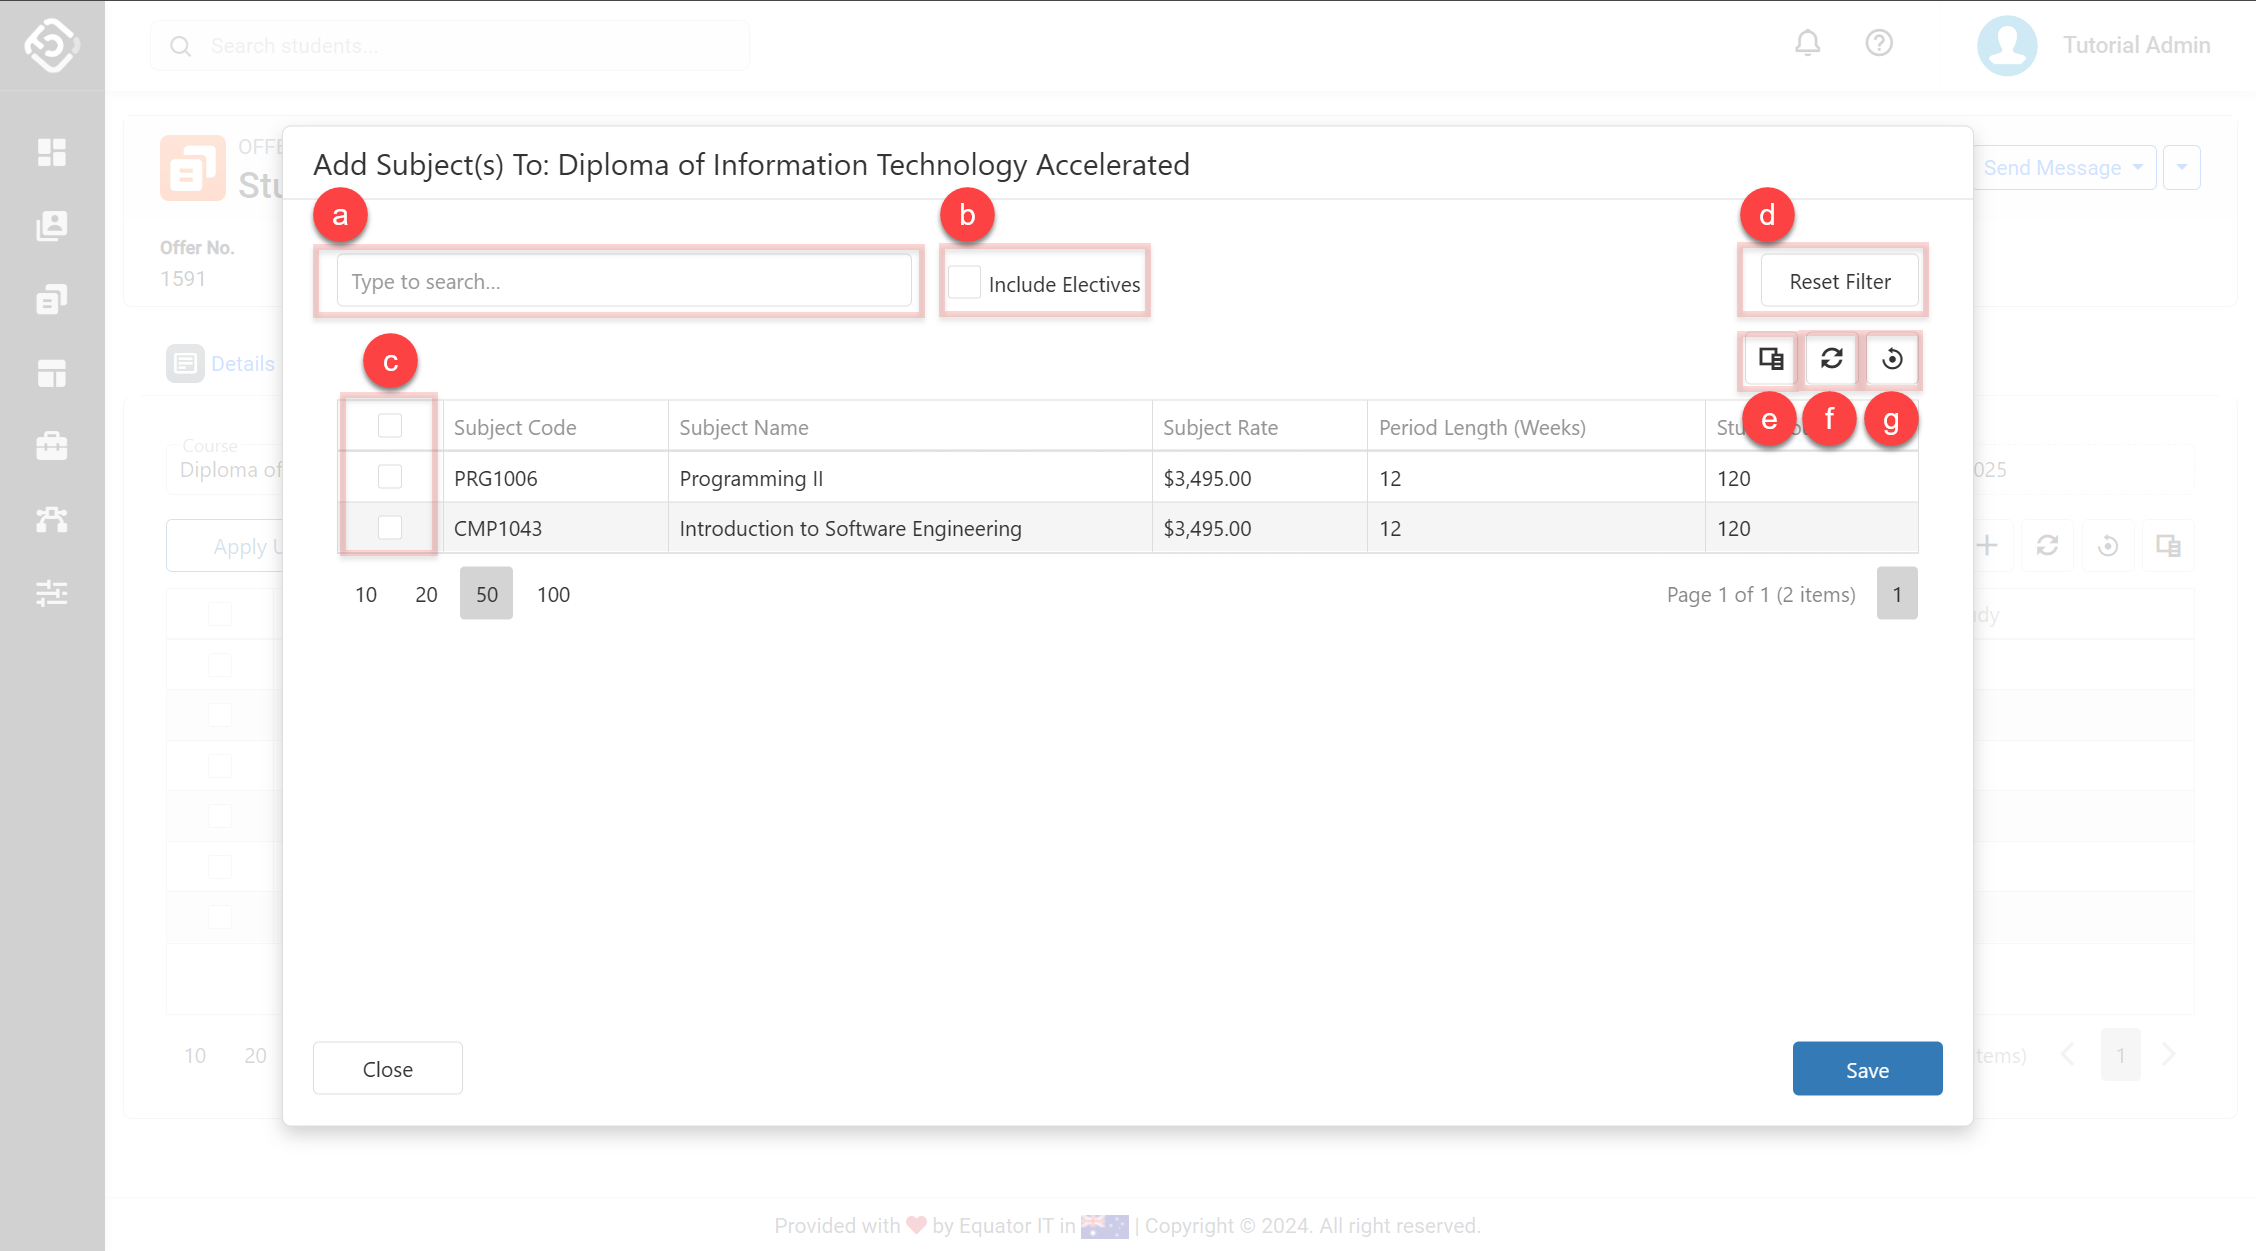
The Add Subject(s) window will pop up to search and select the subjects to add to the selected course.
By default, the data grid will display subjects linked to the course that aren’t already on the offer course.
The options available on the grid are:-
Search Box: Filter the subjects by the name or code.
-
Include Electives: If selected, it will show all the subjects in the system in the data grid excluding those already attached to the course.
-
Select Box: An option to select one or multiple subjects.
-
Reset Filter: Resets all filters to the default values.
-
Column Chooser: Customise the columns in the grid.
-
Refresh Grid Data: Refresh the current data grid with the latest values.
-
Reset Grid: Resets the grid to the default configuration.
-
-
Select the subject(s) that you intend to add to the course in the offer and click on Save.
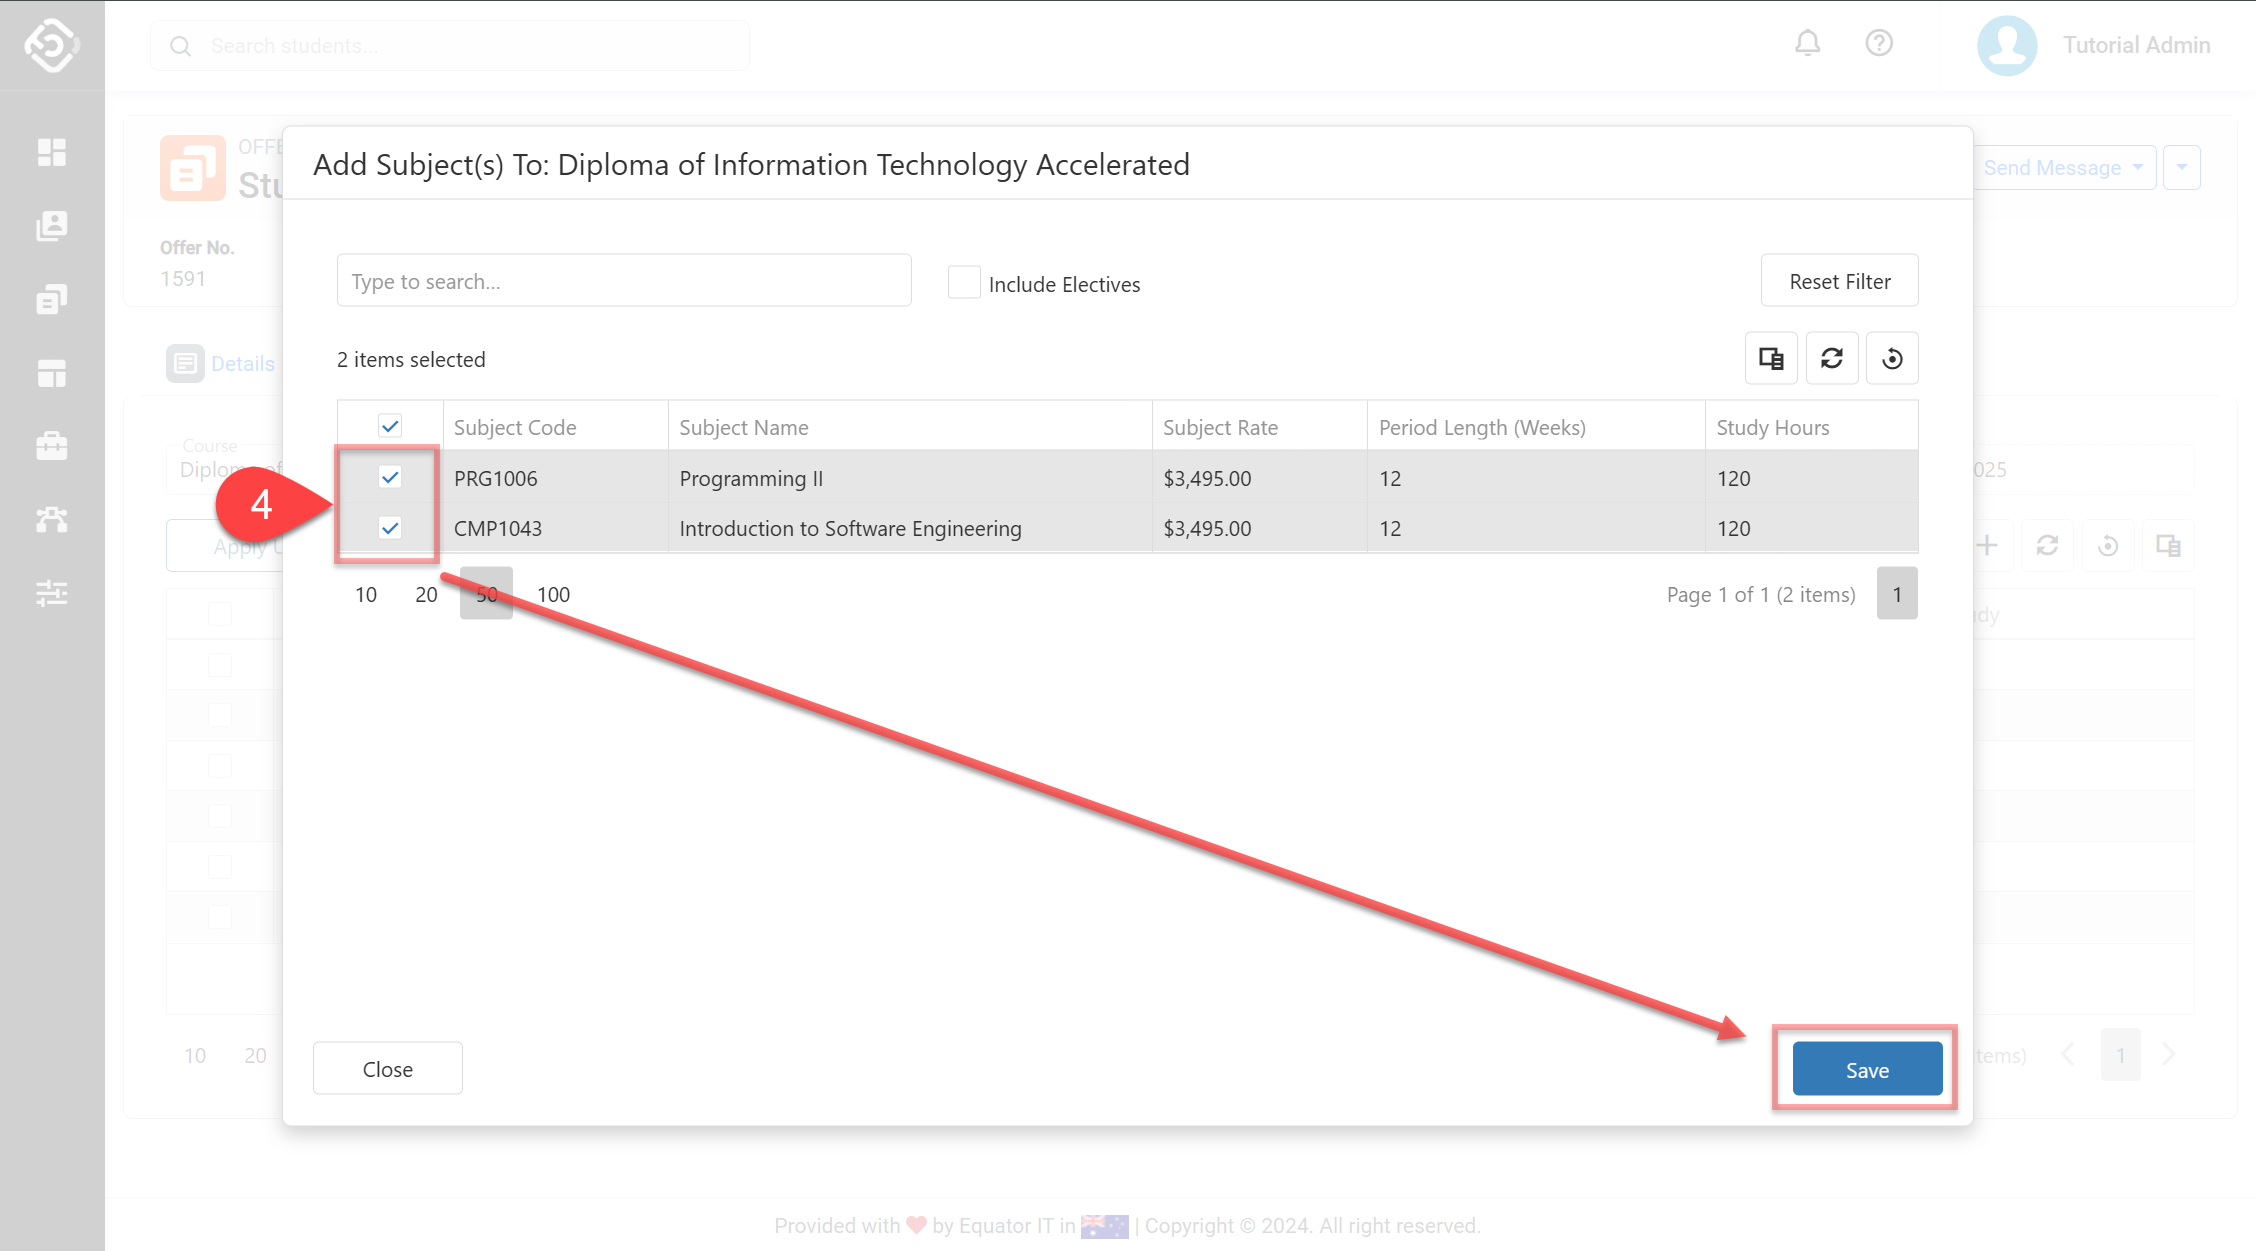
-
The selected subject(s) are added to the course in the offer.
The subjects will be added without any values for the Start/End Date, Due Date, Census Date (for Subject-based courses), and Unit of Study (for Units of Study courses) fields.
For Subject-based courses, the Total Price of the Offer will be adjusted according to the added subject(s) cost, and instalments for the respective subjects will be created respectively.
Remove Subjects from an Offer Course
-
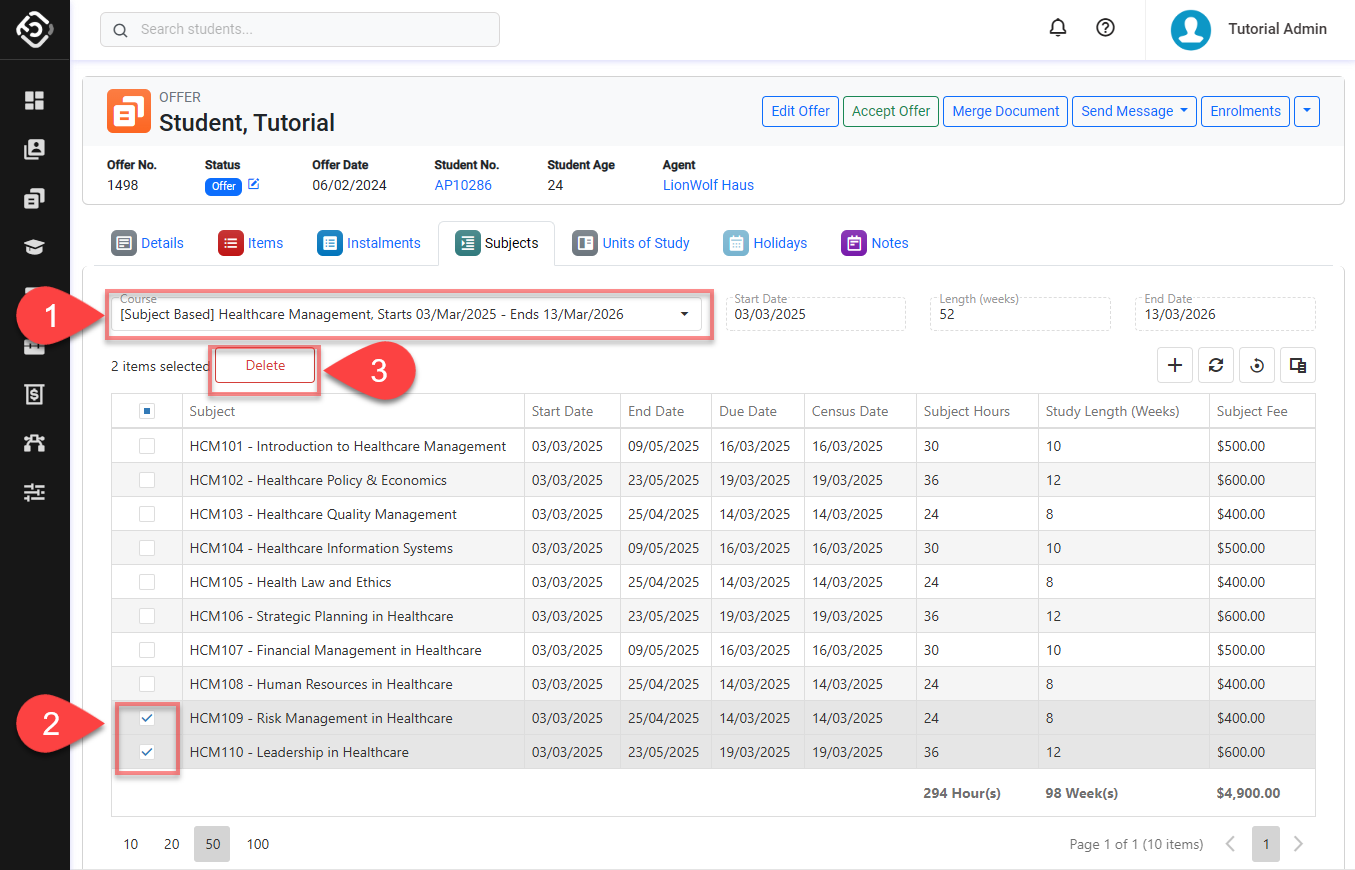
Go to the Subjects tab in the offer and select the course that you want to remove the subject(s) from.
-
Using the Select column on the grid, select the subject(s) that you would like to remove.
-
Click on Delete from the Action Panel.
-
Click on Yes to confirm.