
The Revenue Income Recognition Report is a financial report used to track changes in revenue over a period of time. When you run this report, the results are stored, and changes are tracked in future reports.
Overview
The Revenue Income Recognition Report is designed to produce repeatable results regardless of changes to student enrolments allowing the monitoring of changes in Revenue.
It is used to track the changes in earned revenue for different fee types (tuition, agent, accommodation etc) in a given period. Regardless of changes in the enrolments, the data for these reports will remain the same. All the changes in revenue will then be captured in future reports.
General Concepts
Report Period
When running the report, a single Entry Date date is selected by the user. This date determines the period for the report as follows:
-
If a report has been created for past periods, the new report will cover the time frame between the last report's date and the newly chosen Entry Date.
-
If no reports exist yet, an initial report to serve as a baseline for future ones needs to be created. It's recommended to generate this initial report for a time frame before your first period of interest. For instance, if you plan to start monthly reporting in January 2023, create your baseline report for December 2022. This will set the baseline for all subsequent reports, including the one for January 2023.
Enrolments to Report
The report includes only enrolments that:
-
Are current or future (end date is after the start date of the report period). Or;
-
Have any financial activity in the report period. Or;
-
Have any changes in the report period.
The report only considers invoice, credit, and debit amounts with an invoice, credit, and debit date, respectively, that are less than or equal to the end date of the report period.
Projections
When a report is generated with a future Entry Date, it's considered a Projection. While these Projection reports are calculated in the usual way, they won't influence future reports or historical data. Essentially, they allow you to preview changes without impacting the data in other reports.
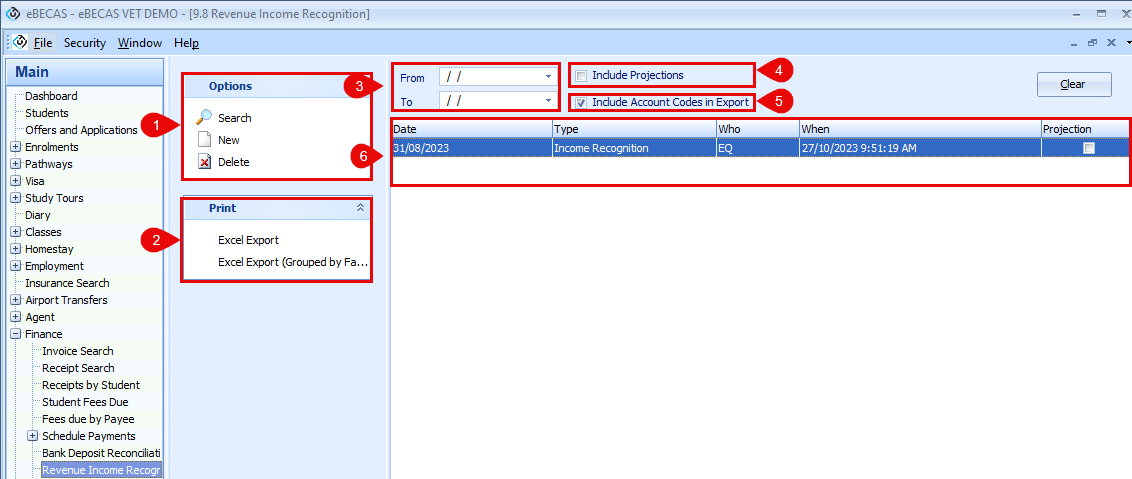
Access the Report
From the Navigation menu, go to Finance > Revenue Income Recognition
The report screen has the following sections/options:
-
Options Panel: Use this panel to search, create and delete reports.
-
Print Panel: Use this panel to export a existing report
-
Report Period Filter: Use these date fields to search existing reports where the report date is within the filters period. These dates are not used to create new reports but only to filter existing reports.
-
Include Projections: Select this option to include in the search results Projection Reports. This setting does not affect new reports and it is only used to filter existing reports.
-
Include Account Codes in Export: If the Account Codes are set up in the system, select this option to include them in the export file. This is particular useful to see revenue changes for multiple accounts.
-
Report Grids: Display the existing reports.
When there are existing reports, you can find them following these steps:
-
Go to the report screen: Finance > Revenue Income Recognition
-
Use the search filters and click on Search on the Options Panel. To see all the reports, leave the From and To dates blank.
-
The reports will display in the report grid.
-
To export a report, see the section Export a Report on this page.
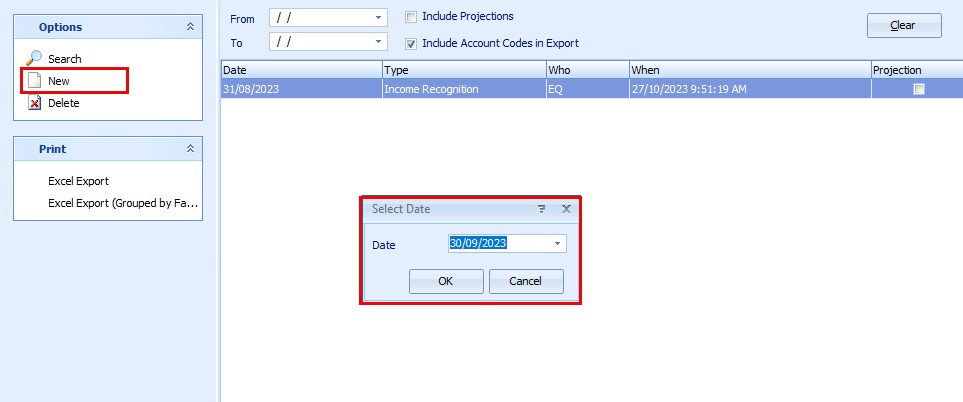
Generate a Report
To generate a new report:
-
From the report screen, click on New.
-
Select the Entry Date for the report. The selected date will determine the report period. See the section Report Period on this page for more details.
If the selected date is in the future, the report will be generated as a projection. See the section Projections on this page for more details.
-
Click on Ok. The report will be generated.
-
Search for the new report to export the data.
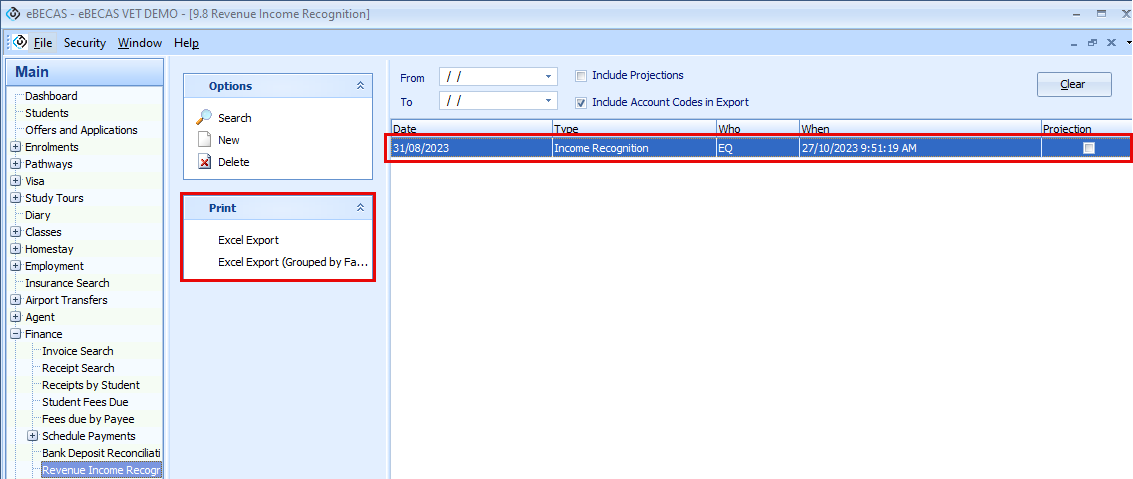
Export a Report
After generated, the report data can be exported to Excel as follows:
-
Locate the report to export.
-
Click on the report on the grid.
-
If needed, select the option to Include the Account Codes in the Export.
-
From the Print Panel, select one of the options to export the data:
-
Excel Export: The data will show the details for each enrolment.
-
Excel Export (Grouped by Faculty): The data will be summarised by Faculty.
-
-
Excel will open automatically with the data of the report selected.
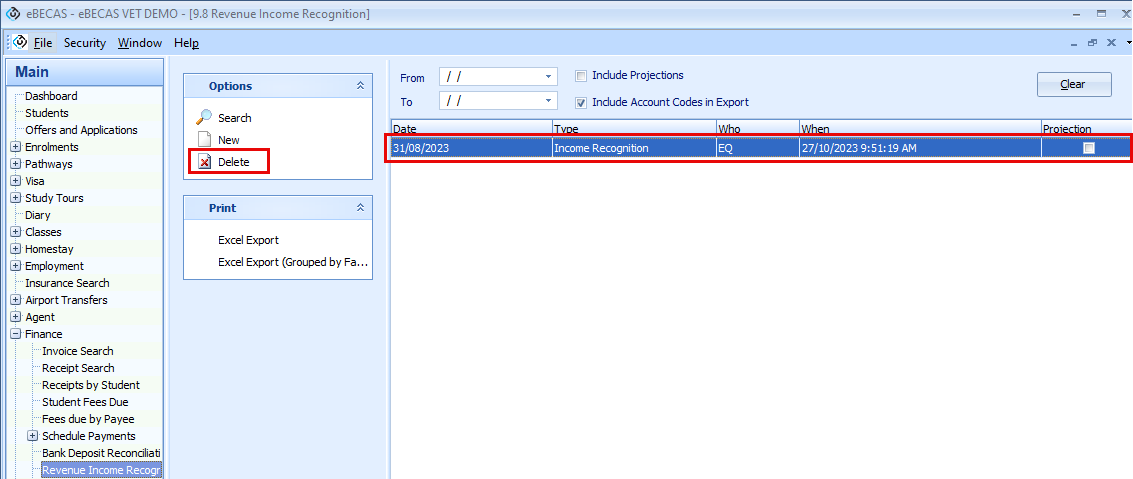
Delete a Report
Before deleting a report, consider the following:
-
As each report relies on the previous one, only the most recent report can be deleted. To remove an older report, you must first delete all subsequent reports in reverse order.
-
Deleting a report also erases its corresponding data snapshot. This action is irreversible.
To delete a report:
-
Locate the report to delete.
-
Click on the report on the grid.
-
From the Options Panel, click on Delete.
Example
Let’s explore in detail how this report works with an example.
Our student Maria has an enrolment with the following details:
-
Course Start Date: Monday 10 July 2023
-
Course End Date: Friday 18 August 2023
-
Course Length: 6 weeks
-
Total Course Cost: $10,000.00
-
Invoice Date: 01/07/2023
To simplify the example, we're assuming Maria only has tuition costs, even though the report also covers other fees like agent commission, tax, and accommodation.
Maria’s enrolment on a timeline looks like the following (assuming Maria’s enrolment does not have any holidays):

To see how the report tracks the changes over a period, let’s generate two consecutive reports to include Maria’s enrolment: July 2023 and August 2023. We are assuming that we are running the report on the first day of the each month.
-
July 2023
-
Report Date (Entry Date): 31/07/2023 → This is the date we select when we generate the report.
-
As we are assuming this report is being generated every month, there should be a report for June (30/06/2023). Therefore, by selecting 31/07/2023 as the entry date, the system creates the report using the report period: 30/06/2023 (last report entry date) and 31/07/2023 (current report entry date).
-
-
August 2023
-
Report Date (Entry Date): 30/08/2023 → Entry date for the report
-
The report period is: 31/07/2023 (last report entry date) and 30/08/2023 (current report entry date).
-
The following image displays a comparison of the 2 reports (July and August). To simplify the example, only some values of the report are displayed.

Note the following:
-
As there are no other fees on the enrolment than tuition, the Total amounts are the same as the tuition amounts.
-
On the July report, the earned tuition (row 5) is $6,400 which is the tuition earned in that report period. This amount corresponds to 16 study days.
-
On the July report, the Change in Earned amounts is the same as the Earned amount. This is because the enrolment did not have any study days on the periods for those previous reports (June 2023 and the previous ones).
-
As the enrolment finished in August, the August report shows the Current Days as the total study days for the enrolment: 25. However, the study days in the report period (August) were only 9.
-
As the enrolment finished in August, the total tuition for the enrolment was earned by August: $10,000.00. However, as in the July report we had already recognised $6,400.00 for that enrolment, we need to only recognise the remaining in August ($3,600), otherwise, we would be recognising the same revenue twice. That is what the Earned Change values (row 10 and 11) tell us. In August, we only need to recognise $3,600.00 as the $6,400.00 were already recognised in the past.
-
As by August, we have earned and recognised the total revenue for the enrolment (invoiced amount), future reports will not include this enrolment (unless changes to the enrolment occur).
Conclusion
As you can see in the example above, the Revenue Income Recognition report let’s you track variations in revenue and it let’s you produce repeatable results regardless of changes to student enrolments. If you export the July 2023 and August 2023 reports in few days, weeks or months, the data for those reports will remain the same even if changes have happened to the enrolments. Those changes will be captured in the future reports.