Transfer Fees
A transfer involves moving fee payments between two enrolments. If a course is shortened or cancelled and the fees have already been receipted, those fees can be transferred to another enrolment for the same student.
Considerations for Transferring Fees
Fees can only be transferred between enrolments for the same student.
A transfer requires two enrolments: a source enrolment with paid fees and a target enrolment with outstanding fees.
Only paid or transferred fees that have not been previously transferred or refunded within the source enrolment are eligible for transfer. Received money that has been scheduled for payment to an agent is eligible. Other scheduled payments (to Insurance, Accommodation and Airport Pickup Providers) are not eligible for transfer.
The fee transferred is no longer owed in the source enrolment. Depending on System Setup, the write off is either implied (with no entry created for the credit write-off), or a credit write-off is also created alongside the transfer.
Transfer of Fees
This section outlines the process for transferring fees, excluding Agent Credit(s). For Agent Credit transfers, refer to the following article: Transfer Agent Credit.
To transfer fees between two enrolments, follow these steps:
Go to the Fees tab on the enrolment from which you want to transfer the fees (source enrolment).
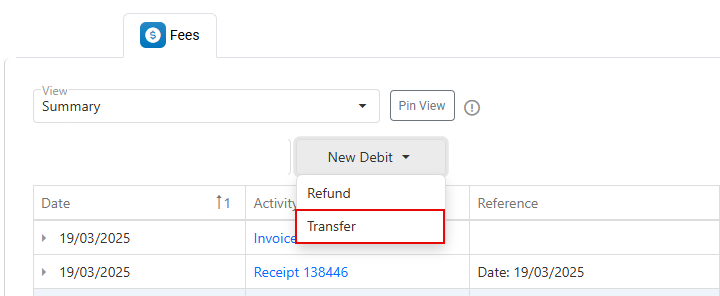
In the action panel, click New Debit, then select Transfer. The Transfer Wizard will open.

Step 1: Select Fees from the Source Enrolment
In the Transfer Wizard, the first step is to select the fees and amounts to transfer from the source enrolment. A grid will appear showing the available items and amounts from the source enrolment. To proceed:
Select the transaction date (defaults to Today).
Customise the grid as needed (learn more about customising the grids)
The Credit Amount column shows the maximum amount per item that can be transferredUse one of the following methods to enter the amounts to be transferred (debit amounts):
Manual Entry: Double-click the relevant cell in the Debit Amount column and enter the amount manually.
Debit Full Item: Double-click any row to debit the full credit amount for that item.
Debit Full Group: If records are grouped, double-click the group row to debit all items in that group.
Debit Selected: Select specific rows using check boxes, then click Debit Selected in the action panel.
Debit All: Without any rows selected, click on the button Debit All from the grid actions panel.
Click on Next to continue.
The second step of the wizard will display.
Step 2: Allocate Fees to the Target Enrolment
The second and final step is to apply the debit total to the items on the target enrolment.
In the Target Enrolment field, select the enrolment where you want to transfer the fees.
Only enrolments with outstanding balances will have items available for credit.Once the target enrolment is selected, the creditable items will appear in the grid.
Note that basic details of the selected enrolment and transaction information are displayed above the grid.
Use one of the following methods to enter the credit amounts:
Manual Entry: Double-click the relevant cell in the Credit Amount column and enter the amount manually.
Credit Full Item: Double-click any row to credit the full amount for that item.
Credit Full Group: If records are grouped, double-click the group row to credit all items in that group.
Credit Selected: Select specific rows using checkboxes, then click Credit Selected in the action panel.
Quick Credit: Without any rows selected, click on the button Quick Credit from the grid actions panel. This option will automatically credit the individual items in order (top to bottom) until the total debit amount is reached.
To complete the fee transfer, the total debit amount must be allocated to items on the target enrolment. Use the "Difference" field above the grid to check the discrepancy between the two amounts. Adjust the credits so that the difference is $0 before proceeding.
Click on Submit to finish.
Edit Transferred Fees
Since transferring fees results in multiple transactions, any updates must be made to these transactions individually.
For the resultant debits transactions, only the date of the transaction can be updated
Navigate to the Fees tab on the enrolment of interest.
Double click the debit record, or select the debit row and click Edit Debit from the action panel. A pop-up window will display.
Select the new date.
Click Update to apply the changes.
Delete Transferred Fees
Since transferring fees creates multiple transactions, each transaction must be deleted individually.
Please note that credits associated with the debit transactions, both in the source and target enrolments, cannot be deleted directly. Deleting the related debit transactions will automatically remove the associated credits.
The Transfer Credit can be used for a Transfer to another enrolment. In these cases, the original transfer cannot be deleted until the chain of transfers is also deleted.
To delete the debit transactions:
Navigate to the Fees tab on the enrolment of interest.
Select the debit row and click Delete Debit from the action panel.
Confirm the action.
