
Overview
The Import External Payments feature allows you to quickly import payment data from third-party platforms or bank feeds into eBECAS/EDMISS. It reduces manual work and helps maintain accurate records.
It also supports auto-reconciliation, duplicate payment prevention, overpayments, and surcharges.
You can upload an Excel or CSV file, map the columns, review the data, and then complete the import.
This feature is ideal for institutions that need an efficient way to record payments from external systems where a native integration is not available.
Prepare the File for Import
Before you begin, make sure the file is set up correctly for the import:
File Type/Extension
The import supports Excel (.xls, .xlsx) and CSV (.csv) formats. Each row in the file represents a single external payment record.
Excel files are recommended for better formatting and data consistency.
File Size
The file for the import must be under 5MB.
File Requirements
-
Header Row: The file must include a header with the column names, and it must appear as the first row. The order and names of the columns do not need to match the system, as you will map them during the import.
-
First Spreadsheet: For Excel files, only the first worksheet is used during the import. If your file has multiple sheets, ensure the first one contains the data you want to import.
-
Maximum Records: The import is limited to 150 records per upload. If your file exceeds this limit, split it into smaller batches and upload them separately.
-
Date Values: All dates must follow a single, consistent format such as
dd/mm/yyyy, as only one date format is supported during the import. -
Data Validation: The system imports the data as provided. Although it validates the format of the data, it does not verify if the data itself is correct. Always confirm that student numbers, amounts, and transaction dates are accurate before importing.
-
Amounts Format: Amount fields accept numeric values, including those with common currency prefixes. For example:
-
10
-
10.25
-
AUD$10.00
-
US10.25
Any currency symbols or alphabetic prefixes are automatically ignored.
However, values with suffixes or invalid characters will not be accepted. For example:
-
10.0ABC ❌
-
10$ ❌
-
1T0 ❌
If an invalid value is provided, the corresponding row will fail and be skipped during import.
-
-
Once your file meets these requirements, ensure that it includes the following headers and required fields.
Available Fields
Each row in the import file represents one payment record and can include the following fields.
Required fields must be present and contain valid values for the import to succeed.
|
Field Name |
Description |
Required |
|---|---|---|
|
Student No. |
The student number that the payment is for, |
Yes |
|
Payment Amount |
The amount paid. Negative values will be skipped, |
Yes |
|
Transaction Date |
The date the payment was made, |
Yes |
|
Payment Reference |
The payment reference or ID supplied by the external payment provider, |
Only when the Prevent Duplicate Payments option is enabled for the import |
|
Surcharge Amount |
Any surcharge applied by the payment provider for the transaction. See Surcharge section below for details. |
No |
Example of a Valid File
Below is an example of a valid file:
|
Student No |
Payment Amount |
Transaction Date |
Payment Reference |
Surcharge Amount |
|---|---|---|---|---|
|
12345 |
1500.50 |
15/08/2025 |
FW-09213 |
2.5 |
|
12346 |
2500.25 |
16/08/2025 |
CIBC-77432 |
2.5 |
Each row represents one external payment record that will be imported into the system.
Import Payments
To start, go to External Payments Search, then click on the Import Payments button on the right side of the header.
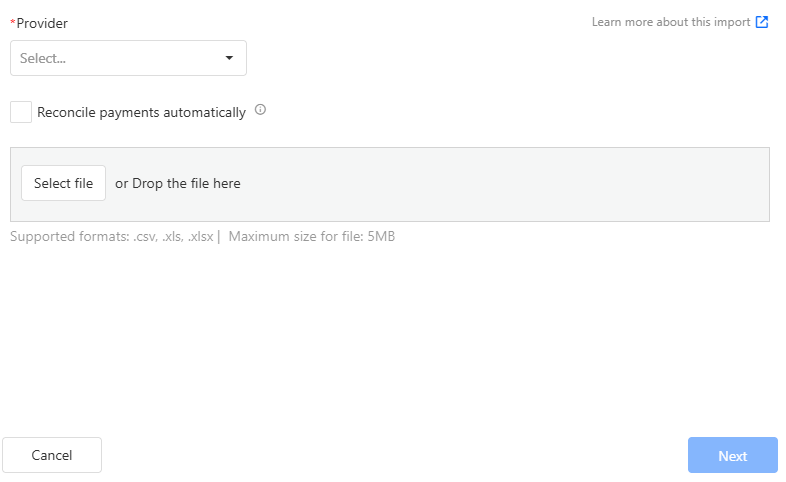
Step 1: Import Setup
-
Select the Payment Provider (source of the payments)
-
Select Reconcile Payments Automatically if you want the system to attempt reconciliation during the import.
When this option is enabled, additional fields will appear. Complete these fields to define how receipts should be created for successfully reconciled payments.
Refer to the Auto-Reconciliation section below for more details.
-
Select the file with the data to import.
-
Click Next.
Step 2: File Configuration
Data Preview
The Data Preview section shows the number of records in the file and a preview of the first rows with their headers. Review this carefully to confirm the details are correct. If anything looks wrong, cancel the process, update the file, and start again.
Fields Mapping
Use the dropdown menus to map each header from your file to the corresponding system fields in the system. Make sure that all required fields are correctly mapped.
Additional Configuration
Use this section to configure the settings applied during the import process.
Prevent Duplicate Payments (Recommended)
When enabled, the system checks for existing payments with the same Provider and Payment Reference. If a match is found, the new payment is not created.
This helps prevent duplicates when the same file or payment data is uploaded more than once.
When enabled, your file must include a column that can be mapped to the Payment Reference field.
If a record does not have a Payment Reference, the payment will still be created without checking for duplicates.
Allow Overpayments
This option is only available when auto-reconciliation is enabled for the import.
When enabled, payments can exceed the total outstanding balance of the invoices. Any excess is applied as an overpayment and included in the last receipt created during the allocation.
When disabled, the payment is still created, but it is not allocated if the amount exceeds the total outstanding balance of the invoice(s).
Date Format
Select the date format that matches the format used in your file. This ensures that date values are interpreted correctly during import.
Select the date format that matches the format used in your file.
Example formats:
-
dd/mm/yyyy→ 01/12/2023 -
mm/dd/yyyy→ 12/01/2023 -
yyyy-mm-dd→ 2023-12-01 -
d/m/yyyy→ 1/12/2023 -
m/d/yyyy→ 12/1/2023
When ready, click Submit.
A window will appear where you can enter an optional description for the process. Leave it blank if not required, then click Proceed to start the process.
The import runs in the background as a Process. This allows the import and any auto-reconciliation to complete while you continue working. You will receive a notification once it has finished.
From the Process details page, you can view the status and review the logs. The logs show the result for each record, including any errors.
An Excel file will also be available, containing the original data and the import result for each row.
Import Surcharge Amounts
You can include a surcharge amount when importing external payments (learn more about surcharges to understand how they are handled during the payment reconciliation).
To do so:
-
Ensure your source file includes a surcharge column. This is separate from the payment amount
-
If only some records have a surcharge, map the field and leave it blank or set to 0 where not applicable
-
Ensure a surcharge fee is configured in Faculty settings
-
During column mapping, map the Surcharge field to the correct column in your file
Reconcile Imported Payments
Payments that are imported are automatically set as ‘Ready for Reconciliation’.
You can reconcile them in two ways: