
Invoices can be created in two different ways:
Option 1: On Offer Acceptance
When an offer is accepted, enrolments are created for each item group. Instalments with the same due date in a group are combined into one invoice. Different due dates will generate separate invoices.
Please note that once the offer is accepted, offer instalments cannot be modified. Any changes must be made to the enrolment invoices.
For detailed information, refer to the following links:
Option 2: From an Enrolment
Invoices can also be created at the Enrolment stage (after the offer is converted).
-
Go to the Fees tab of the Enrolment of interest.
-
Click on the New Invoice button on the grid action panel and select between Tuition Invoice and Non-Tuition Invoice (for all non-tuition products).
-
A new pop-up window will display.
Tuition Invoices
-
Enter the basic details for the invoice.
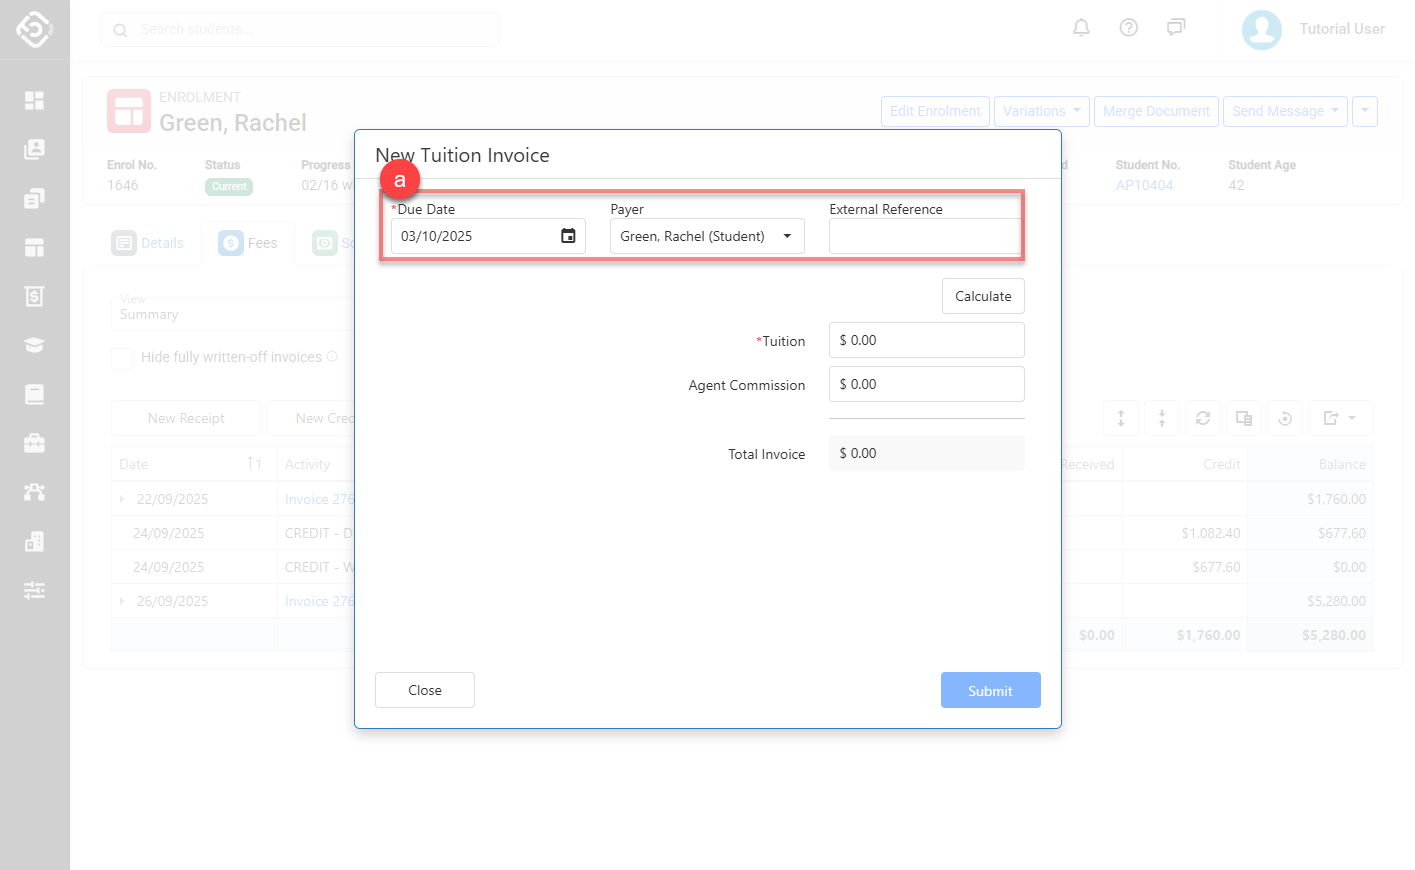
-
Specify the invoice amounts.
You can enter the amounts for the invoice in two ways.
-
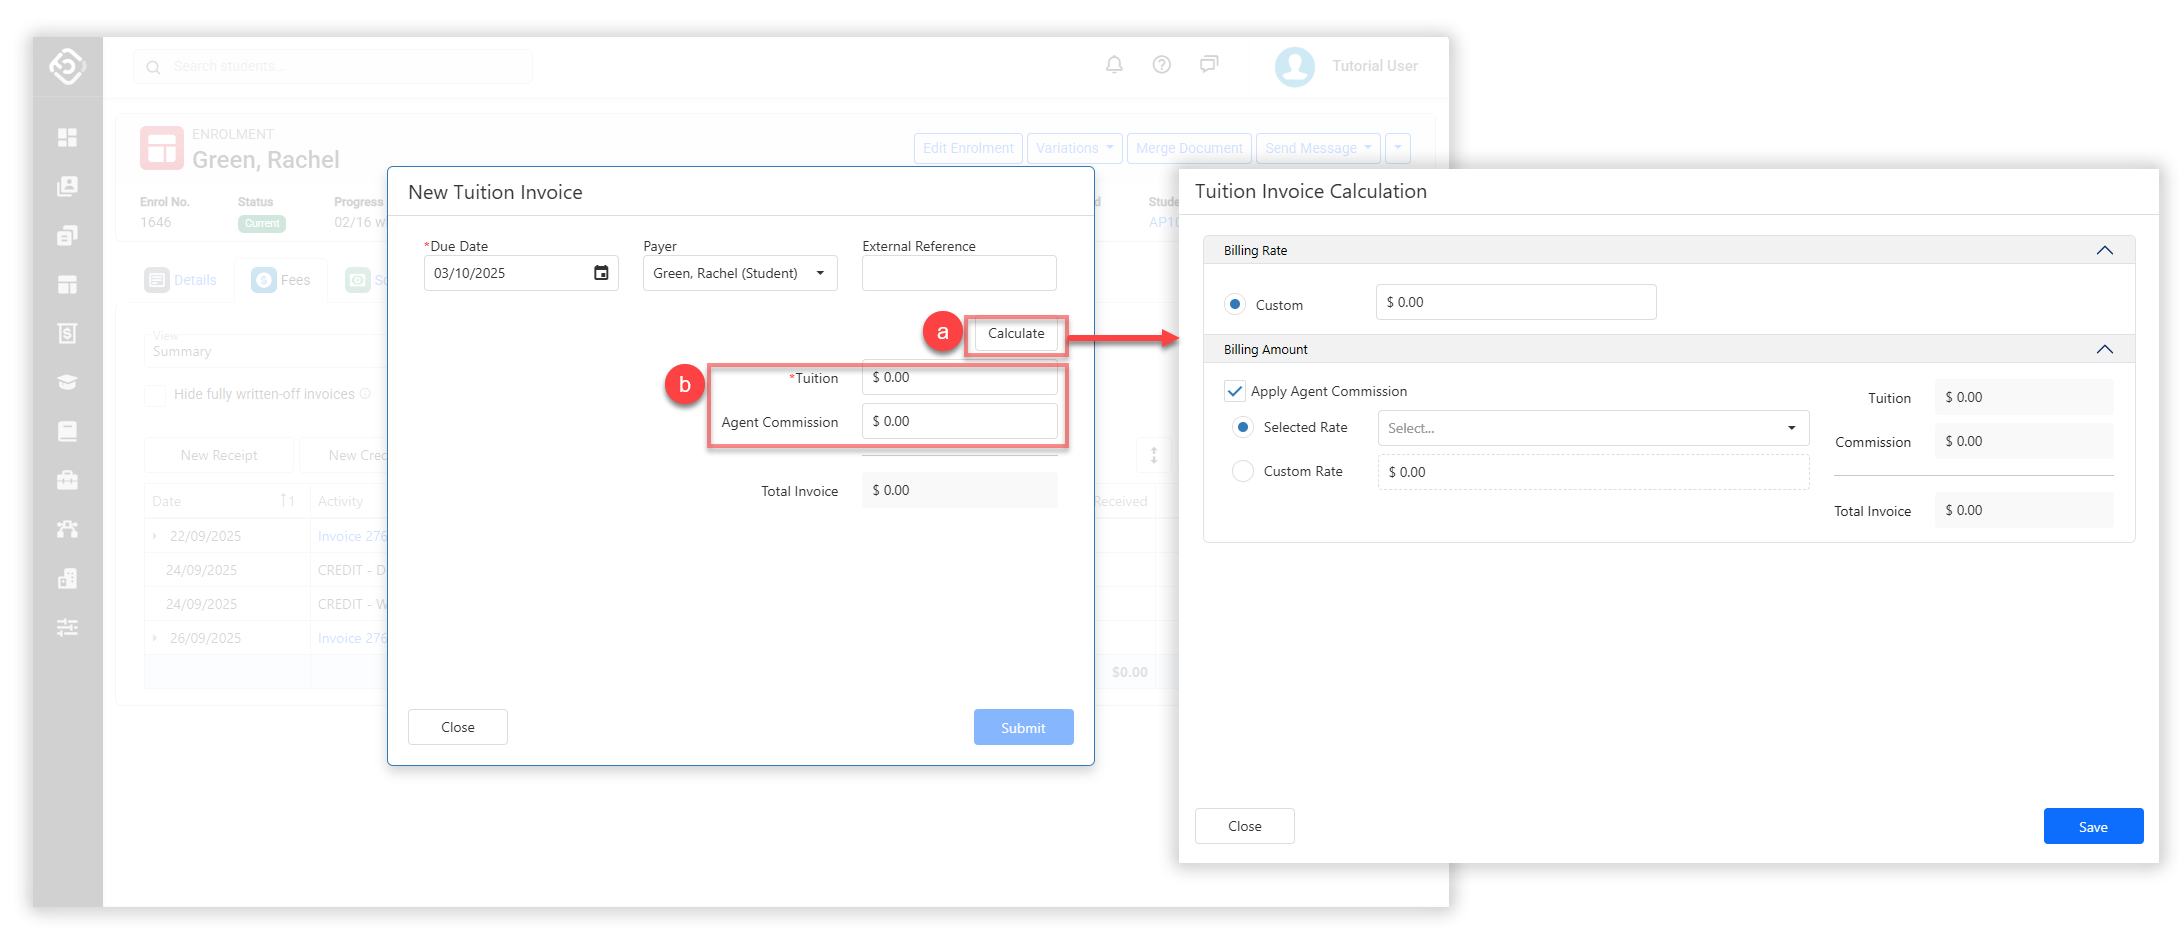
Invoice Calculation
Click Calculate to automatically apply any taxes and agent commission (if applicable). This is the recommended option, as it ensures accurate calculations and simplifies the invoicing process.With this method, a list of applicable agent commissions will be displayed for you to select from, and the system will calculate them automatically.
Agent Commission Rules
-
If an enrolment does not have an agent, no commission can be added.
-
If an enrolment has an agent with a contract, only commissions linked to that contract and other currently active contracts can be selected.
-
If an enrolment has an agent without a contract, commissions from active contracts as well as commissions not tied to a contract will be available for selection.
-
Manual Entry
Note: Manual entry is unavailable if the course is configured with taxes. Use the Invoice Calculation method instead.
Enter the required amount details manually.-
Tuition: The amount for the tuition (excluding any agent commission).
-
Agent Commission: The agent commission amount (if applicable).
-
-
Once you’ve reviewed the tuition invoice details and amounts, click Submit button to generate the invoice.
Non-Tuition Invoices
-
Enter the basic details for the invoice (Due Date/Payer/External Reference).
-
In the grid, you can add, edit or remove the items for the invoice.
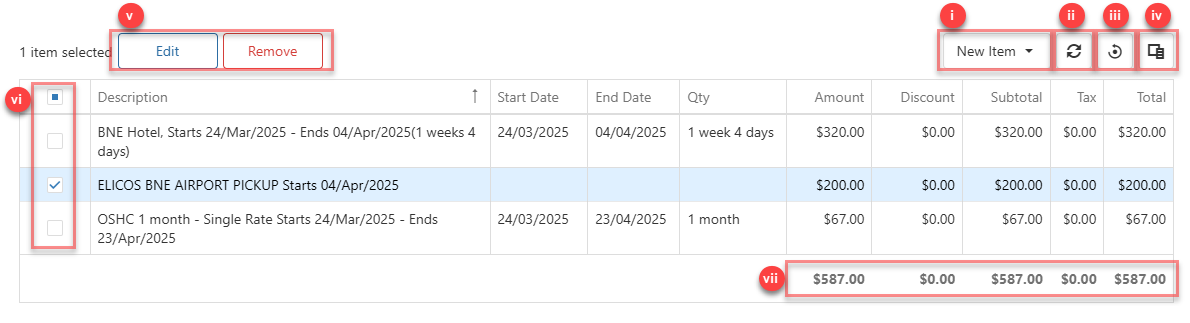
The grid includes the following components and available actions:
-
New Item: Click on this button to add new invoice items.
-
Refresh: Refresh the current data grid to latest values.
-
Reset View: Reset the current data grid’s columns to the default ones.
-
Column Chooser: Add or remove columns to and from the grid. Any changes made to the grid will be saved automatically so they will remain when you come back. Click on Reset View to reset the changes you have made to the grid.
-
Actions panel: Execute actions on the invoice items selected within the data grid.
-
Select Box: Select one or multiple invoice items.
-
Total Amount Row: View the total amounts for the columns.
-
Use the Grid to add, edit, or remove items you’d like to include in the invoice.
-
Add invoice items:
-
Click on the New Item button, and select the type of item that you want to create. If you cannot see the item type that you intend to add, contact your system administrator to ensure the related App is installed on your system.
For specific details on each item type, click on the respective link below. The process for adding invoice items is the same as for offer items:
-
-
Edit invoice items:
-
Double click on the invoice item that you’d like to edit. Alternately, tick the Select Box for the invoice item and then click on the Edit button.
-
Edit the details as needed.
-
Click on Save to finish.
-
-
Delete invoice items:
-
Select the invoice item/items that you’d like to delete from the invoice.
-
Click on the Delete button.
-
Confirm to delete.
-
-
-
Once you’ve reviewed the items to be included in the invoice, click Submit button to generate the invoice.
When an Insurance item is included in a generated Invoice, the insurance details will also be recorded under the Student > Insurance tab.
The Insurance record can then be viewed and managed under Students > Insurance.
For more information, please refer to the Student Insurance article.
Edit an Invoice
Only a limited number of fields can be updated on an invoice. To make other changes, you can apply credit transactions to reduce or offset the invoice amount. Learn more in the article: Credits
There are 2 ways to edit an invoice:
Edit an Invoice from the Enrolment Fees page
-
Go to the Fees tab of the Enrolment of interest.
-
Click on the Invoice that you’d like to edit or the Invoice Item that you’d like to edit Description. Then click on the Edit Invoice button or Edit Invoice Item button in the grid action panel.
-
Modify the details as required and click on Update to save the changes.
.gif)
Edit an Invoice from the Invoice Details Page
-
Go to the details page of the invoice of interest.
-
Click on the Edit Invoice button at the top right of the screen, or the Invoice Item that you’d like to edit Description.
-
Modify the details as required and click on Update to save the changes.
.gif)
Tip: Use Payer to Automate Invoice Reminders
Each invoice includes a Payer — the person or organisation responsible for paying the invoice.
This information is used not only to identify who is responsible for payment, but also to enable targeted Invoice Reminders — helping reduce missed payments and improve follow-up.
Learn more about Invoice Reminders in this article: Invoice Reminders
Delete an Invoice
Invoices cannot be deleted, but you can apply a credit to reduce or offset the invoice amount. Learn more on the article: Credits