
Learn how to configure automated invoice reminders in eBECAS/EDMISS NextGen to help your organisation follow up on invoices that are due soon or already overdue. This guide covers how to create, customise, and manage reminders so that students and payers receive timely notifications.
What This Guide Covers
This guide walks you through setting up two automated invoice reminders for students:
-
An email reminder sent 7 days before the invoice due date, with the invoice attached as a PDF
-
An SMS reminder sent 1 day after the invoice due date
It also includes how to add conditions to exclude:
-
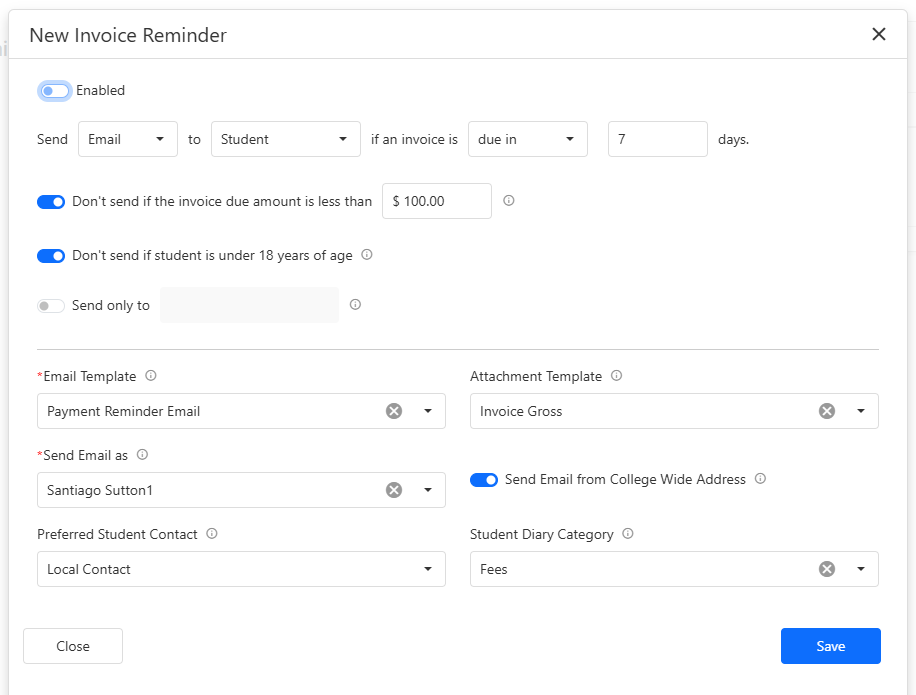
Invoices with a due amount less than $100
-
Students under 18 years of age
Before You Start
Make sure the following templates are available:
-
Invoice Email Template – used as the content of the email reminder
-
Invoice Document Template – used to generate a PDF of the invoice to attach to the email
-
Invoice SMS Template – used as the content of the SMS reminder
Also, make sure your email and SMS provider integrations are set up and working.
Key Concepts
-
Invoice Age (days) is a field that shows how many days remain until the due date or how many days have passed since it:
-
If the invoice has no amount due, the value is 0
-
If the due date is in the future, the value is positive, showing days until it’s due
-
If the due date is in the past, the value is negative, showing days overdue
-
-
Invoice Payer is the person or organisation responsible for paying the invoice. This is the student by default but can be selected or updated on each invoice.
Invoice Search Grid Set Up (Optional)
To preview which invoices match the reminder conditions, you can customise the Invoice Search Grid. This can help you review and verify the data before reminders are sent.
-
Create a new view for the grid and give it a meaningful name, for example: 7 days due invoices.
-
Add the following columns to the grid (if not present) in your order of preference.
-
Due Date
-
Due Amount
-
Invoice Age
-
Age: This is the student’s age
-
-
Add or remove any other columns.
-
Set the header filters as follow:
-
Date Range: Due Date
-
Range Type: Custom
-
From Date: Select any date earlier than 7 days from today
-
To Date: Select any date later than 1 day from today
-
-
Set the column filters as follow:
-
Set the Age field to be greater or equal to 18.
-
Set the Due Amount to be greater or equal to 100.
-
-
Save the view
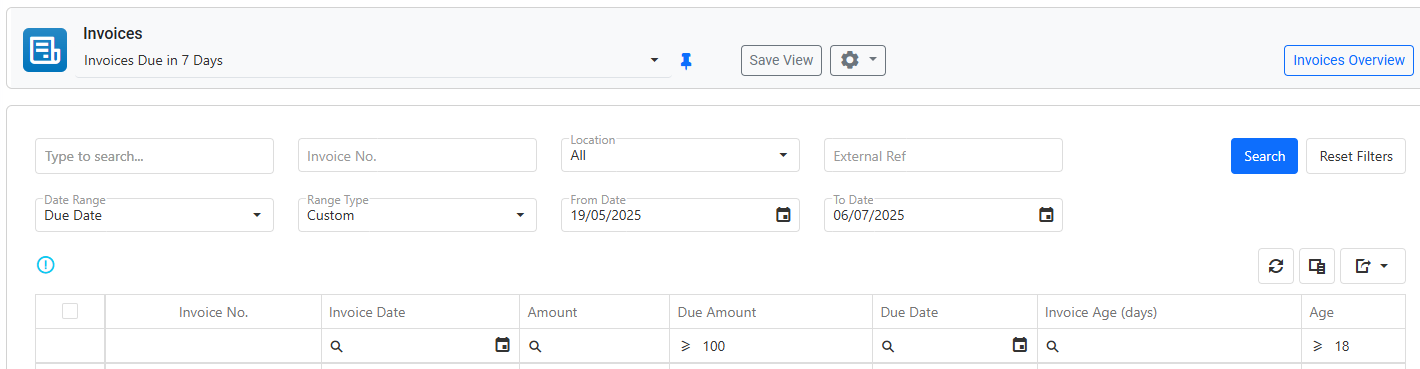
In the following steps, we’ll further customise the grid using other column filters to match the conditions of each reminder configuration.
Invoice Reminder 1: 7 Days Before the Invoice Due Date
This first reminder is a friendly message sent to the student to let them know an invoice is coming due soon. It encourages timely payment and helps reduce the need for follow-up.
Follow these steps to set up the reminder:
-
From the navigation menu, go to Utilities > Settings > Finance.
-
In the Invoice Reminders section, click the ➕ icon to add a new reminder.
-
Configure the reminder with the following settings:
-
Enabled: Leave this unticked until you’re ready to activate the reminder
-
Templates: Choose the email and invoice document templates you want to use
-
Send Email As: Select the user who will receive the reminder process notifications (learn more)
-
Send Email from College Wide Address: Tick this option to send emails from your college-wide address instead of the selected user
-
Preferred Student Contact: Select Local Contact to use the student local email as the primary email address
-
Student Diary Category: Select the student diary category where the email sent will be stored
-
-
Click on Save to create the reminder.
Since the reminder is not yet enabled, no messages will be sent until you activate it.
If you’ve set up the grid to preview which invoices will be targeted by reminders, follow these additional steps to see which invoices this reminder would pick up if it ran today. Otherwise, you can skip this section.
There is one more filter we need to add to the grid to see the invoices for this reminder:
-
In the Invoice Age (days) column, apply a filter with the value Equals 7. This will display only the invoices that are due in 7 days.
-
Save the View.
-
Click on Search.
The grid will now display invoices that match your reminder conditions. If everything looks correct, you can go ahead and enable the reminder. If not, make any necessary adjustments before activating it.
Invoice Reminder 2: 1 Day After Invoice Due Date
Repeat the same steps used for Invoice Reminder 1, updating the configuration to match the example shown in the image below.
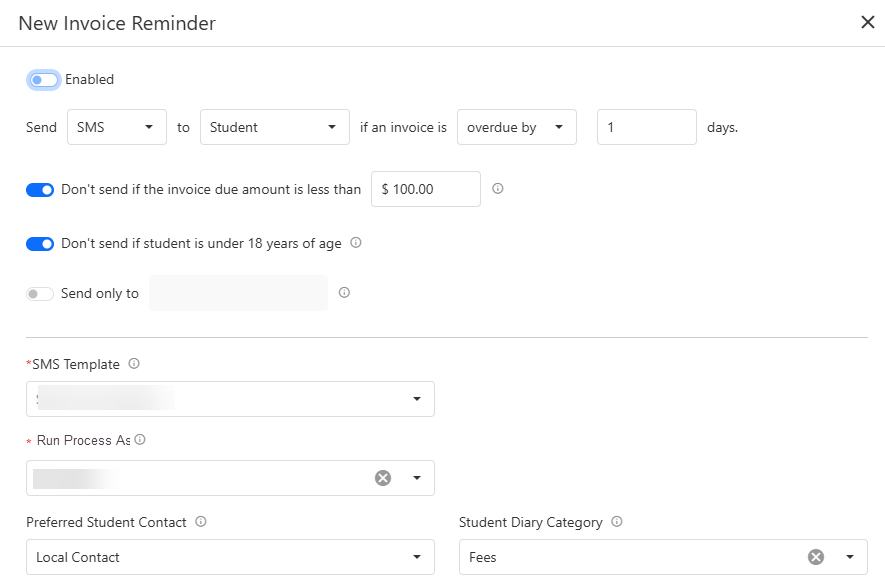
To preview the invoices targeted by this reminder, go to Invoice Search and set the Invoice Age (days) column filter to Equals -1.
Don’t forget to activate the reminder when you are ready.
View Reminder Status and Logs
For details on how to view the status and history of invoice reminders, see the following article: Invoice Reminders